• Skip to primary navigation
  • Skip to main content
  • Skip to primary sidebar

Yellow Bricks

by Duncan Epping

  • Home
  • Unexplored Territory Podcast
  • HA Deepdive
  • ESXTOP
  • Stickers/Shirts
  • Privacy Policy
  • About
  • Show Search
Hide Search

Storage

“Hacking” Site Recovery Manager (SRM) / a Storage Array Adapter

Duncan Epping · Jan 10, 2012 ·

** Disclaimer: This is for educational purposes, please don’t implement this in your production environment as it is not supported! **

Last week I received a question and I figured I would dive in to it this week. The question was if it is possible to fail-over LUNs using VMware Site Recovery Manager (SRM) which are not part of the Cluster which SRM “manages”. In other words, can I fail-over a LUN which is attached to a physical Windows Server or to a completely separate VMware Cluster? Before we continue, I did not hack SRM itself, neither did I make any changes to the SRA.

Lets briefly explain what SRM does normally when you go through the process of of creating a DR plan. Now this is slimmed down with only focussing on the relevant stuff for this question:

  • First it will discover the devices using the Storage Replication Adapter (SRA)
  • It then discovers all LUNs using the SRA
  • It show the replicated LUNs containing VMs to the admin
  • Admin can use these in his plan and “protect” the VMs appropriately

I decided to install SRM in a nested environment using the Celerra Uber VSA. I installed the VNX SRA and configured it and went through some of the log files just to find a piece of evidence that my plan is even possible. For Windows 2008 you can find the SRM Log Files in this location by the way:

%ALLUSERSPROFILE%\VMware\VMware vCenter Site Recovery Manager\Logs\

Other locations are documented in this KB. When I created the environment I created multiple LUNs with different sizes to make them easily recognizable. The LUN which is replicated but not exposed to our vCenter/SRM environment is 25GB and the LUN which is exposed is 30GB. This is what the log files showed me when I did a quick find on the size:

(Production) fsid=14 size=30000MB alloc=0MB dense  read-write
path=/srm01/fs14_T1_LUN1_BB005056AE32800000/fs14_T1_LUN1_BB005056AE32800000 (snapped)
(Production) fsid=16 size=25000MB alloc=0MB dense read-write
path=/vc01/fs16_T1_LUN2_BB005056AE32800000/fs16_T1_LUN2_BB005056AE32800000 (snapped)

As you can see both my 25GB and my 30GB LUN is listed. I added a name to it which also allows me to quickly identify it “srm01” and “vc01”, where “vc01” is the one which is not managed by SRM.

So how does SRM get this information? Well it is actually pretty straight forward, SRM calls a script which is part of the SRA. SRM feeds this script XML. This XML code contains the commands / details required. I’ve written about this a long time ago when I was troubleshooting SRM and it is still applicable:

perl command.pl < file.xml

Now the XML file is of course key here… How does that need to be structured and can we use, or should I say abuse, it to do a fail-over of a LUN which is not “managed” by SRM/vCenter. Well I started digging and it turns out to be fairly straight forward. Keep in mind the disclaimer at the top though, this is not what the SRA’s were intended for… this is purely for educational purposes and far from supported. Again the logfiles exposed a lot of details here, but I stripped it down to make it readable. This is the response from the SRA when SRM asked for details on which devices are available:

2012-01-09T12:14:53.583-08:00 [05388 verbose 'SraCommand' opID=7D6C5634-00000023] discoverDevices responded with:
--> <?xml version="1.0" encoding="UTF-8" standalone="yes"?>
--> <SourceDevice state="read-write" id="1-1">
--> <Name>fs14_T1_LUN1_BB005056AE32800000</Name>
--> <Identity>
--> <Wwn>60:06:04:8c:ab:b2:88:c0:59:40:72:24:1b:5f:77:72</Wwn>
--> </Identity>
--> <TargetDevice key="fs14_T1_LUN1_BB005056AE32800000_fs10_T1_LUN1_BB005056AE32820000"/>
--> </SourceDevice>
--> <SourceDevice state="read-write" id="1-2">
--> <Name>fs16_T1_LUN2_BB005056AE32800000</Name>
--> <Identity>
--> <Wwn>60:06:04:8c:b8:50:22:96:0c:0b:bf:d8:59:0b:a1:75</Wwn>
--> </Identity>
--> <TargetDevice key="fs16_T1_LUN2_BB005056AE32800000_fs12_T1_LUN3_BB005056AE32820000"/>
--> </SourceDevice>
--> </SourceDevices>

Now if you look at SRM and try to make a Protection Group plan you will quickly discover that only those Datastores which have a VM hosted on there can be added. This is shown in the screenshot below.
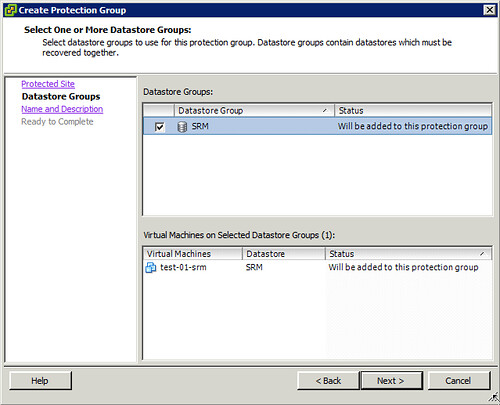
As mentioned SRM filters out the “irrelevant LUNs”, to me this LUN wasn’t irrelevant however. So what’s next? I decided to initiated a fail-over and to look at the log files. When the fail-over is initiated the following is issued by SRM, again I stripped some details to make it more readable:

--> <FailoverParameters>
--> <ArrayId>BB005056AE32820000-server_2</ArrayId>
--> <AccessGroups>
--> <AccessGroup id="domain-c7">
--> <Initiator id="iqn.1998-01.com.vmware:localhost-11616041" type="iSCSI"/>
--> <Initiator id="iqn.1998-01.com.vmware:localhost-4a15366e" type="iSCSI"/>
--> <Initiator id="10.21.68.106" type="NFS"/>
--> <Initiator id="10.21.68.105" type="NFS"/>
--> </AccessGroup>
--> </AccessGroups>
--> <TargetDevices>
--> <TargetDevice key="fs14_T1_LUN1_BB005056AE32800000_fs10_T1_LUN1_BB005056AE32820000">
--> <AccessGroups>
--> <AccessGroup id="domain-c7"/>
--> </AccessGroups>
--> </TargetDevice>
--> </TargetDevices>
--> </FailoverParameters>

I guess we should be able to work with this! Using the “discoverdevices” information and combining it with the “Failover” information I should be able to construct my own custom XML file. After creating this XML file I should be able to fail-over any LUN which is part of the selected device… What is my plan? I am planning to change the following:

  • Initiator id
  • TargetDevice key

I wasn’t sure if I needed to change the AccessGroup so I figured I would just test it like this. I called the script as follows:

<path to perl>\bin\perl.exe command.pl < file.xml

I watched a whole bunch of messages pass by and then looked at the Celerra when then fail-over commend was completed and noticed the following:

And of course within the “unmanaged” vCenter you can see it:

Successful fail-over of a LUN which wasn’t part of an SRM Protection Group! Yes, when you replace the Initiator ID even the masking is correctly configured. The only thing left would be either resignaturing the volume or mounting the volume. This of course depends on the OS owning the volume and the desired end result. All in all, a nice little experiment… Once again, don’t try this in your own environment, it is far from supported!

Using Storage IO Control and Network IO Control together?

Duncan Epping · Dec 7, 2011 ·

I had a question today from someone who asked if there was any point in enabling SIOC (Storage IO Control) when you have NIOC (Network IO Control) enabled and configured. Lets start with the answer: Yes there is! NIOC controls traffic on a single NIC port level. In other words, when you have 10GbE NIC ports and vMotion, VMs and NFS (for instance) use the same NIC port it will prevent one of the streams from claiming all bandwidth while others need it. It basically is the police officer who controls a group of people getting too loud in a single room.

As not many people realize this lets repeat it… NIOC controls traffic on a NIC port level. Not on a NIC pair, not on a host level and not on a cluster wide level. On a NIC port level!

SIOC does IO control on a Datastore-VM layer. Meaning that when a certain threshold is reached it will determine on a datastore wide level which hosts and essentially which VMs get a specific chunk of the resources. SIOC prevents a single VM from claiming all IO resources for a datastore in a cluster. SIOC is cluster wide on a datastore level! It basically is the police officer who asks your neighbor to tone it down when as he is bothering the rest of the street.

Yes, enabling SIOC and NIOC together makes a lot of sense!

Fling: ESX System Analyzer

Duncan Epping · Nov 30, 2011 ·

When I joined Tech Marketing in February of this year my first task literally was the ESX System Analyzer. I was part of the team who developed the specs and test the app, but the main driving force behind the tool was my colleague Kyle Gleed (@VMwareESXi).

The tool / fling was designed specifically to help people migrate from ESX to ESXi and to smoothen the transition especially in those environments where the Service Console was customized over the years. If you haven’t migrated yet, and want to make the jump to a lean and mean hypervisor I suggest to take a look at this fling and analyze your environment to help with planning the transition!

Source: VMware Labs

The ESX System Analyzer is a tool designed to help administrators plan a migration from ESX to ESXi. It analyzes the ESX hosts in your environment and, for each host, collects information on factors that pertain to the migration process:

  • Hardware compatibility with ESXi
  • VMs registered on the ESX host, as well as VMs located on the host’s local disk
  • Modifications to the Service Console
    • RPMs which have been added or removed
    • Files which have been added
    • Users and cronjobs which have been added

This tool also provides summary information for the whole existing environment

  • Version of VMware Tools and Virtual Hardware for all VMs
  • Version of Filesystem for all datastores

By having this information, administrators can determine what tasks need to be done prior to the migration. Examples include:

  • Relocate VMs from local datastores to shared datastores
  • Make note of what agent software has been added to the host and obtain the equivalent agentless version
  • Replace cronjobs with equivalent remote scripts written with PowerCLI or vCLI

Resolved: Slow booting of ESXi 5.0 when iSCSI is configured

Duncan Epping · Nov 6, 2011 ·

My colleague Cormac posted an article about this already, but I figured it was important enough to rehash some of content. As many of you have experienced there was an issue with ESXi 5.0 in iSCSI environments. Booting would take a fair amount of time due to the increase of the amount of retries in the case creating a connection to the array would fail.

This is what the log file would typically look like:

iscsid: cannot make a connection to 192.168.1.20:3260 (101,Network is unreachable)
iscsid: Notice: Reclaimed Channel (H34 T0 C1 oid=3)
iscsid: session login failed with error 4,retryCount=3
iscsid: Login Target Failed: iqn.1984-05.com.dell:powervault.md3000i.6002219000a14a2b00000000495e2886 if=iscsi_vmk@vmk8 addr=192.168.1.20:3260 (TPGT:1 ISID:0xf) err=4
iscsid: Login Failed: iqn.1984-05.com.dell:powervault.md3000i.6002219000a14a2b00000000495e2886 if=iscsi_vmk@vmk8 addr=192.168.1.20:3260 (TPGT:1 ISID:0xf) Reason: 00040000 (Initiator Connection Failure)

This is explained in KB 2007108 which also contains the download link. Make sure to download it and update your environment if you are running iSCSI.

Cool tool: RVTools 3.2 released

Duncan Epping · Oct 29, 2011 ·

Today Rob de Veij released an update of his excellent tool called RVTools. We are up to version 3.2 already. You can find the update on the RVTools website. RVTools is an essential tool for every vSphere Admin. It allows you to report on the most important aspects of your virtual infrastructure, but probably the most important ones are limits / reservations / VMware tools. Seriously give it a try and you will be surprised with what you might find. I have used it in many environments and always managed to discover inconsistencies… Thanks again for the great work Rob!

These are the changes in version 3.2:

  • New tabpage with distributed switch information
  • New tabpage with distributed port information
  • It’s now possible to export a single tabpage to an excel file from the command line
  • It’s now possible to save the filter. The next time RVtools is started it will use the filter automatically.
  • Bugfix: On vSnapshot tab the displayed filename and filesize are not always correct
  • Bugfix: Improved exception handling on vPort tab
  • « Go to Previous Page
  • Page 1
  • Interim pages omitted …
  • Page 93
  • Page 94
  • Page 95
  • Page 96
  • Page 97
  • Interim pages omitted …
  • Page 101
  • Go to Next Page »

Primary Sidebar

About the Author

Duncan Epping is a Chief Technologist and Distinguished Engineering Architect at Broadcom. Besides writing on Yellow-Bricks, Duncan is the co-author of the vSAN Deep Dive and the vSphere Clustering Deep Dive book series. Duncan is also the host of the Unexplored Territory Podcast.

Follow Us

  • X
  • Spotify
  • RSS Feed
  • LinkedIn

Recommended Book(s)

Also visit!

For the Dutch-speaking audience, make sure to visit RunNerd.nl to follow my running adventure, read shoe/gear/race reviews, and more!

Do you like Hardcore-Punk music? Follow my Spotify Playlist!

Do you like 80s music? I got you covered!

Copyright Yellow-Bricks.com © 2026 · Log in