• Skip to primary navigation
  • Skip to main content
  • Skip to primary sidebar

Yellow Bricks

by Duncan Epping

  • Home
  • Unexplored Territory Podcast
  • HA Deepdive
  • ESXTOP
  • Stickers/Shirts
  • Privacy Policy
  • About
  • Show Search
Hide Search

Server

Cool tool: vBenchmark fling

Duncan Epping · Feb 29, 2012 ·

Today I decided to start testing the vBenchmark fling. It sounded like a cool tool so I installed it in my lab. You can find the fling here for those wanting to test it themselves. So what doe the tool do? The VMware Labs website summarizes it in a good way:

Have you ever wondered how to quantify the benefits of virtualization to your management? If so, please consider using vBenchmark. vBenchmark measures the performance of a VMware virtualized infrastructure across three categories:

  • Efficiency: for example, how much physical RAM are you saving by using virtualization?
  • Operational Agility: for example, how much time do you take on average to provision a VM?
  • Quality of Service: for example, how much downtime do you avoid by using availability features?

vBenchmark provides a succinct set of metrics in these categories for your VMware virtualized private cloud. Additionally, if you choose to contribute your metrics to the community repository, vBenchmark also allows you to compare your metrics against those of comparable companies in your peer group. The data you submit is anonymized and encrypted for secure transmission.

The appliance can be deployed in a fairly simple way:

  • Download OVA –> unzip
  • Open vCenter client –> File –> Deploy OVF Template
  • Select the vBenchmark OVA as a source
  • Give it a name, I used used the default (vBenchmark)
  • Select a resource pool
  • Select a datastore or datastore cluster
  • Select the disk format
  • Select the appropriate (dv)portgroup
  • Fill out the network details
  • Finish

Now after it has been deployed you can power it on. When it is powered on check the summary tab and remember the ip-address (for those using dhcp). You can access the web interface on “http://<ip-address>:8080/”.

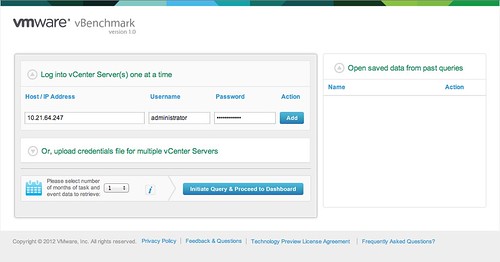
Now you will see a config screen. You can simply enter the details of the vCenter Server of the vSphere environment you want to “analyze” and hit “Initiate Query & Proceed to Dashboard”.

Now comes the cool part. vBenchmark will analyze your environment and provide you with a nice clean looking dashboard… but that is not it. You can decide to upload your dataset to VMware and compare it with “peers”. I tried it and noticed their wasn’t enough data for the peer group I selected. So I decided to select “All / All” to make sure I saw something.

I can understand that many of you don’t want to send data to an “unknown” destination. The good thing is though that you can inspect what is being sent. Before you configure the upload just hit “Preview all data to be sent” and you will get a CSV file of the data set. This data is transported over SSL, just in case you were wondering.

I am going to leave this one running for a while and am looking forward to see what the averages are of my peers. I also am wondering what this tool will evolve in to.

One thing that stood out from the “peer results” is the amount of GBs of Storage per VM: 116.40GB. That did surprise me as I would have estimated this to be around 65GB. Anyway, download it and try it out. It is worth it.

Resource pool shares don’t make sense with vCloud Director?

Duncan Epping · Feb 28, 2012 ·

I’ve had multiple discussions around Resource Pool level shares in vCloud Director over the last 2 years so I figured I would write an article about it. A lot easier to point people to the article instead, and it also allows me to gather feedback on this topic. If you feel I am completely off, please comment… I am going to quote a question which was raised recently.

One aspect of “noise neighbor” that seems to never be discussed within vCloud is the allocation of shares.  An organization with a single VM has better CPU resource access per VM than an organization that has 100 VMs.  The organization resource pools have equal number of shares, so each VM gets a smaller and smaller allocation of shares as the VM count in an organization virtual data center increases.

Before I explain the rationale behind the design decision around shares behavior in a vCloud environment it is important to understand some of the basics. An Org vDC is nothing more than a resource pool. The chosen “allocation model” for your Org vDC and the specified charateristics determine what your Resource Pool will look like. I wrote a fairly lengthy article about it a while back, if you don’t understand allocation models take a look at it.

When an Org vDC is created on a vSphere layer a resource pool is created and it will typically have the following characteristics. In this example I will use the “Allocation Pool” allocation model as it is the most commonly used:

Org vDC Characteristics –> Resource Pool Characteristics

  • Total amount of resources –> Limit set to Y
  • Percentage of resources guaranteed –> Reservation set to X

On top of that each resource pool has a fixed number of shares. The difference between the limit and the reservation is often referred to as the “bust space”. Typically each VM will also have a reservation set. If 80% of your memory resources are guaranteed this will result in a 80% reservation on memory on your VM as well. This means that when you start deploying new VMs in to that resource pool you will be able to create as many until the limit is reached. In other words:

10GHz/10GB allocation pool Org vDC with 80% guaranteed resources = Resource pool with a 10GHz/GB limit and an 8GHz/GB reservation. In this pool you can create as many VMs until you hit those limits. Resources are guaranteed up to 8GHz/8GB!

Now what about those shares? The statement is, will the Org vDC with 100 VMs have less resource access than the Org vDC with only 10 VMs? Lets use that previous example again:

10GHz/10GB allocation pool with 80% resource guaranteed. This results in a resource pool with a 10GHz/10GB limit and an 8GHz/GB reservation.

Two Org VDCs are deployed, and each have the exact same characteristics. In “Org VDC – 1” 10 VMs were provisioned, while in “Org VDC – 2” 100 VMs are provisioned. It should be pointed out that the provider charges these customers for their Org VDC. As both decided to have 8GHz/GB guaranteed that is what they will pay for and when they exceed that “guarantee” they will be charged for it on top of that. They are both capped at 10GHz/GB however.

If there is contention than shares come in to play. But when is that exactly? Well after the 8GHz/GB of resources has been used. So in that case Org VDCs  will be fighting over:

limit - reservation

In this scenario that is “10GHz/GB – 8GHz/GB = 2GHz/GB”. Is Org VDC 2 entitled to more resource access than Org VDC 1? No it is not. Let me repeat that, NO Org VDC 2 is not entitled to more resources.

Both Org VDC 1 and Org VDC 2 bought the exact same amount of resource. The only difference is that Org VDC 2 chose to deploy more VMs. Does that mean Org VDC 1’s VMs should receive less access to these resources just because they have less VMs? No they should not have less access! A provider cannot, in any shape or form, decide which Org VDC  is entitled to more resources in that burst space, especially not based on the amount of VMs deployed as this gives absolutely no indication of the importance of these workloads.Org VDC 2 should buy more resources to ensure their VMs get what they are demanding.

Org VDC 1 cannot suffer because Org VDC 2 decided to overcommit. Both are paying for an equal slice of the pie… and it is up to themselves to determine how to carve that slice up. If they notice their slice of the pie is not big enough, they should buy a bigger or an extra slice!

However, there is a a scenario where shares can cause a “problem”… If you use “Pay As You Go” and remove all “guarantees” (reservations) and have contention in that scenario each resource pool will get the same access to the resources. If you have resource pools (Org VDCs) with 500 VMs and resource pools with 10 VMs this could indeed lead to a problem for the larger resource pools. Keep in mind that there’s a reason these “guarantees” were introduced in the first place, and overcommitting to the point where resources are completely depleted is most definitely not a best practice.

Number 1 virtualization/VMware Blog!

Duncan Epping · Feb 26, 2012 ·

Eric Siebert (vSphere-Land) just published the results of the best VMware/Virtualization blog election today. Just like last year Eric rounded up the gang and recorded a very special edition of vChat. This edition features Eric Siebert together with Simon Seagrave, David Davis and John Troyer. During the vChat Eric and crew announce the Top 25 and comment on each and every single blog out there, they also announced the winners in the new categories that Eric created!

I would like to thank everyone for voting for me again. I am honored to be part of the list and humbled to be voted number 1 amongst so many excellent blogs, especially when listed with old-timers like Mike “RTFM” Laverick and Eric “Scoop” Sloof.

Watch the webcast for the full list, or take a shortcut and check Eric’s vSphere-Land.com post which has all the results.

I want to take this opportunity to congratulate a couple of “newcomers” who’s content I’ve highly enjoyed this year. Starting with Mr Chris “vCloud” Colotti… he entered the top 25 this year at spot 21. If you weren’t following his blog, make sure you do! Of course I cannot forget the newcomers category itself, great work by Barry Coombs, Josh Atwell and Andrea “the giant” Mauro.

Let me repeat what was mentioned at the end of top 25 list… all these bloggers are really approachable. If they present at a VMUG, if you see them walking around at VMworld / PEX / any other event don’t hesitate to step up and introduce yourself. Believe me, it is great to talk to readers and get feedback or just have a chat!

Once again thanks for voting! Make sure you watch that webcast. I loved every second of it.


Digging deeper into the VDS construct

Duncan Epping · Feb 23, 2012 ·

The following comment was made on my VDS blog and I figured while would investigate this a bit further:

It seems like the ESXi host only tries to sync the vDS state with the storage at boot and never again afterward. You would think that it would keep trying, but it does not.

Now lets look at the “basics” first. When an ESXi host boots it will get the data required to recreate the VDS structure locally by reading /etc/vmware/dvsdata.db and from esx.conf. You can view the dvsdata.db file yourself by doing:

net-dvs -f /etc/vmware/dvsdata.db

But is that all that is used? If you check the output of that file you will see that all data required for a VDS configuration to work is actually stored in there, so what about those files stored on a VMFS volume?

Each VMFS volume that holds a working directory (place where .vmx is stored) for at least 1 virtual machine that is connected to a VDS will have the following folder:

drwxr-xr-x    1 root     root          420 Feb  8 12:33 .dvsData

If you go to this folder you will see another folder. This folder appears to be some sort of unique identifier, and when comparing the string to the output of “net-dvs” it appears to be the identifier of the dvSwitch that was created.

drwxr-xr-x    1 root     root         1.5k Feb  8 12:47 6d 8b 2e 50 3c d3 50 4a-ad dd b5 30 2f b1 0c aa

Within this folder you will find a collection of files:

-rw------- 1 root root 3.0k Feb 9 09:00 106
-rw------- 1 root root 3.0k Feb 9 09:02 136
-rw------- 1 root root 3.0k Feb 9 09:00 138
-rw------- 1 root root 3.0k Feb 9 09:05 152
-rw------- 1 root root 3.0k Feb 9 09:00 153
-rw------- 1 root root 3.0k Feb 9 09:05 156
-rw------- 1 root root 3.0k Feb 9 09:05 159
-rw------- 1 root root 3.0k Feb 9 09:00 160
-rw------- 1 root root 3.0k Feb 9 09:00 161

It is no coincidence that these files are “numbers” and that these numbers resemble the port ID of the virtual machines stored on this volume. This is the port information of the virtual machines which have their working directory on this particular datastore. This port info is also what HA uses when it needs to restart a virtual machine which uses a dvPort. Let me emphasize that, this is what HA uses when it needs to restart a virtual machine! Is that all?

Well I am not sure. When I tested the original question I powered on the host without access to the storage system and powered on my storage system when the host was fully booted. I did not get this confirmed, but it seems to me that access to the datastore holding these files is somehow required during the boot process of your host, in the case of “static port bindings” that is. (Port bindings are more in-depth described here.)

Does this imply that if your storage is not available during the boot process virtual machines cannot connect to the network when they are powered on? Yes that is correct, I tested it and when you have a full power-outage and your hosts come-up before your storage you will have a “challenge”. As soon as the storage is restored you probably will want to restart your virtual machines but if you do you will not get a network connection. I’ve tested this 6 or 7 times in total and not once did I get a connection.

As a workaround you can simply reboot your ESXi hosts. If you reboot the host the problem is solved and your virtual machines can be powered on and will get access to the network. Rebooting a host can be a painfully slow exercise though, as I noticed during my test runs in my lab. Fortunately there is a really simple workaround: restarting the management agents! Before you power-on your virtual machines and after your storage connection has been restored do the following from the ESXi shell:

services.sh restart

After the services have been restarted you can power-on your virtual machines and network connection will be restored!

Side note, on my article there was one question about the auto-expand property of static port groups and whether this was officially supported and where it was documented. Yes it is fully supported. There’s a KB Article about how to enable it and William Lam recently blogged about it here. That is it for now on VDS…

Using F5 to balance load between your vCloud Director cells

Duncan Epping · Feb 16, 2012 ·

** I want to thank Christian Elsen and Clair Roberts for providing me with the content for this article **

A while back Clair contacted me and asked me if I was interested in getting the info to write an article about how to setup F5’s Big IP LTM VE to front a couple of vCloud Director cells. As you know I used to be part of the VMware Cloud Practice and was responsible for architecting vCloud environments in Europe. Although I did design an environment where F5 was used I never actually was part of the team who implemented it, as it is usually the Network/Security team who takes on this part. Clair was responsible for setting this up for the VMworld Labs environment and couldn’t find many details around this on the internet, hence the reason for this article.

This post will therefore outline how to setup the below scenario of distributing user requests across multiple vCloud Director cells.

figure 1:

For this article we will assume that the basic setup of the F5 Big IP load balancers has already been completed. Besides the management and HA interface, one interface will reside on the external – end-user facing – part of the infrastructure and another interface on the internal – vCloud director facing – part of the infrastructure.

Configuring a F5 Big IP load balancer to front a web application usually requires a common set of configuration steps:

  • Creating a health monitor
  • Creating a member pool to distribute requests among
  • Creating the virtual server accessible by end-users

Let’s get started configuring the health monitor.  A monitor is used to “monitor” the health of the service. Go to the Local Traffic page, then go to monitors. Add a monitor for vCD_https. This is unique to vCD, we recommend to use the following string “http://<cell.hostname>/cloud/server_status“ (figure 3). Everything else can be set to default.

figure 2:

figure 3:

figure 4:

Next you will need to define the vCloud Director Cells as nodes of a member pool. The F5 Big IP will then distribute the load across these member pool nodes. You will need to type in the IP address, add the name and all the info. We suggest to use 3 vCloud Director Cells as a minimum. Go to Nodes and check your node list, depicted in figure 5. You should have three defined as shown in figure 5 and 6. You can create these by simply clicking “Create”  and defining the ip-address and the name of the vCD Cell

figure 5:

figure 6:

figure 7:

Now that you have defined the cells you will need to pool them. If vCloud Director needs to respond to both http and https (figure 8 and 9) you will need to configure two pools. Each pool will have the three cells added. We are going with most of the basics settings. (Pools menu) Don’t forget the Health Monitors.

figure 8:

figure 9:

Now validate if the health monitor has been able to successfully communicate with the vCD cells, you should see a green dot! The green dot means that the appliance can talk to the cells and that the health monitoring is fine and getting results on the query.

Last you will need to create a Virtual IP (VIP) per server. In this case two “virtual servers”  (as the F5 appliance names them, figure 10) will have the same IP but with different ports!, http and https. These can be simply created by clicking “Create” and then define the IP Address which will be used to access the cells (figure 11).

figure 10:

figure 11:

Repeat the above steps for the Consoleproxy IP address of your vCD setup.

Last you will need to specify these newly created VIPs in the vCD environment.

See Hany’s post on how to do the vCloud Director part of it… it is fairly straight forward. (I’ll give you a hint: Administration –> System Settings –> Public Addresses)


  • « Go to Previous Page
  • Page 1
  • Interim pages omitted …
  • Page 157
  • Page 158
  • Page 159
  • Page 160
  • Page 161
  • Interim pages omitted …
  • Page 336
  • Go to Next Page »

Primary Sidebar

About the Author

Duncan Epping is a Chief Technologist and Distinguished Engineering Architect at Broadcom. Besides writing on Yellow-Bricks, Duncan is the co-author of the vSAN Deep Dive and the vSphere Clustering Deep Dive book series. Duncan is also the host of the Unexplored Territory Podcast.

Follow Us

  • X
  • Spotify
  • RSS Feed
  • LinkedIn

Recommended Book(s)

Also visit!

For the Dutch-speaking audience, make sure to visit RunNerd.nl to follow my running adventure, read shoe/gear/race reviews, and more!

Do you like Hardcore-Punk music? Follow my Spotify Playlist!

Do you like 80s music? I got you covered!

Copyright Yellow-Bricks.com © 2026 · Log in