We (the Unexplored Territory team) have just published two brand-new episodes which discuss What’s New with vSphere 8.0 U1 and vSAN 8.0 U1. You can of course listen to them using your favorite podcast app, or you simply use the embedded players below to enjoy the content.
Server
vSAN ESA ReadyNode configurations are more flexible than you think!
I had a discussion at the Dutch VMUG yesterday about the ReadyNode configurations for vSAN ESA. The discussion was about how difficult it was to select a host and customize it. It was then that I realized that most people hadn’t noticed yet that there is an easier method (or lifehack as my kids would say) when it comes to selecting your server model. How does that work? Well, let me show you!
First, let’s take a look at the vSAN ESA ReadyNode Hardware Guidance Table. The table below shows you what the node capacity is for each profile from a storage, CPU, memory, and networking perspective.

Now if you look at the table you will see that as the “profile” number goes up, so does the capacity for each of the various components. This is actually what provides you with a lot of flexibility in my opinion. If we take Dell as an example, but the same applies for most vendors on the current list, and we select “vSAN-ESA-AF2” and look at the list of options we see the following:
- PowerEdge R650
- PowerEdge R6515
- PowerEdge R750
- PowerEdge R7515
Now, if we look at “vSAN-ESA-AF8” next, which is the highest profile, we see that we only can pick 1 server model, which happens to be the PowerEdge R750. If we then look at the difference between the hosts selected for each profile a few things stand out:
- vSAN-ESA-AF2 has an Intel Xeon Silver 4314, while vSAN-ESA-AF8 has a Platinum 8358
- vSAN-ESA-AF2 has 512GB, while vSAN-ESA-AF8 has 1024GB
- vSAN-ESA-AF2 a 25Gbps NIC, while vSAN-ESA-AF8 has a 100Gbps NIC
- vSAN-ESA-AF2 has five 3.2TB NVMe devices while vSAN-ESA-AF8 has twenty-four 3.2TB devices
Now if I look at the KB article which explains what you can, and cannot change, something stands out, most of the components can be modified/customized. For instance, for CPU you can go to a higher core count and/or higher base clock speed! For memory, you can go up, same for storage devices (as long as you stay within supported limits), etc etc.
In other words, what is the difference between a vSAN-ESA-AF2 and a vSAN-ESA-AF8? Basically the expected workload, the performance, the capacity. This ultimately results in a different configuration. Nothing, at this point in time, stops you from selecting the “lowest” vSAN ReadyNode Profile and spec it as an “AF4”, “AF6” or “AF8” from a CPU stance, or from a storage/memory capacity point of view. If you want to have some more flexibility, try selecting a smaller profile, select the host type, and increase the resources/components where needed!
When you start exploring the options it may seem complex, but when you look more closely you will quickly realize that it actually isn’t that complex, and that it actually provides you with a lot of flexibility, as long as you stick to the rules and pick supported components!
Why is vCenter Server trying to access assets.contentstack.io or send DNS requests for it?
On VMTN I noticed somehow asking why vCenter Server was trying to access assets.contentstack.io, and why there were so many DNS requests for assets.contentstack.io. It took me a while to figure it out, but I noticed that there’s a plugin for the VMware Cloud Provider Services, this plugin is hosted on contentstack.io, and that is the reason you see vCenter Server trying to connect with that URL and why you are seeing DNS requests for assets.contentstack.io. You can prevent this from happening by simply selecting the plugin, and then removing it. That is, of course, if you are not planning on using these services.

vSAN ESA is using more CPU cycles than vSAN OSA?
Over the last couple of weeks, I’ve had conversations with customers and partners who have been running performance benchmarks against both vSAN ESA and vSAN OSA. As you can imagine, people want to compare version 8 of OSA against version 8 of ESA, and that is completely fair. What I noticed though is that some of those customers came back with comments around CPU usage of vSAN OSA against ESA. The general comment we get is that vSAN ESA is using more CPU cycles than vSAN OSA.
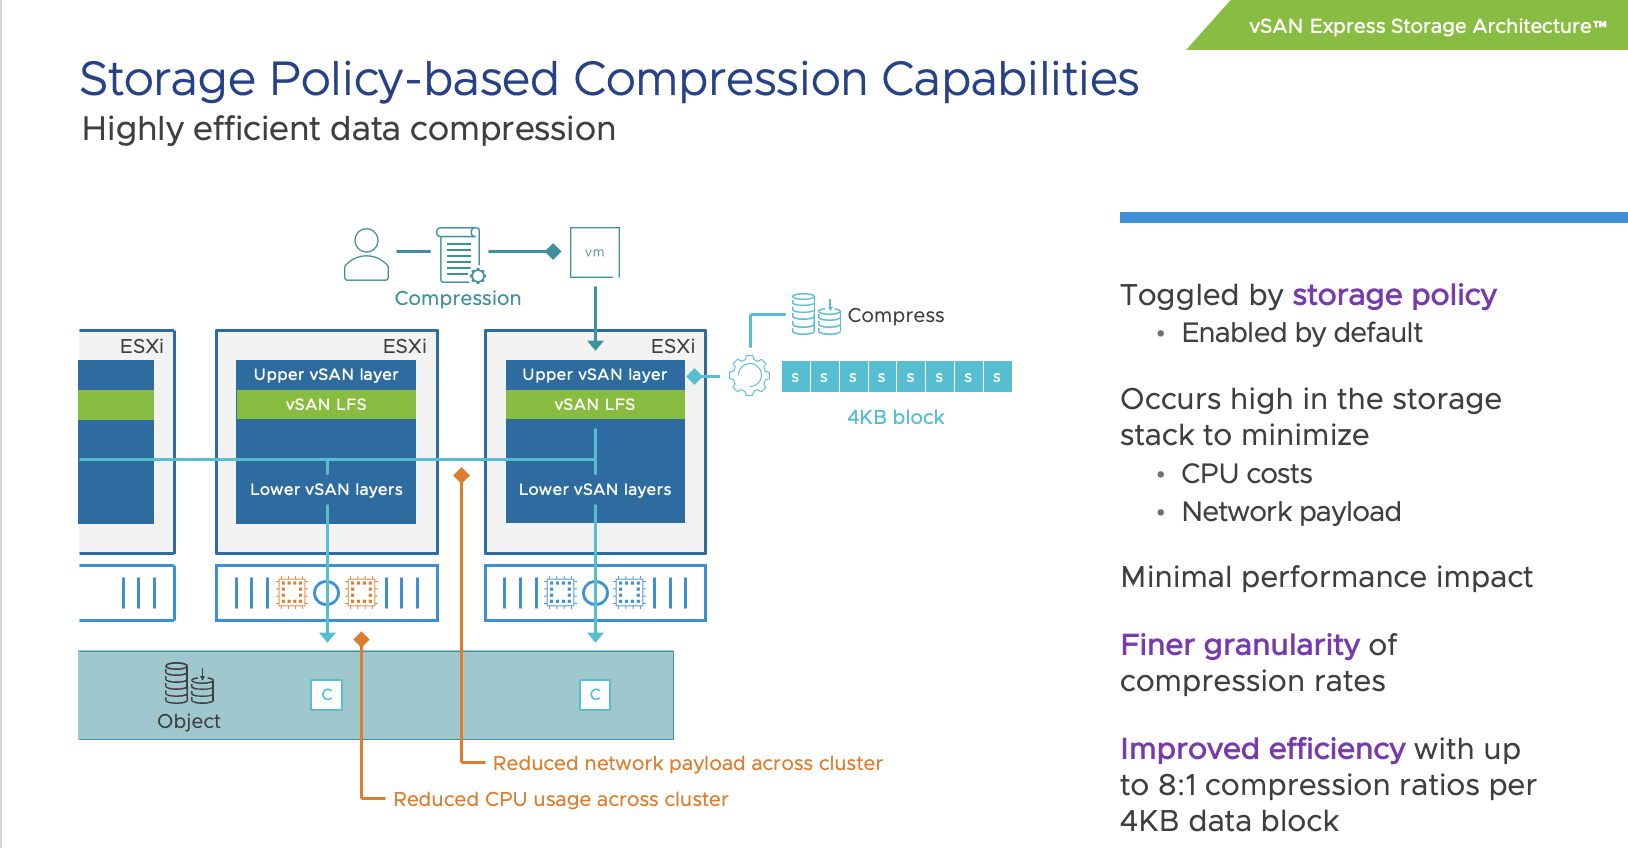
When looking at it from a total number point of view, or CPU cycles consumed, it is very likely you will see vSAN ESA using more cycles than vSAN OSA. The question then typically arises why that is the case, as VMware (the vSAN team) has been claiming that vSAN ESA is much more efficient than vSAN OSA. To be fair, it is much more efficient. For instance data services like checksumming, encryption, and compression have moved to the top of the stack (as shown below) resulting in the fact that we don’t have to compress/encrypt data 3/4/5/6 times but can do it once at the source and then send it over the network to the destination.
Still, it leaves the question, why is more CPU capacity used? The answer is simple, you are pushing much more IO. We’ve seen customers easily reaching 4x the number of IOPS with ESA than with OSA. Even though ESA is more efficient, if you are pushing 4x (or more) the amount of IO then you will need to remember that those additional IOs also come at a cost, and that cost is CPU cycles to process them. So when you make a comparison, please compare apples to apples, and not apples to oranges.
The last thing I want to add, and hopefully I can share some data in the future, the use of RDMA with vSAN 8 ESA seems to have a significant impact on CPU usage, as in lower the amount of CPU required to produce the same results (or better results). So it is worth considering RDMA for sure when adopting vSAN 8 ESA!
What can I change about a vSAN ESA Ready Node?
I’ve had half a dozen people asking about this over the past weeks, it really seems more and more people are at the point of adopting vSAN ESA (Express Storage Architecture. When they look at the various vSAN ESA Ready Node configurations what stands out is that the current list is limited in terms of server models and configurations. (https://vmwa.re/vsanesahcl)
The list is being updated every week, last week for instance Supermicro popped up as a Server vendor. Of course, Dell, HPe, and Lenovo had been on the list since day 1. When you select the vendor, the ready node type, and the model you will then have the option to select a number of things, but in most cases, you seem to be limited to “Storage Device” and “Number of Storage Devices”. This however does not mean you cannot change anything. A knowledge base article has been released which describes what you can, and cannot change when it comes to these configurations! The KB article is listed on the vSAN ESA VMware Compatibility Guide list, but somehow it seems people don’t always notice the link. (Yes, I have asked the team to make the link more obvious somehow.)
Now when you look at the KB it lists what you can change, and what the rules are when it comes to making changes. For instance, you can change the CPU, but only for the same or higher core count and the same or higher base clock speed. For memory, you can increase the amount, and the same applies to storage capacity for instance. For storage it is even a bit more specific, you need to use the same make/model, so basically if the ReadyNode configuration lists a P5600 of 1.6TB, you can swap it for a P5600 of 3.2TB. We recently (May 20th 2023) had a change in support, and we now support the change of device model/make, as long as you follow the other guidelines mentioned in the KB. For instance, you can swap an Intel device for a Samsung, but that Samsung would need to be supported by the OEM vendor and needs to be the same (or higher) performance and endurance class. And of course the device needs to be certified for vSAN ESA: http://vmwa.re/vsanesahclc. Anyway, if you are configuring a Ready Node for ESA, make sure to check the KB so that you make supported changes!