• Skip to primary navigation
  • Skip to main content
  • Skip to primary sidebar

Yellow Bricks

by Duncan Epping

  • Home
  • Unexplored Territory Podcast
  • HA Deepdive
  • ESXTOP
  • Stickers/Shirts
  • Privacy Policy
  • About
  • Show Search
Hide Search

Software Defined

How do you know where an object is located with Virtual SAN?

Duncan Epping · Sep 5, 2013 ·

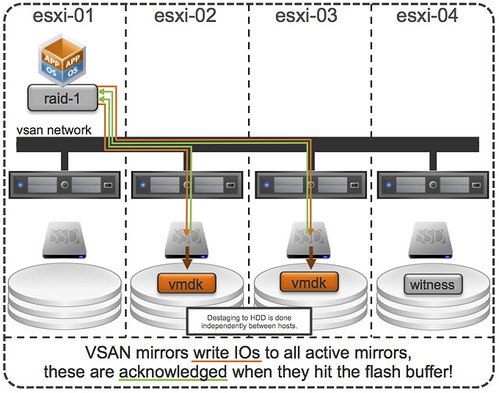
You must have been wondering the same thing after reading the introduction to Virtual SAN. Last week at VMworld I received many questions on this topic, so I figured it was time for a quick blog post on this matter. How do you know where a storage object resides with Virtual SAN when you are striping across multiple disks and have multiple hosts for availability purposes, what about Virtual SAN object location? Yes I know this is difficult to grasp, even with just multiple hosts for resiliency where are things placed? The diagram gives an idea, but that is just from an availability perspective (in this example “failures to tolerate” is set to 1). If you have stripe width configured for 2 disks then imagine what could happen that picture. (Before I published this article, I spotted this excellent primer by Cormac on this exact topic…)

Luckily you can use the vSphere Web Client to figure out where objects are placed:

  • Go to your cluster object in the Web Client
  • Click “Monitor” and then “Virtual SAN”
  • Click “Virtual Disks”
  • Click your VM and select the object

The below screenshot depicts what you could potentially see. In this case the Policy was configured with “1 host failure to tolerate” and “disk striping set to 2”. I think the screenshot explains it pretty well, but lets go over it.

The “Type” column shows what it is, is it a “witness” (no data) or a “component” (data). The “Component state” shows you if it is available (active) or not at the moment. The “Host” column shows you on which host it currently resides and the “SSD Disk Name” column shows which SSD is used for read caching and write buffering. If you go to the right you can also see on which magnetic disk the data is stored in the column called  “Non-SSD Disk Name”.

Now in our example below you can see that “Hard disk 2” is configured in RAID 1 and then immediately following with RAID 0. The “RAID 1” refers to “availability” in this case aka “component failures” and the “RAID 0” is all about disk striping. As we configured “component failures” to 1 we can see two copies of the data, and we said we would like to stripe across two disks for performance you see a “RAID 0” underneath. Note that this is just an example to illustrate the concept, this is not a best practice or recommendation as that should be based on your requirements! Last but not least we see the “witness”, this is used in case of a failure of a host. If host 10.20.177.19 would fail or be isolated from the network somehow then the witness would be used by host 10.20.177.17 to claim ownership. Makes sense right?

Virtual SAN object location

Hope this helps understanding Virtual SAN object location a bit better… When I have the time available, I will try to dive a bit more in to the details of Storage Policy Based Management.

Testing vSphere Virtual SAN in your virtual lab with vSphere 5.5

Duncan Epping · Sep 2, 2013 ·

For those who want to start testing the beta of vSphere Virtual SAN in their lab with vSphere 5.5 I figured it would make sense to describe how I created my nested lab. (Do note that performance will be far from optimal) I am not going to describe how to install ESXi nested as there are a billion articles out there that describe how to do that.I suggest creating ESXi hosts with 3 disks each and a minimum of 5GB of memory per host:

  • Disk 1 – 5GB
  • Disk 2 – 20GB
  • Disk 3 – 200GB

After you have installed ESXi and imported a vCenter Server Appliance (my preference for lab usage, so easy and fast to set up!) you add your ESXi hosts to your vCenter Server. Note to the vCenter Server NOT to a Cluster yet.

Login via SSH to each of your ESXi hosts and run the following commands:

  • esxcli storage nmp satp rule add –satp VMW_SATP_LOCAL –device mpx.vmhba2:C0:T0:L0 –option “enable_local enable_ssd”
  • esxcli storage nmp satp rule add –satp VMW_SATP_LOCAL –device mpx.vmhba3:C0:T0:L0 –option “enable_local”
  • esxcli storage core claiming reclaim -d mpx.vmhba2:C0:T0:L0
  • esxcli storage core claiming reclaim -d mpx.vmhba3:C0:T0:L0

These two commands ensure that the disks are seen as “local” disks by Virtual SAN and that the “20GB” disk is seen as an “SSD”, although it isn’t using an SSD. There is another option which might even be better, you can simply add a VMX setting to specify the disks are SSDs. Check William’s awesome blog post for the how to.

After running these two commands we will need to make sure the hosts are configured properly for Virtual SAN. First we will add them to our vCenter Server, but without adding them to a cluster! So just add them on a Datacenter level.

Now we will properly configure the host. We will need to create an additional VMkernel adapter, do this for each of the three hosts:

  1. Click on your host within the web client
  2. Click “Manage” -> “Networking” -> “VMkernel Adapters”
  3. Click the “Add host networking” icon
  4. Select “VMkernel Network Adapter”
  5. Select the correct vSwitch
  6. Provide an IP-Address and tick the “Virtual SAN” traffic tickbox!
  7. Next -> Next -> Finish

When this is configured for all three hosts, configure a cluster:

  1. Click your “Datacenter” object
  2. On the “Getting started” tab click “Create a cluster”
  3. Give the cluster a name and tick the “Turn On” tickbox for Virtual SAN
  4. Also enable HA and DRS if required

Now you should be able to move your hosts in to the cluster. With the Web Client for vSphere 5.5 you can simply drag and drop the hosts one by one in to the cluster. VSAN will now be automatically configured for these hosts… Nice right. When all configuration tasks are completed just click on your Cluster object and then “Manage” -> “Settings” -> “Virtual SAN”. Now you should see the amount of hosts part of the VSAN cluster, number of SSDs and number of data disks.

Now before you get started there is one thing you will need to do, and that is enable “VM Storage Policies” on your cluster / hosts. You can do this via the Web Client as follows:

  • Click the “home” icon
  • Click “VM Storage Policies”
  • Click the little policy icon with the green checkmark, second from the left
  • Select your cluster and click “Enable” and then close

Now note that you have enabled VM Storage Policies, there are no pre-defined policies. Yes there is a “default policy”, but you can only see that on the command line. For those interested just open up an SSH session and run the following command:

~ # esxcli vsan policy getdefault
Policy Class Policy Value
------------ --------------------------------------------------------
cluster (("hostFailuresToTolerate" i1) )
vdisk (("hostFailuresToTolerate" i1) )
vmnamespace (("hostFailuresToTolerate" i1) )
vmswap (("hostFailuresToTolerate" i1) ("forceProvisioning" i1))
~ #

Now this means that in the case of “hostFailuresToTolerate”, Virtual SAN can tolerate a 1 host failure before you potentially lose data. In other words, in a 3 node cluster you will have 2 copies of your data and a witness. Now if you would like to have N+2 resilience instead of N+1 it is fairly straight forward. You do the following:

  • Click the “home” icon
  • Click “VM Storage Policies”
  • Click the “New VM Storage Policy” icon
  • Give it a name, I used “N+2 resiliency” and click “Next”
  • Click “Next” on Rule-Sets and select a vendor, which will be “vSan”
  • Now click <add capability> and select “Number of failures to tolerate” and set it to 2 and click “Next”
  • Click “Next” -> “Finish”

That is it for creating a new profile. Of course you can make these as complex as you want, their are various other options like “Number of disk stripes” and “Flash read cache reservation %”. For now I wouldn’t recommend tweaking these too much unless you absolutely understand the impact of changing these.

In order to use the profile you will go to an existing virtual machine and you right click it and do the following:

  • Click “All vCenter Actions”
  • Click “VM Storage Service Policies”
  • Click “Manage VM Storage Policies”
  • Select the appropriate policy on “Home VM Storage Policy” and do not forget to hit the “Apply to disks” button
  • Click OK

Now the new policy will be applied to your virtual machine and its disk objects! Also while deploying a new virtual machine you can in the provisioning workflow immediately select the correct policy so that it is deployed in a correct fashion.

These are some of the basics for testing VSAN in a virtual environment… now register and get ready to play!

Startup News Flash part 4

Duncan Epping · Aug 27, 2013 ·

This is the fourth part already of the Startup News Flash, we are in the middle of VMworld and of course there were many many announcements. I tried to filter out those which are interesting, as mentioned in one of the other posts if you feel one is missing leave a comment.

Nutanix announced version 3.5  of their OS last week. The 3.5 release contains a bunch of new features, one of them being what they call the “Nutanix Elastic Deduplication Engine”. I think it is great they added this feature is ultimately it will allow you to utilize your flash and RAM tier more efficiently. The more you can cache the better right?! I am sure this will result in a performance improvement in many environment, you can imagine that especially for VDI or environments where most VMs are based on the same template this will be the case. What might be worth knowing is that Nutanix dedupe is inline for their RAM and flash tier and then for their magnetic disks is happening in the background. Nutanix also announced that besides supporting vSphere and KVM they also support Hyper-V as of now, which is great for customers as it offers you choice. On top of all that, they managed to develop a new simplified UI and a rest-based API allowing for customers to build a software defined datacenter! Also worth noting is that they’ve been working on their DR story. They’ve developed a Storage Replication Adapter which is one of the components needed to implement Site Recover Manager with array based replication. They also optimized their replication technology by extending their compression technology to that layer. (Disclaimer: the SRA is not listed on the VMware website, as such it is not supported by VMware. Please validate the SRM section of the VMware website before implementing.)

Of course an update from a flash caching vendor, this time it is Proximal Data who announced the 2.0 version of their software. AutoCache 2.0 includes role-based administration features and multi-hypervisor support to meet the specific needs of cloud service providers. Good to see that multi hypervisor and cloud is part of the proximal story soon. I like the Proximal aggressive price point. It starts at $999 per host for flash caches less than 500GB, which is unique for a solution which does both block and file caching. Not sure I agree with Proximal’s stance with regards to write-back caching and “down-playing” 1.0 solutions, especially not when you don’t offer that functionality yourself or were a 1.0 version yesterday.

I just noticed this article published by Silicon Angle which mentions the announcement of the SMB Edition of FVP, priced at a flat $9,999, supports up to 100 VMs across a maximum of four hosts with two processors and one flash drive each. More details to be found in this press release by PernixData.

Also something which might interest people is Violin Memory filing for IPO. It had been rumored numerous times, but this time it seems to be happening for real. The Register has an interesting view by the way. I hope it will be a huge success for everyone involved!

Also want to point people again to some of the cool announcements VMware did in the storage space, although far from being a startup I do feel this is worth listing here again: introduction to vSphere Flash Read Cache – introduction to Virtual SAN.

Introduction to vSphere Flash Read Cache aka vFlash

Duncan Epping · Aug 26, 2013 ·

vSphere 5.5 was just announced and of course there are a bunch of new features in there. One of the features which I think people will appreciate is vSphere Flash Read Cache (vFRC), formerly known as vFlash. vFlash was tech previewed last year at VMworld and I recall it being a very popular session. In the last 6-12 months host local caching solutions have definitely become more popular and interesting as SSD prices keep dropping and thus investing in local SSD drives to offload IO gets more and more interesting. Before anyone asks, I am not going to do a comparison with any of the other host local caching solutions out there. I don’t think I am the right person for that as I am obviously biased.

As stated, vSphere Flash Read Cache is a brand new feature which is part of vSphere 5.5. It allows you to leverage host local SSDs and turn that in to a caching layer for your virtual machines. The biggest benefit of using host local SSDs of course is the offload of IO from the SAN to the local SSD. Every read IO that doesn’t need to go to your storage system means resources can be used for other things, like for instance write IO. That is probably the one caveat I will need to call out, it is “write through” caching only at this point, so essential a read cache system. Now, by offloading reads, potentially it could help improving write performance… This is not a given, but could be a nice side effect.

Just a couple of things before we get in to configuring it. vFlash aggregates local flash devices in to a pool, this pool is referred too as a “virtual flash resource” in our documentation. So in other words, if you have 4 x 200 GB SSD you end up with a 800GB virtual flash resource. This virtual flash resource has a filesystem sitting on top of it called “VFFS” aka “Virtual Flash File System”. As far as I know it is a heavily flash optimized version of VMFS, but don’t pin me on this one as I haven’t broken it down yet.

So now that I know what it is and does, how do I install it, what are the requirements and limitations? Well lets start with the requirements and limitations first.

Requirements and limitations:

  • vSphere 5.5 (both ESXi and vCenter)
  • SSD Drive / Flash PCIe card
  • Maximum of 8 SSDs per VFFS
  • Maximum of 4TB physical Flash-based device size
  • Maximum of 32TB virtual Flash resource total size (8x4TB)
  • Cumulative 2TB VMDK read cache limit
  • Maximum of 400GB of virtual Flash Read Cache per Virtual Machine Disk (VMDK) file

So now that we now the requirements, how do you enable / configure it? Well as with most vSphere features these days the setup it fairly straight forward and simple. Here we go:

  • Open the vSphere Web Client
  • Go to your Host object
  • Go to “Manage” and then “Settings”
  • All the way at the bottom you should see “Flash Read Cache Resource Management”
    • Click “Add Capacity”
    • Select the appropriate SSD and click OK
      Introduction to vSphere Flash Read Cache aka vFlash
  • Now you have a cache created, repeat for other hosts in your cluster. Below is what your screen will look like after you have added the SSD.

Now you will see another option below “Flash Read Cache Resource Management” and it is called “Cache Configuration” this is for the “Swap to host cache” / “Swap to SSD” functionality that was introduced with vSphere 5.0.

Now that you have enabled vFlash on your host, what is next? Well you enable it on your virtual machine, yes I agree it would have been nice to enable it for a full cluster or for a datastore as well but this is not part of the 5.5 release unfortunately. It is something that will be added at some point in the future though. Anyway, here is how you enable it on a Virtual Machine:

  • Right click the virtual machine and select “Edit Settings”
  • Uncollapse the harddisk you want to accelerate
  • Go to “Flash Read Cache” and enter the amount of GB you want to use as a cache
    • Note there is an advanced option, at this section you can also select the block size
    • The block size could be important when you want to optimize for a particular application

Not too complex right? You enable it on your host and then on a per virtual machine level and that is it… It is included with Enterprise Plus from a licensing perspective, so those who are at the right licensing level get it “for free”.

Introduction to VMware Virtual SAN (vSAN)

Duncan Epping · Aug 26, 2013 ·

VMware Virtual SAN, or I should say VMware vSAN, has been around since August 2013. Back then it was indeed called Virtual SAN, today is it is officially known as vSAN, but that is what most people used anyway. As this article keeps popping up on google search I figured I would rewrite it and provide a better more generic introduction to vSAN which is up to date and covers all that VMware vSAN is about up to the current version of writing, which is VMware vSAN 6.6.

VMware vSAN is a software based distributed storage solution. Some will refer to it as hyper-converged, others will call it software defined storage and some even referred to is as hypervisor converged at some point. The reason for this is simple, VMware vSAN is fully integrated with VMware vSphere. Those of you who are vSphere administrators who are reading this will have no problem configuring vSAN. If you know how to enable HA and DRS, then you know how to configure vSAN. Of course you will need to have a vSAN Network, and you achieve this by creating a VMkernel interface and enabling vSAN on it. vSAN works with L2 and L3 networks, and as of vSAN 6.6 no longer requires multicast to be enabled on the network. (If you want to know what changed with vSAN 6.6 read this article.)

enable vsan

Before we will get a bit more in to the weeds, what are the benefits of a solution like vSAN? What are the key selling points?

  • Software defined – Use industry standard hardware, as long as it is on the HCL you are good to go!
  • Flexible – Scale as needed and when needed. Just add more disks or add more hosts, yes both scale-up and scale-out are possible.
  • Simplicity – Ridiculously easy to manage! Ever tried implementing or managing some of the storage solutions out there? If you did, you know what I am getting at.
  • Automated – Per virtual machine and per virtual disk policy based management. Yes, even VMDK level granularity. No more policies defined on a per LUN/Datastore level, but at the level where you need it!
  • Hyper-Converged – It allows you to create dense / building block style solutions!

To me “simplicity” is the key reason customers buy vSAN. Not just simplicity in configuring or installing, but even more so simplicity in management. Features like the vSAN Health Check provide a lot of value to the admin. With one glance you can see what the status is of your vSAN. Is it healthy or not? If not, what is wrong?

vsan health check

Okay that sounds great right, but where does that fit in? What are the use-cases for vSAN, how are our 7000+ customers using it today?

  • Production / Business Critical Workloads
    • Exchange, Oracle, SQL, anything basically…. This is what the majority of customers use vSAN for.
  • Management Clusters
    • Isolate their management workloads completely, and remove the dependency on your storage systems to be available. Even when your enterprise storage system is down you have access to your management tools
  • DMZ
    • Where NSX helps isolating a DMZ from the world from a networking/security point of view, vSAN can do the same from a storage point of view. Create a separate cluster and avoid having your production storage go down during a denial of service attack, and avoid complex isolated SAN segments!
  • Virtual desktops
    • Scale out model, using predictive (performance etc) repeatable infrastructure blocks lowers costs and simplifies operations. Note that vSAN is included with Horizon Advanced and Enterprise!
  • Test & Dev
    • Avoids acquisition of expensive storage (lowers TCO), fast time to provision, easy scale out and up when required!
  • Big Data
    • Scale out model with high bandwidth capabilities, Hadoop workloads are not uncommon on vSAN!
  • Disaster recovery target
    • Cheap DR solution, enabled through a feature like vSphere Replication that allows you to replicate to any storage platform. Other options are of course VAIO based replication mechanisms like Dell/EMC Recover Point.

Yes that is a long list of use cases, I guess it it fair to say that vSAN fit everywhere and anywhere! Now, lets get a bit more technical, just a bit as this is an introduction and for those who want to know more about specific features and settings I have hundreds of vSAN articles on my blog. Also a vSAN book available, and then there’s of course the long list of articles by the likes of William Lam and Cormac Hogan.

When vSAN is enabled a single shared datastore is presented to all hosts which are part of the vSAN enabled cluster. Typically all hosts will contribute performance (SSD) and capacity (magnetic disks or flash) to this shared datastore. This means that when your cluster grows from a compute perspective, your datastore will typically grow with it. (Not a requirement, there can be hosts in the cluster which just consume the datastore!) Note that there are some requirements for hosts which want to contribute storage. Each host will require at least one flash device for caching and one capacity device. From a clustering perspective, vSAN supports the same limits as vSphere: 64 hosts in a single cluster. Unless you are creating a stretched cluster, then the limit is 31 hosts. (15 per site.)

As can be expected from any recent storage system, vSAN heavily relies on flash for performance. Every write I/O will go to the flash cache first, and eventually they will go to the capacity tier. vSAN supports different types of flash devices, broadest support in the industry, ranging from SATA SSDs to 3D XPoint NVMe based devices. This goes for both the caching as well as the capacity tier. Note that for the capacity layer, vSAN of course also supports regular spinning disks. This ranges from NL-SAS to SAS, 7200 RPM to 15k RPM. Just check the vSAN Ready Node HCL or the vSAN Component HCL for what is supported and what is not.

As mentioned, you can set policies on a per virtual machine or even virtual disk level. These policies define availability and performance aspects of your workloads. But for instance also allow you to specify whether checksumming needs to be enabled or not. There are 2 key features which are not policy driven at this point and these are “Deduplication and Compression” and Encryption. Both of these are enabled on a cluster level. But lets get back to the the policy based management. Before deploying your first VMs, you will typically create a (or multiple) policy. In this policy you define what the characteristics of the workload should be. For instance as shown in the example below, how many failures should the VM be able to tolerate? In the below example it shows that “primary” and “secondary” level of failures to tolerate is set to 1. Which in this case means the VM is stretched across 2 locations and also protected by RAID-5 in each site as the “Failure Tolerance Method” is also specified.

vsan policy

The above is a rather complex example, it can be as simple as only setting “Failures to tolerate” to “1”, which in reality is what most people do. This means you will need 3 nodes at a minimum and you will from a VM perspective have 2 copies of the data and 1 witness. vSAN is often referred to as a generic object based storage platform, but what does that mean? The VM can be seen as an object and each copy of the data and the witness can be seen as components. Objects are placed and distributed across the cluster as specified in your policy. As such vSAN does not require a local RAID set, just a bunch of local disks which can be attached to a passthrough disk controller. Now, whether you defined a 1 host failure to tolerate, or for instance a 3 host failure to tolerate, vSAN will ensure enough replicas of your objects are created within the cluster. Is this awesome or what?

Lets take a simple example to illustrate that as I realize it is also easy to get lost in all these technical terms. We have configured a 1 host failure and we create a new virtual disk. This results in vSAN creating 2 identical data components and a witness component. The witness is there just in case something happens to your cluster and to help you decide who will take control in case of a failure, the witness is not a copy of your data component let that be clear, it is just a quorum mechanis. Note, that the amount of hosts in your cluster could potentially limit the amount of “host failures to tolerate”. In other words, in a 3 node cluster you can not create an object that is configured with 2 “host failures to tolerate” as it would require vSAN to place components on 5 hosts at a minimum. (Cormac has a simple table for it here.) Difficult to visualize? Well this is what it would look like on a high level for a virtual disk which tolerates 1 host failure:

First, lets point out that the VM from a compute perspective does not need to be aligned with the data components. In order to provide optimal performance vSAN has an in memory read cache which is used to serve the most recent blocks from memory. Of course blocks which are not in the memory cache will need to be fetched from either of the two hosts that serve the data component. Note that a given block always comes from the same host for reads. This to optimize the flash based read cache. For writes it is straight forward. Every write is synchronously pushed to the hosts that contain data components for that VM. Some may refer to this as replication or mirroring. With all this replication going on, are there requirements for networking? At a minimum vSAN will require a dedicated 1Gbps NIC port for hybrid configurations, and 10GbE for all-flash configurations. Needless to say, but 10Gbps is definitely preferred with solutions like these, and you should always have an additional NIC port available for resiliency. There is no requirement from a virtual switch perspective, you can use either the Distributed Switch or the plain old vSwitch, both will work fine, the Distributed Switch is recommended and comes included with the vSAN license.

So what else is there, well from a feature / functionality perspective there’s a lot. Let me list some of my favourite features:

  • RAID-1 / RAID-5 / RAID-6
  • Stretched Clustering
  • All-Flash for all License options
  • Deduplication and Compression
  • vSAN Datastore Encryption
  • iSCSI Targets (for physical machines)

That more or less covers the basics and I think is a decent introduction to vSAN. Something that hopefully sparks your interest in this distributed storage platform that is deeply integrated with vSphere and enables convergence of compute and storage resources as never seen before. It provides virtual machine and virtual disk level granularity through policy based management. It allows you to control availability, performance and security in a way I have never seen it before, simple and efficient. And then I haven’t even spoken about features like the Health Check, Config Assist, Easy Install and any of the other cool features that are part of vSAN 6.6.

If there are any questions, find me on twitter!

  • « Go to Previous Page
  • Page 1
  • Interim pages omitted …
  • Page 64
  • Page 65
  • Page 66
  • Page 67
  • Page 68
  • Interim pages omitted …
  • Page 71
  • Go to Next Page »

Primary Sidebar

About the Author

Duncan Epping is a Chief Technologist and Distinguished Engineering Architect at Broadcom. Besides writing on Yellow-Bricks, Duncan is the co-author of the vSAN Deep Dive and the vSphere Clustering Deep Dive book series. Duncan is also the host of the Unexplored Territory Podcast.

Follow Us

  • X
  • Spotify
  • RSS Feed
  • LinkedIn

Recommended Book(s)

Also visit!

For the Dutch-speaking audience, make sure to visit RunNerd.nl to follow my running adventure, read shoe/gear/race reviews, and more!

Do you like Hardcore-Punk music? Follow my Spotify Playlist!

Do you like 80s music? I got you covered!

Copyright Yellow-Bricks.com © 2026 · Log in