• Skip to primary navigation
  • Skip to main content
  • Skip to primary sidebar

Yellow Bricks

by Duncan Epping

  • Home
  • Unexplored Territory Podcast
  • HA Deepdive
  • ESXTOP
  • Stickers/Shirts
  • Privacy Policy
  • About
  • Show Search
Hide Search

VMware

vSphere 5.0 – what’s new for esxtop

Duncan Epping · Oct 4, 2011 ·

I was just playing around with esxtop in vSphere 5.0 and spotted something that changed. I figured there must be more so I started digging. I didn’t dig too deep as there is a great VMworld session (VSP1999) on this topic by Krishna Raj Raja and I figured why re-invent the wheel. Anyway, here’s the things I noticed which will definitely come in handy at some point while troubleshooting performance issues:

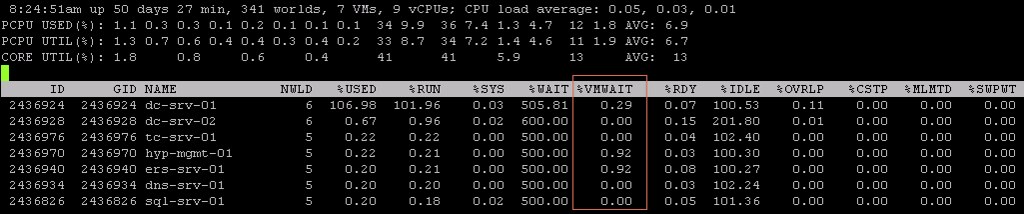
  • Each display type now shows the number of Worlds, VMs and vCPUs on the host on the first line. This will allow you to quickly identify why there for instance is a high %RDY.
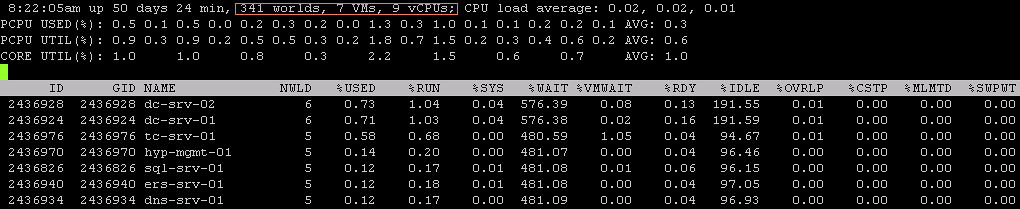
  • %VMWAIT is a derivitive of %WAIT, however it does not include IDLE time and only %SWPWT and “blocked”. It could for instance also be blocked when the connectivity to the storage device has failed.
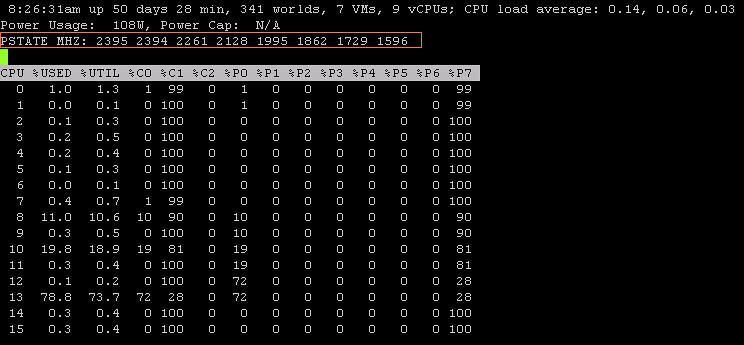
  • In the Power display there’s a new line which is PSTATE MHZ. This shows you the different clock frequencies per state. For instance “2395” is the clock frequency of %P0 and “1596” is the clock frequency of %P7. Please note that “%USED” is based on the base (%P0) of your CPU. %UTIL is the utilization in it’s current state (%Px), so in this case that could be 40% of %P7 (1596) which is 638.
  • In the “Device Display” there are new stats starting with “F”, for example FCMDs, these show the failed I/Os. Fairly quick way to see if there are any I/O errors.
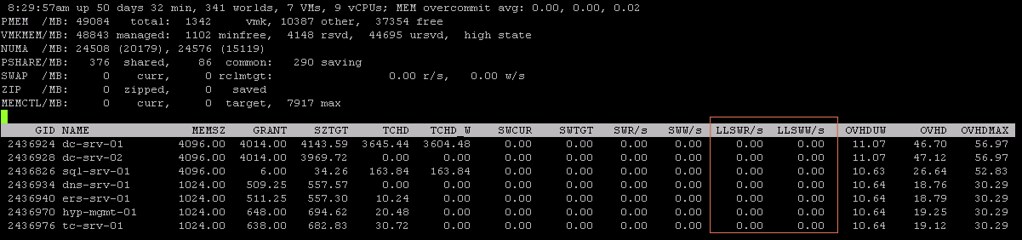
  • These two new counters in the “Memory Display”, LLSWR/s / LLSWW/s, show the amount of memory being written to host cache or read from host cache. Useful when you have enabled this feature and want to know if it is actively being used. Of course there are also vCenter stats for this one.

I love esxtop, with 5.0 is has become even better and especially “%VMWAIT” and the PSTATE details will come in handy at some point in time!

Top 10 books sold at VMworld US

Duncan Epping · Sep 10, 2011 ·

Top 10 books sold at the VMworld Bookstore. First of all congrats to everyone who made the top-10! I guess you can say we are really happy with this result especially because we don’t have a huge publisher helping with advertizement/distribution. Go Self-Publishing! Go DIY!

  1. vSphere 5 Clustering Tech Deepdive (Self Publishing)
  2. Admin VMware SRM Pre-­Publishing (VMware Press)
  3. VMware vSphere PowerCLI Reference (Wiley)
  4. VMware vSphere Design (Wiley)
  5. Cloud Comp w VMware vCloud Director (Usenix)
  6. vSphere 5 DVD Training (TrainSignal)
  7. Cloud Virtual Data Storage Networking (Taylor & Francis)
  8. VCP VMware Certification for vSphere 4 (McGraw Hill)
  9. Managing VMware Infrastructure w Win PowerShell (Sapien)
  10. VCP4 Exam Cram (Pearson)

I want to thank DigitalGuru.com for giving us the opportunity to sell our book at VMworld.

VMworld Labs 2011….

Duncan Epping · Aug 28, 2011 ·

This morning I stopped by at the Labs and the Lab team was working full pace on getting the labs done. They were testing the labs and each and every station to guarantee a great experience. Last year I reported extensively on the Lab as I was one of the Lab Captains. This year I am not a Lap Captain as I have too many sessions scheduled but I do want to inform you about the labs as I feel it is one of the coolest things at VMworld.

First of all lets start with the hours, there’s 50 hrs of Labs this year:

  • Sunday, Aug. 28th  –  2:00pm – 8:00pm
  • Monday, Aug. 29th  –  7:00am – 3:00pm and 5:00pm – 8:00pm
  • Tuesday, Aug. 30th  –  10:00am – 10:00pm
  • Wednesday, Aug. 31st  –  7:00am – 7:00pm
  • Thursday, Sept. 1st  –  7:00am – 4:00pm

So if you are here on Sunday, get registered and get a couple of Labs done before everyone else will. For those who did the labs last year (of before) they made some changes. The labs are not around a specific feature or product anymore they are all scenario based.  That means that it is more real life and less artificial and I am certain you will enjoy it.

Last year we had impressive numbers:

  • 480 lab seat, 44 lab hours, 21,120 lab seat hours
  • 15,344 labs completed
  • 145,097 VMs deployed

This year we are aiming a lot higher:

  • 480 lab seats, 50 lab hours, 24,000 lab seat hours
  • Targets – 18,000 to 20,000 labs completed
  • Targets – 225,000 to 250,000 VMs deployed

Just read that again…. 18,000 labs and 225,000 VMs deployed is the lower-end of the target. That is massive… H u g e!

Another huge difference is that last year we had “Hybrid” Cloud setup. Basically running in the cloud with resources available locally if needed. We never used it and based on that a new direction was taken. This is what we call a geographically distributed Public Cloud model. Terramark, Colt and Switch Supernap are providing the resources required for this environment. The cool thing though about Switch Supernap is that they are based out of Las Vegas and you can actually get a free tour of their datacenter this week. I’ve seen many cool datacenters but the Switch Supernap is probably the coolest I have seen. Check the following pictures for an impression, and if you are interested in the free tour email this adress: vmworldswitchtour@switchnap.com. They will also provide transportation etc!

Make sure to stop by at the VMworld Labs and get a couple of the labs done. I guarantee you will enjoy it. It is not only a great way to discover products and features but it is just a great experience in general. Be there, and remember that just last like year there’s contest again … The person who does the most labs wins  free VMworld 2012 ticket, last year someone completed all of them and then started doing the ones he liked the most again. If you want to win you will need to start tomorrow (Sunday) and just keep going, have fun and enjoy!

Using vSphere 5 auto-deploy in your home lab

Duncan Epping · Aug 25, 2011 ·

I was just playing around with auto-deploy and I figured I would quickly scribble down the steps required to configure it. The documentation is okay but it often refers me back and forth in the document which makes it difficult to read at times. Here is what I did to get it working. I was in doubt if I would add screenshots, but that would make this article fairly lengthy and I am sure that most of you wouldn’t need it any way. I have my complete lab virtualized at home, so this whole setup is running in VMware Workstation.

  • Download vCenter Server 5
  • Download the ESXi 5.0 Offline Bundle
  • Install vCenter Server 5
  • Install Powershell 2.0 (installed it on the vCenter Server)
  • Install PowerCLI (installed it on the vCenter Server)
  • Install Auto-deploy (also located on vCenter iso) (installed it on the vCenter Server)
  • Install TFTP Server (I used Solarwinds) (installed it on the vCenter Server)
    • Click “File” and “Configure” and start the TFTP Server
    • A folder C:\TFTP-Root will be created
    • Make sure if you are running this on Windows that the Firewall is open for TFTP
  • Open up your vCenter Client
  • Go to the Home screen and click “Auto Deploy”
  • Click “Download TFTP Boot Zip”
    • I temporarily disabled IE ESC to be able to quickly download the zip file (Control Panel –> Add / Remove Programs –> Turn Windows Features On/Off –> Look for “Configure IE ESC in the Security Information section)
  • Unzip the TFTP Boot Zip file in your TFTP-Root folder
  • Copy the location of “BIOS DHCP File Name as mentioned in your Auto Deploy screen. This will be “undionly.kpxe.vmw-hardwired”.
  • Go to your DHCP Server and add the filename and the ip address of the
    • In my case this is what I added to the advanced settings in my Tomato Router/DHCP server:
      dhcp-boot=undionly.kpxe.vmw-hardwired,,192.168.1.45
    • In the case of a MS DHCP Server you will need to follow this MS KB article. (#66 and #67 should be sufficient)
  • Now it should be possible to boot your host, however you should see a screen that tells you that there no ESXi image associated yet. Now we need to do some PowerCLI magic…
  • First of all we will need to set the execution policy to “remotesigned” if you haven’t done so already, in my case I haven’t as this is a brand new installed Windows VM:
    Set-ExecutionPolicy RemoteSigned
  • Now you can open up PowerCLI and connect to your vCenter Server:
    Connect-VIServer <vcenter name>
  • Next we will need to add a software depot, this is the Offline Bundle file you downloaded at the beginning:
    Add-EsxSoftwareDepot c:\tmp\VMware-ESXi-5.0.0-469512-depot.zip
  • Now that you’ve added the depot you will need to identify the ImageProfile you wan to use. Run the following command to list the image profiles:
    Get-EsxImageProfile
  • In my case it returns the following:
    Name
    ——-
    ESXi-5.0.0-469512-no-tools ….
    ESXi-5.0.0-469512-standard ….
  • We will use the “Standard” image profile as we want to be able to install VMware Tools as well through vCenter. In order to use it we will need to define a rule. This basically tells the client which image it should pick up during the PXE Boot. No key thing with this command is the “-Pattern” as that basically defines which machines will get boot the image. In my case everything is running within VMware Workstation and the vendor will always be “VMware Virtual Platform” so I decided to use that is the identifier for this specific rule.
    New-DeployRule –Name “FirstTimeBoot” –Item “ESXi-5.0.0-469512-standard” –Pattern “model=VMware Virtual Platform”
  • This will take a while as it is unzipping and uploading the required packages. When it has successfully completed we will need to make this deploy rule active:
    Add-DeployRule -DeployRule FirstTimeBoot
  • That’s it, now the host should be able to boot up using the assigned image profile. See the screenshot below of my PXE booted ESXi host within VMware Workstation
    Using vSphere 5 auto-deploy in your home lab

Now if you would go to vCenter and check your Datacenter you will see a host appearing. This host however will still need to be configured and that is the second portion of this exercise…

What we creating here is a stateless configuration. That means we will need to use host profiles in order to configure this host correctly after reach reboot. These are the steps I took to create a host profile for my Lab hosts:

  • Configure the host as needed. Don’t forget things like NTP, Storage, Networking, Scratch etc.
  • Go to Host Profiles
  • Create a New Profile from an existing host
  • Select the host you just configured
  • Give it a name that you will remember, I used “ESXiLabHostProfile”
  • After creating the host profile you will need to attach the host to the profile and check for compliancy. This test should fail as you will need to create an answer file first.
    • Right click the host and select “Update Answer File”
    • Check all settings (ip-address etc) and when finished click “update”
    • Right click the host and select “Check Answer File”, result should be “x”
    • Select the host and click “Check Compliance”, result should be “compliant”
  • Before we will create a new deploy rule we will want to add the HA depot and create a new image profile which includes the HA agent as we will want our hosts to be part of that. If you don’t add it the “new-deployrule” statement will throw a message that you will need to add it. First we will add the vSphere HA depot. The ip-address should of course be replace with the ip-address of your own vCenter server:
    Add-EsxSoftwareDepot http://192.168.1.45:80/vSphere-HA-depot
  • Now we will need to clone the ESXi Standard depot and add the HA agent to it:
    New-EsxImageProfile -CloneProfile ESXi-5.0.0-469512-standard -name “ESXiHA”
    Add-EsxSoftwarePackage -ImageProfile “ESXiHA” -SoftwarePackage vmware-fdm
  • Now we will create a new deploy rule and associate it with the just created host profile called “ESXiLabHostProfile”. We will also directly enable this new rule. Note that “HA-DRS” is the name of my cluster in this case. First we will remove the old rule to make sure we start with a clean slate:
    Remove-DeployRule -DeployRule FirstTimeBoot -delete
    New-DeployRule –Name “ProductionBootRule” –Item “ESXiHA”, ESXiLabHostProfile, HA-DRS –Pattern “model=VMware Virtual Platform”
    Add-DeployRule -DeployRule “ProductionBootRule”
  • Now you can restart the ESXi host and it should end up in the cluster (HA-DRS) with the correct host profile (ESXiLabHostProfile) and completely configured ready for action! (Note that for the next host you will need to create the answer file as well initially for it to work correctly.)

That’s it for today… Hope it helps, I had a lot of fun exploring this cool new feature! I love it but boy do I feel like a n00b playing around with PowerCLI after having seen some of Alan‘s or Luc‘s magic. Gabe also has a nice article on this topic… check it out, worth reading!


Changelog:
Edit 1: Changed naming scheme

What’s new?

Duncan Epping · Jul 20, 2011 ·

I had a lot of trouble finding the vSphere 5.0 What’s New whitepapers so I figured I would list all of them as I probably wouldn’t be the only one finding it challenging to get all of these. These are useful to quickly scan what has been introduced for a specific category. I would recommend reading these as it will give you a better understanding of what is coming up!

  • What’s New in vSphere 5.0
  • What’s New in VMware vSphere 5.0: VMware vCenter
  • What’s New in VMware vSphere 5.0: Platform Whitepaper
  • What’s New in VMware vSphere 5.0: Performance Whitepaper
  • What’s New in VMware vSphere 5.0: Storage Whitepaper
  • What’s New in VMware vSphere 5.0: Networking Whitepaper
  • What’s New in VMware vSphere 5.0: Availability Whitepaper
  • What’s New in VMware Data Recovery 2.0 Technical Whitepaper
  • VMware vSphere Storage Appliance Technical Whitepaper
  • What’s New in VMware vCenter Site Recovery Manager 5 Technical Whitepaper
  • What’s New in VMware vCloud Director 1.5 Technical Whitepaper
  • « Go to Previous Page
  • Page 1
  • Interim pages omitted …
  • Page 81
  • Page 82
  • Page 83
  • Page 84
  • Page 85
  • Interim pages omitted …
  • Page 123
  • Go to Next Page »

Primary Sidebar

About the Author

Duncan Epping is a Chief Technologist and Distinguished Engineering Architect at Broadcom. Besides writing on Yellow-Bricks, Duncan is the co-author of the vSAN Deep Dive and the vSphere Clustering Deep Dive book series. Duncan is also the host of the Unexplored Territory Podcast.

Follow Us

  • X
  • Spotify
  • RSS Feed
  • LinkedIn

Recommended Book(s)

Advertisements


Copyright Yellow-Bricks.com © 2025 · Log in