• Skip to primary navigation
  • Skip to main content
  • Skip to primary sidebar

Yellow Bricks

by Duncan Epping

  • Home
  • Unexplored Territory Podcast
  • HA Deepdive
  • ESXTOP
  • Stickers/Shirts
  • Privacy Policy
  • About
  • Show Search
Hide Search

virtual san

Check your VSAN disk controllers against the HCL with PowerCLI

Duncan Epping · Feb 24, 2016 ·

Every now and then customers ask if it is possible to check if disk controllers are on the VSAN HCL (Or VMware Compatibility Guide (VCG) as it is actually called these days) for a given set of hosts through PowerCLI. Alan Renouf figured he would knock something out, thanks Alan for sharing! (Next up would be validate drivers and firmware of all components, thanks!) What this script does is the following, note that you need internet access for this to work:

  • Connect to vCenter
  • Download latest VSAN HCL details (json file)
  • Compare controllers of each host against the VSAN HCL
  • Report the state of your infra

Here is the script, it can also be found in the VMware Developer Center repository by the way.

Connect-VIServer myvcenter -user Administrator -password MyPass23
 
 
Function Get-CompatibleVSANController {
    if (-Not $vSANHCL) {
        $vSANHCL = Invoke-WebRequest -Uri http://partnerweb.vmware.com/service/vsan/all.json | ConvertFrom-Json
    }
    $vSANHCL.data.controller
}
 
$HBAs = get-vmhost | Get-VMHostPciDevice | where { $_.DeviceClass -eq "MassStorageController" }
 
Foreach ($HBA in $HBAs) {
    $HBAFound = $false
    Write-Host "Looking for $($hba.name) from host $($HBA.VMhost)"
    Foreach ($entry in Get-CompatibleVSANController) {
        $vid = [String]::Format("{0:x}", $HBA.VendorId)
              $did = [String]::Format("{0:x}", $HBA.DeviceId)
              $svid = [String]::Format("{0:x}", $HBA.SubVendorId)
        $ssid = [String]::Format("{0:x}", $HBA.SubDeviceId)
        If (($vid -eq $entry.vid) -and ($did -eq $entry.did) -and ($svid -eq $entry.svid) -and ($ssid -eq $entry.ssid) ) {
            Write-Host " HBA in $($HBA.VMHost) is $($HBA.Name) which can be found in the HCL as $($Entry.vendor) - $($Entry.Model) at the following URL: `n $($entry.vcglink)" -ForegroundColor Green
            $HBAFound = $true
        }
    }
    If (-Not $HBAFound){
        Write-Host " $($HBA.Name) in $($HBA.VMHost) is not found!" -ForegroundColor Red
    }
}

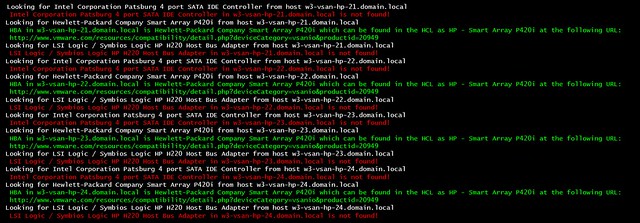
If you run it the output will look like this:

The 10% rule for VSAN caching, calculate it on a VM basis not disk capacity!

Duncan Epping · Feb 16, 2016 ·

Over the last couple of weeks I have been talking to customers a lot about VSAN 6.2 and how to design / size their environment correctly. Since the birth of VSAN we have always spoken about 10% cache to capacity ratio to ensure performance is where it needs to be. When I say 10% cache to capacity ratio, I should actually say the following:

The general recommendation for sizing flash capacity for Virtual SAN is to use 10% of the anticipated consumed storage capacity before the NumberOfFailuresToTolerate is considered.

Reality is though that what most customers did was they looked at their total capacity, cut it in half (FTT=1) and then said “we will take 10%” of that. So a 10TB VSAN Datastore would require “10% of 5TB” in terms of cache. This is fast way of indeed calculating what your caching requirements are… That is, if ALL of your virtual machines have the same “availability” requirements. Because even in 6.1 and prior the outcome would change if you had VMs which required FTT=2 or FTT=3 or even FTT=0. (Although I would not recommend FTT=0.)

With VSAN 6.2 this is amplified even more. Why? Well as you hopefully read, VSAN 6.2 introduces space efficiency functionality (for all-flash) like deduplication, compression, RAID-5 or RAID-6 over the network. The following diagram depicts what that looks like. In this case we show RAID-6 with 4 data blocks and 2 parity blocks, which is capable of tolerating 2 failures anywhere in the cluster of 6 hosts.

raid-6

If you look at the above, and take that old “FTT=1”  or “FTT=2” diagram in mind you quickly realize that the effective capacity per datastore is not as easy to calculate as it was in the past. Lets take a look at a simple example to show the impact which using certain data services can have on your design / sizing.

  • 1000 VMs with on average 50GB disk space required
  • 1000 * 50GB = 50TB

Lets take a look at both FTT=1 and FTT=2 with and without Raid-5/6 enabled. The calculations are pretty simple. Note that “FTT” stands for “Failures to Tolerate” and FTM stands for “Failure Tolerance Method”.

FTTFTMCalculationResult
1Raid-11000 VMs * 50GB * 2 (overhead)100TB
1Raid-5/61000 VMs * 50GB * 1.33 (overhead)66.5TB
2Raid-11000 VMs * 50GB * 3 (overhead)150TB
2Raid-5/61000 VMs * 50GB * 1.5 (overhead)75TB

Now if you look at the table, you will see there is a big difference between the capacity requirements for FTT=2 using RAID-1 and FTT=2 using RAID-5/6 even between the FTT=1 variations the difference is significant. You can imagine that when you base your required cache capacity simply on the required disk capacity that the math will be off. Assuming that the amount of hot data in all cases is 10% the difference could be substantial. However, when you base your cache requirements on the initial 10% of “1000* 50GB” the result never changes!

And in this case I haven’t even taken deduplication and compression in to account, you can imagine that with a data reduction of 2x using VSAN compression and deduplication that the math will change again for the caching tier, well that is if you do it wrong and calculate it based on the actual capacity layer… To summarize, when you do your VSAN design and sizing, make sure to always base it on the Virtual Machine size, it is the safest and definitely the easiest way to do the math!

For more details on RAID-5/6 and – or on Deduplication and Compression make sure to read Cormac’s excellent articles on these topics.

What’s new for Virtual SAN 6.2?

Duncan Epping · Feb 10, 2016 ·

Yes, finally… the Virtual SAN 6.2 release has just been announced. Needless to say, but I am very excited about this release. This is the release that I have personally been waiting for. Why? Well I think the list of new functionality will make that obvious.  There are a couple of clear themes in this release, and I think it is fair to say that data services / data efficiency is most important. Lets take a look at the list of what is new first and then discuss them one by one

  • Deduplication and Compression
  • RAID-5/6 (Erasure Coding)
  • Sparse Swap Files
  • Checksum / disk scrubbing
  • Quality of Service / Limits
  • In mem read caching
  • Integrated Performance Metrics
  • Enhanced Health Service
  • Application support

That is indeed a good list of new functionality, just 6 months after the previous release that brought you Stretched Clustering, 2 node Robo etc. I’ve already discussed some of these as part of the Beta announcements, but lets go over them one by one so we have all the details in one place. By the way, there also is an official VMware paper available here.

Deduplication and Compression has probably been the number one ask from customers when it comes to features requests for Virtual SAN since version 1.0. The Deduplication and Compression is a feature which can be enabled on an all-flash configuration only. Deduplication and Compression always go hand-in-hand and is enabled on a cluster level. Note that Deduplication and Compression are referred to as nearline dedupe / compression, which basically means that deduplication and compression happens during destaging from the caching tier to the deduplication tier.

VSAN 6.2

Now lets dig a bit deeper. More specifically, deduplication granularity is 4KB and will happen first and is then followed by an attempt to compress the unique block. This block will only be stored compressed when it can be compressed down to 2KB or smaller. The domain for deduplication is the disk group in each host. Of course the question then remains, what kind of space savings can be expected? It depends is the answer. In our environments, and our testing, have shown space savings between 2x and 7x. Where 7x arefull clone desktops (optimal situation) and 2x is a SQL database. Results in other words will depend on your workoad.

Next on the list is RAID-5/6 or Erasure Coding as it is also referred to. In the UI by the way, this is configurable through the VM Storage Policies and you do this through defining the “Fault Tolerance Method” (FTM). When you configure this you have two options: RAID-1 (Mirroring) and RAID-5/6 (Erasure Coding). Depending on how FTT (failures to tolerate) is configured when RAID-5/6 is selected you will end up with a 3+1 (RAID-5) configuration for FTT=1 and 4+2 for FTT=2.

VSAN RAID-6

Note that “3+1” means you will have 3 data blocks and 1 parity block, in the case of 4+2 this means 4 data blocks and 2 parity blocks. Note that again this functionality is only available for all-flash configurations. There is a huge benefit to using it by the way:

Lets take the example of a 100GB Disk:

  • 100GB disk with FTT =1 & FTM=RAID-1 set –> 200GB disk space needed
  • 100GB disk with FTT =1 & FTM=RAID-5/6 set –> 130.33GB disk space needed
  • 100GB disk with FTT =2 & FTM=RAID-1 set –> 300GB disk space needed
  • 100GB disk with FTT =2 & FTM=RAID-5/6 set –> 150GB disk space needed

As demonstrated, the space savings are enormous, especially with FTT=2 the 2x savings can and will make a big difference. Having that said, do note that the minimum number of hosts required also change. For RAID-5 this is 4 (remember 3+1) and 6 for RAID-6 (remember 4+2). The following two screenshots demonstrate how easy it is to configure it and what the layout looks of the data in the web client.


Sparse Swap Files is a new feature that can only be enabled by setting an advanced setting. It is one of those features that is a direct result of a customer feature request for cost optimization. As most of you hopefully know, when you create VM with 4GB of memory a 4GB swap file will be created on a datastore at the same time. This is to ensure memory pages can be assigned to that VM even when you are overcommitting and there is no physical memory available. With VSAN when this file is created it is created “thick” at 100% of the memory size. In other words, a 4GB swap file will take up 4GB which can’t be used by any other object/component on the VSAN datastore. When you have a handful of VMs there is nothing to worry about, but if you have thousands of VMs then this adds up quickly. By setting the advanced host setting “SwapThickProvisionedDisabled” the swap file will be provisioned thin and disk space will only be claimed when the swap file is consumed. Needless to say, but we only recommend using this when you are not overcommitting on memory. Having no space for swap and needed to write to swap wouldn’t make your workloads happy.

Next up is the Checksum / disk scrubbing functionality. As of VSAN 6.2 for every write (4KB) a checksum is calculated and stored separately from the data (5-byte). Note that this happens even before the write occurs to the caching tier so even an SSD corruption would not impact data integrity. On a read of course the checksum is validated and if there is a checksum error it will be corrected automatically. Also, in order to ensure that over time stale data does not decay in any shape or form, there is a disk scrubbing process which reads the blocks and corrects when needed. Intel crc32c is leveraged to optimize the checksum process. And note that it is enabled by default for ALL virtual machines as of this release, but if desired it can be disabled as well through policy for VMs which do not require this functionality.

Another big ask, primarily by service providers, was Quality of Service functionality. There are many aspects of QoS but one of the major asks was definitely the capability to limit VMs or Virtual Disks to a certain number of IOPS through policy. This simply to prevent a single VM from consuming all available resources of a host. One thing to note is that when you set a limit of 1000 IOPS VSAN uses a block size of 32KB by default. Meaning that when pushing 64KB writes the 1000 IOPS limits is actual 500. When you are doing 4KB writes (or reads for that matter) however, we still count with 32KB blocks as this is a normalized value. Keep this in mind when setting the limit.

When it comes to caching there was also a nice “little” enhancement. As of 6.2 VSAN also has a small in-memory read cache. Small in this case means 0.4% of a host’s memory capacity up to a max of 1GB. Note that this in-memory cache is a client side cache, meaning that the blocks of a VM are cached on the host where the VM is located.

Besides all these great performance and efficiency enhancements of course a lot of work has also been done around the operational aspects. As of VSAN 6.2 no longer do you as an admin need to dive in to the VSAN observer, but you can just open up the Web Client to see all performance statistics you want to see about VSAN. It provides a great level of detail ranging from how a cluster is behaving down to the individual disk. What I personally feel is very interesting about this performance monitoring solution is that all the data is stored on VSAN itself. When you enable the performance service you simply select the VSAN storage policy and you are set. All data is stored on VSAN and also all the calculations are done by your hosts. Yes indeed, a distributed and decentralized performance monitoring solution, where the Web Client is just showing the data it is provided.

Of course all new functionality, where applicable, has health check tests. This is one of those things that I got used to so fast, and already take for granted. The Health Check will make your life as an admin so much easier, not just the regular tests but also the pro-active tests which you can run whenever you desire.

Last but not least I want to call out the work that has been done around application support, I think especially the support for core SAP applications is something that stands out!

If you ask me, but of course I am heavily biased, this release is the best release so far and contains all the functionality many of you have been asking for. I hope that you are as excited about it as I am, and will consider VSAN for new projects or when current storage is about to be replaced.

Virtual SAN, the leader in the hyper-converged market!

Duncan Epping · Jan 27, 2016 ·

I was just listening to the VMware earnings call, and needless to say that I was very excited hearing all the great news about Virtual SAN. When I talk to customers this is something that comes up every now and then, they want to know where we stand in the market. I figured I would share what was stated by Carl Eschenbach and Pat Gelsinger at the 2015 Q4 earnings call:

Summarizing a few other product areas, our hyper-converged offerings based on VMware Virtual SAN experienced significant traction. Specifically, our Virtual SAN business saw successes across a wide variety of industries, market segments, and geos. In Q4, total VSAN bookings grew nearly 200% year-over-year, and customer count has increased to over 3,000 versus over 1,000 a year ago. We are now well over $100 million annual run rate per total bookings.

With our next release of VSAN in Q1, we expect our momentum to build given the powerful new enterprise capabilities, the product brings to market. Taking into account, the hardware associated with running the Virtual SAN software and our current booking to run rate, we believe we are the industry leader in the hyper-converged offerings measured both by software and as an appliance.

And the best is yet to come… New version is around the corner, and I can’t wait for it to be released. Make sure to sign up for the launch events! (or attend one of the many VMUGs the upcoming months, I will personally be presenting in Newcastle, Johannesburg, Durban, Capetown and Den Bosch)

Rebuilding failed disk in VSAN versus legacy storage

Duncan Epping · Jan 26, 2016 ·

This is one of those questions that comes up every now and then, I have written about this before, but it never hurts to repeat some of it. The comment I got was around rebuild time of failed drives in VSAN, surely it takes longer than with a “legacy” storage system. The answer of course is: it depends (on many factors).

But what does it depend on? Well it depends on what exactly we are talking about, but in general I think the following applies:

With VSAN components (copies of objects, in other words copies of data) are placed across multiple hosts, multiple diskgroups and multiple disks. Basically if you have a cluster of lets say 8 hosts with 7 disks each and you have 200 VMs then the data of those 200 VMs will be spread across 8 hosts and 56 disks in total. If one of those 56 disks happens to fail then the data that was stored on that disk would need to be reprotected. That data is coming from the other 7 hosts which is potentially 49 disks in total. You may ask, why not 55 disks? Well because replica copies are never stored on the same hosts for resiliency purposes, look at the diagram below where a single object is split in to 2 data components and a witness, they are all located on different hosts!

We do not “mirror” disks, we mirror the data itself, and the data can and will be place anywhere. This means that when a failure has occurred of a disk within a diskgroup on a host all remaining disk groups / disk / hosts will be helping to rebuild the impacted data, which is 49 disks potentially. Note that not only will disks and hosts containing impacted objects help rebuilding the data, all 8 hosts and 55 disks will be able to receive the replica data!

Now compare this to a RAID set with a spare disk. In the case of a spare disk you have 1 disk which is receiving all the data that is being rebuild. That single disk can only take an X number of IOPS. Lets say it is a really fast disk and it can take 200 IOPS. Compare that to VSAN… Lets say you used really slow disks which only do 75 IOPS… Still that is (potentially) 49 disks x 75 IOPS for reads and 55 disks for writes.

That is the major difference, we don’t have a single drive as a designated hot spare (or should I say bottleneck?), we have the whole cluster as a hot spare! As such rebuild times when using similar drives should always be faster with VSAN compared to traditional storage. 

  • « Go to Previous Page
  • Page 1
  • Interim pages omitted …
  • Page 11
  • Page 12
  • Page 13
  • Page 14
  • Page 15
  • Interim pages omitted …
  • Page 36
  • Go to Next Page »

Primary Sidebar

About the Author

Duncan Epping is a Chief Technologist and Distinguished Engineering Architect at Broadcom. Besides writing on Yellow-Bricks, Duncan is the co-author of the vSAN Deep Dive and the vSphere Clustering Deep Dive book series. Duncan is also the host of the Unexplored Territory Podcast.

Follow Us

  • X
  • Spotify
  • RSS Feed
  • LinkedIn

Recommended Book(s)

Also visit!

For the Dutch-speaking audience, make sure to visit RunNerd.nl to follow my running adventure, read shoe/gear/race reviews, and more!

Do you like Hardcore-Punk music? Follow my Spotify Playlist!

Do you like 80s music? I got you covered!

Copyright Yellow-Bricks.com © 2026 · Log in