• Skip to primary navigation
  • Skip to main content
  • Skip to primary sidebar

Yellow Bricks

by Duncan Epping

  • Home
  • Unexplored Territory Podcast
  • HA Deepdive
  • ESXTOP
  • Stickers/Shirts
  • Privacy Policy
  • About
  • Show Search
Hide Search

esxi

vSphere 5.0: ESXCLI

Duncan Epping · Jul 18, 2011 ·

Many of us have been logging in to the ESX console for ages and have (ab)used the esxcfg-* commands on a regular basis. We’ve used them in scripts and during troubleshooting and all of that is about to change… vSphere 5.0 introduces a new command line utility: esxcli.

Some of you will say “Hey esxcli was already available before 5.0”, and yes you are correct it was around however it has been completely revamped, it feels different… it is different, hence I said “new”. A unified command is most definitely the direction we are heading in and as such it is of utmost importance that you get familiarized with it. Although the esxcfg-* commands are still available they have been deprecated and as such no longer supported.

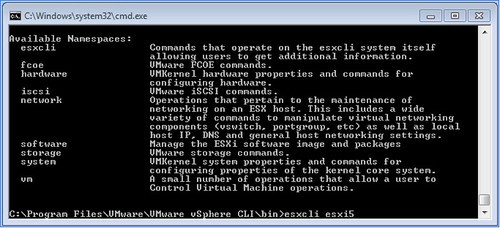
What has changed? Well very simple many new name spaces have been introduced and the namespace that were already in there moved up a layer to allow for a more scalable and flexible tool. Under the “root” of esxcli there are the following namespaces:

So how are these constructed?

esxcli [dispatcher options] <namespace> [<namespace> …] <cmd> [cmd options]

With dispatcher options we are referring to the ability to connect to a remote host for instance but also with a different username/password. Namespaces is mentioned twice as namespaces can actually be nested and use a drill down approach as I would like to call it. Cmd options refers to the command that needs to be executed to this namespace, this could be “get”, “list” or “set”.

I guess most namespaces actually make a lot of sense. Lets give a couple of example to show the power of esxcli:

  • Add a portgroup to a vSwitch –> esxcli network vswitch standard portgroup add –portgroup-name=<portgroup> –vswitch-name=<vSwitch>
  • List all storage devices –> esxcli storage nmp device list
  • Add a dns-server –> esxcli network ip dns server add –server=<dns server name or ip>
  • Add an nfs-share –> esxcli filesystem nfs add –host=<host_name> –share=<share_name> –volume=<volume_name>
  • Change MTU of vmkernel interface –> esxcli network ip interface set -m <mtu size> -i <interface_name>

It is all fairly straight forward as you’ve seen, but I have found myself lost in the trenches of esxcli already a couple of times. If this happens to you remember that you can also list all namespaces very simply by doing the following:

  • esxcli esxcli command list

For more detailed and in-depth info check this excellent article by William Lam.

PXE Manager Fling blog series

Duncan Epping · Jul 11, 2011 ·

One of the upcoming blogs which I really enjoy reading is Arent Consulting by Tom Arentsen. I know Tom for a while as I have been involved with some of his projects and he really knows what he is talking about and is a nice guy. I just noticed his series of articles on the PXE Manager fling and felt that it deserved more attention than it has been getting so far.

PXE Manager is a great fling which enables enables ESXi host state (firmware) management and provisioning. It is probably my favorite fling and I most definitely recommend reading the following articles to get a better understanding of how it works and how it can help you migrating to ESXi or simplifying your ESXi environment!

  • PXE Manager Part 0 – Introduction
  • PXE Manager Part I – PXE Manager Installation
  • PXE Manager Part II – PXE Agent Installation
  • PXE Manager Part III – Configuration of PXE Manager
  • PXE Manager Part IV – Add a driver into the ESXi image (oem.tgz)
  • PXE Manager Part V – Add a Stateful ESXi Host
  • PXE Manager Part VI – How does it work

If you have some spare time on your hands, read the article and play around with the Fling.

Migrating your 32-bit vCenter Server to 64-bit

Duncan Epping · Jul 4, 2011 ·

I am working on a whitepaper about vCenter Server migrations and stumbled upon this great tool which is hidden away on the vCenter install media called “datamigration”. The data migration tool allows you to backup a vCenter Server configuration which is hosted by the MS SQL Express databases that is packaged with vCenter. Now this might seem like a limited scenario but I bet many people start out using the Express database that comes with vCenter using a 32-bit OS and found themselves more or less locked in. If you are still using 4.0 with a 32-bit platform, this is your way out. It is fairly straight forward if I may say so. The beauty of it all is that you can keep your current vCenter config, be it disabled… but you always have a roll back option might it be needed.

  • Build a new 64-bit vCenter Server
  • Download the vCenter zip or ISO
  • Go to the “datamigration” folder and copy/extract the datamigration.zip.
  • Copy the extracted content to your “source” vCenter Server
  • Stop the vCenter Service, Update Management Service and the vCenter Web Service
  • Run  “backup.bat” under the datamigration folder from a Command Prompt
    • One decision that you need to make is if you want to backup all Host patches as well, I prefer to just download them again
  • When the process has completed copy the full “datamigration” folder to your new vCenter server
  • Run  “install.bat” under the datamigration folder from a Command Prompt
    • It will display the name of the vCenter Server you are about to “restore”, validate it and type Y
    • Provide the path to the vCenter install files
    • Provide the path to the VUM install files (probably same as previous step)
    • Now just follow the normal installation process
    • You will see an installer popping up, note that in the Command Prompt window the databases will be restored etc.
    • Takes roughly 15 minutes depending on the amount of data
  • Start the vSphere Client… done,

Is that simple or what? I was kind of amazed by this to be honest, very simple and effective tool to migrate to a new 64-bit vCenter Server while keeping your Events, Tasks, Resource Pools etc… it is all there. Use it to your advantage,

Disk.SchedNumReqOutstanding the story

Duncan Epping · Jun 23, 2011 ·

There has been a lot of discussion in the past around Disk.SchedNumReqOutstanding and what the value should be and how it relates to the Queue Depth. Jason Boche wrote a whole article about when Disk.SchedNumReqOutstanding (DSNRO) is used and when not and I guess I would explain it as follows:

When two or more virtual machines are issuing I/Os to the same datastore Disk.SchedNumReqOutstanding will limit the amount of I/Os that will be issued to the LUN.

So what does that mean? It took me a while before I fully got it, so lets try to explain it with an example. This is basically how the VMware IO scheduler (Start-Time Fair Scheduling aka SFQ) works.

You have set your queue depth for your HBA to 64 and a virtual machine is issuing I/Os to a datastore. As it is just a single VM up to 64 IOs will then end up in the device driver immediately. In most environments however LUNs are shared by many virtual machines and in most cases these virtual machines should be treated equally. When two or more virtual machines issue I/O to the same datastore DSNRO kicks in. However it will only throttle the queue depth when the VMkernel has detected that the threshold of a certain counter is reached. The name of this counter is Disk.SchedQControlVMSwitches and by default it is set to 6, meaning that the VMkernel will need to have detected 6 VM switches when handling I/O before it will throttle the queue down to the value of Disk.SchedNumReqOutstanding, by default 32. (VM Switches means that it will need to detect 6 times that the selected I/O is not coming from the same VM as the previous I/O.)

The reason the throttling happens is because the VMkernel cannot control the order of the I/Os that have been issued to the driver. Just imagine you have a VM A issuing a lot of I/Os and another, VM B, issuing just a few I/Os. VM A would end up using most of the full queue depth all the time. Every time VM B issues an I/O it will be picked quickly by the VMkernel scheduler (which is a different topic) and sent to the driver as soon as another one completes from there, but it will still get behind the 64 I/Os already in the driver, which will add significantly to it’s I/O latency. By limiting the amount of outstanding requests we will allow the VMkernel to schedule VM B’s I/O sooner in the I/O stream from VM A and thus we reduce the latency penalty for VM B.

Now that brings us to the second part of all statements out there, should we really set Disk.SchedNumReqOutstanding to the same value as your queue depth? Well in the case you want your I/Os processed as quickly as possible without any fairness you probably should. But if you have mixed workloads on a single datastore, and wouldn’t want virtual machines to incur excessive latency just because a single virtual machine issues a lot if I/Os, you probably shouldn’t.

Is that it? No not really, there are several questions that remain unanswered.

  • What about sequential I/O in the case of Disk.SchedNumReqOutstanding?
  • How does the VMkernel know when to stop using Disk.SchedNumReqOutstanding?

Lets tackle the sequential I/O question first. The VMkernel will allow by default to issue up to 8 sequential commands (controlled by Disk.SchedQuantum) from a VM in a row even when it would normally seem more fair to take an I/O from another VM. This is done in order not to destroy the sequential-ness of VM workloads because I/Os that happen to sectors nearby the previous I/O are handled by an order of magnitude (10x is not unusual when excluding cache effects or when caches are small compared to the disk size) faster than an I/O to sectors far away. But what is considered to be sequential? Well if the next I/O is less than 2000 sectors away from the current the I/O it is considered to be sequential (controlled by Disk.SectorMaxDiff).

Now if for whatever reason one of the VMs becomes idle you would more than likely prefer your active VM to be able to use the full queue depth again. This is what Disk.SchedQControlSeqReqs is for. By default Disk.SchedQControlSeqReqs is set to 128, meaning that when a VM has been able to issue 128 commands without any switches Disk.SchedQControlVMSwitches will be reset to 0 again and the active VM can use the full queue depth of 64 again. With our example above in mind, the idea is that if VM B is issuing very rare IOs (less than 1 in every 128 from another VM) then we still let VM B pay the high penalty on latency because presumably it is not disk bound anyway.

To conclude, now that the coin has finally dropped on Disk.SchedNumReqOutstanding I strongly feel that the advanced settings should not be changed unless specifically requested by VMware GSS. Changing these values can impact fairness within your environment and could lead to unexpected behavior from a performance perspective.

I would like to thank Thor for all the help he provided.

Ephemeral ports?

Duncan Epping · Jun 2, 2011 ·

A couple of days ago one of my colleagues released an article about Ephemeral Ports. The article explains about how Ephemeral ports could be used as a “backup” when vCenter is down. The summary of the article is in my opinion the paragraph I quoted below.

If the inability to quickly provision a new VM or to reconnect a vNIC while vCenter Server is unavailable has kept you from considering a pure vDS network architecture, ephemeral port groups may be a suitable safety net.  You would not even need to use ephemeral port groups for production virtual networks — simply create a few to have as backups for accessing the most critical VLANs.

This started a discussion internally as the default setting is not Ephemeral but Static. So the question that this resulted in was should we define a new standard or are the “Static” port binding just as good as Ephemeral? I believe that many people are hesitant of using a pure vDS infrastructure due to the inability to make changes to the vDS when vCenter would be unavailable. This applies to both ephemeral and static however and actually leads to another point, which we won’t discuss now, vCenter resiliency. Now, from a virtual machine perspective even if vCenter is down, and Static is used as the port bindings, the virtual machine can be powered on and off. With Static all ports are pre-defined on the host level and when a virtual machine is assigned a port it can consume it. Now the difference between Ephemeral and Static is that Ephemeral allows you to assign “new ports” to new virtual nics or virtual machines. I guess the question is how often do you make changes to the network of your virtual machines when vCenter is down and what type of changes?

Seriously, do we really want to make substantial changes to our environment when our management platform is not available? I believe we shouldn’t and I also feel that Static portgroups are the way forward, they have more or less the same level of flexibility Ephemeral have and on top of that Static offers a lot of advantages from a scaling perspective!

  • « Go to Previous Page
  • Page 1
  • Interim pages omitted …
  • Page 8
  • Page 9
  • Page 10
  • Page 11
  • Page 12
  • Interim pages omitted …
  • Page 66
  • Go to Next Page »

Primary Sidebar

About the Author

Duncan Epping is a Chief Technologist and Distinguished Engineering Architect at Broadcom. Besides writing on Yellow-Bricks, Duncan is the co-author of the vSAN Deep Dive and the vSphere Clustering Deep Dive book series. Duncan is also the host of the Unexplored Territory Podcast.

Follow Us

  • X
  • Spotify
  • RSS Feed
  • LinkedIn

Recommended Book(s)

Also visit!

For the Dutch-speaking audience, make sure to visit RunNerd.nl to follow my running adventure, read shoe/gear/race reviews, and more!

Do you like Hardcore-Punk music? Follow my Spotify Playlist!

Do you like 80s music? I got you covered!

Copyright Yellow-Bricks.com © 2026 · Log in