In episode 30 we spoke with Alan Renouf about the potential future of edge deployments, aka Project Keswick. We figured we also need to cover what is available today in the form of VMware Edge Compute Stack, so we invited Marilyn Basanta who is the Senior Director at VMware for Edge! Marilyn explains what the VMware Edge Compute Stack looks like, what customer use cases she encounters in the field, and how VMware Edge Compute Stack can help you run and deploy applications securely and efficiently in remote, and sometimes strange, locations. You can listen via Spotify – spoti.fi/3WWNIKu , Apple – apple.co/3hEFu9L, or use the embedded player below!
Server
Can you exceed the number of FT enabled vCPUs per host or number of FT enabled vCPUs per VM?
Not sure why, but the last couple of weeks I have had several questions about FT (Fault Tolerance). The questions where around the limits, what is the limit per VM, what is the limit per host, and can I somehow exceed these? All of this is documented by VMware, but somehow seems to be either difficult to find or difficult to understand. Let me write a short summary that hopefully clarifies things.
First of all, the license you use dictates the maximum number of vCPUs a VM can have when enabling FT on that VM:
- vSphere Standard and Enterprise. Allows up to 2 vCPUs
- vSphere Enterprise Plus. Allows up to 8 vCPUs
Now, there are also two other things that come into play. You can have a maximum of 4 FT enabled VMs per host, and a maximum of 8 FT enabled vCPUs per host. You can change these settings, this is fully supported as I already discussed in this blog post. There is however a caveat, while VMware has tested with a higher number of FT enabled VMs per host than 4, and with a high number of FT enabled vCPUs, there’s no guarantee that you will get acceptable performance. The more you increase these default values, the bigger the chance that there will be a performance impact.
When FT is enabled a significant amount of communication between hosts (Primary / Shadow VM) needs to occur to ensure the VMs are in lockstep. This overhead can cause a slowdown, and this is the reason why we have those limitations in place. If you have sufficient networking bandwidth and CPU capacity then you can increase these numbers. Note, typically VMware development does not test beyond the maximum specified numbers. If performance is impacted, or you receive unexpected errors/results, and you contact support then support may request to lower the numbers as that impact can unfortunately not be solved in a different way. I hope that clarifies it.
Unexplored Territory Podcast 29 – What is vSphere Distributed Services Engine? Featuring Parag Chakraborty!
At VMware Explore I was very intrigued by the sessions on vSphere Distributed Services Engine. After the session I briefly was in touch with Parag Chakraborty, Senior Product Line Manager for vSphere Distributed Services Engine (Project Monterey), and asked him if he wanted to join our podcast. Parag was enthusiastic and that is noticeable in this recording if you ask me. In this episode, he explains what is introduced in vSphere 8.0 by VMware with the vSphere Distributed Services Engine, why VMware is building a solution for SmartNICs/DPUs, what the benefits and use cases are, and goes over some operational considerations when adopting this new technology. It does make me wonder what datacenter infrastructure will look like in 10 years! Listen now via Spotify (spoti.fi/3S5NH3o), Apple (apple.co/3TqeRTr), or below via the embedded player.
vSAN 8.0 ESA and Compression by default?
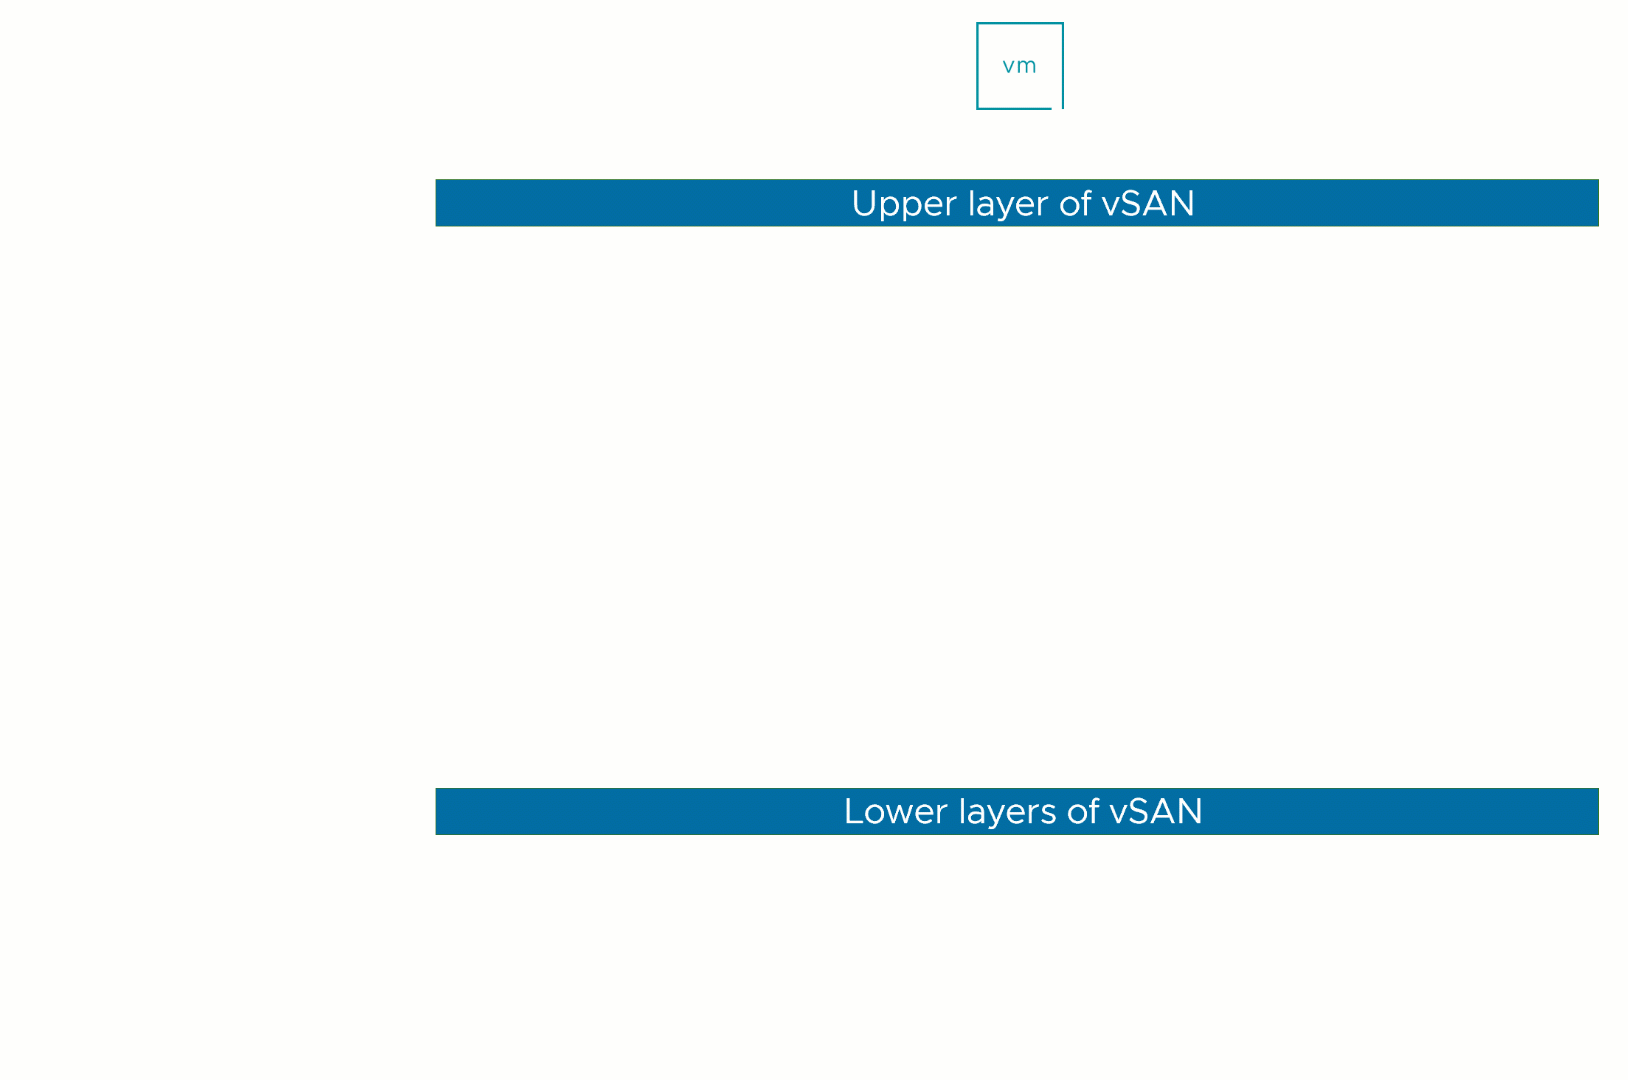
Starting with vSAN 8 ESA (Express Storage Architecture) how data services have been implemented has changed significantly compared to the Original Storage Architecture. In vSAN OSA compression (and deduplication) happens before the data is stored on disk on each of the hosts the data is stored on. With vSAN 8.0 ESA this has changed completely. With vSAN ESA compression actually happens all the way at the top of the architecture, as shown and explained in the diagram/slide below.

Now, the big benefit of course of this is that if you compress the data first, and you compress the data from let’s say 4K to 2K then only 2K needs to be sent over the network to all hosts where the data is being stored. Not only that, if data needs to encrypted then only 2KB needs to be encrypted, and of course when you checksum the data then also only 2KB needs to be checksummed. So what are the savings here when encryption is enabled on ESA vs OSA?
- Less data to send over the network
- Less data to encrypt when encryption is enabled
- Less data to checksum
- Compression only takes place on the source host, and not on the destination hosts, so a lower number of CPU cycles is used for each IO
Also, with vSAN ESA the granularity in terms of compression is also different than with vSAN OSA. With OSA vSAN would compress from 4KB down to 2KB and that is it. If it couldn’t compress down to 2KB then it would not compress the block. With vSAN ESA that has changed. vSAN ESA will aim to always compress, but of course, it needs to make sense. No point in compressing 4KB down to 3.8KB. And yes, vSAN ESA will also go beyond 2KB if possible. As mentioned above in the screenshot, theoretically it is possible to reach an 8:1 compression ratio per 4KB block.
Now, the other difference is that you enable/disable compression through policy. How do you do this? When you create a policy for ESA you have the options in Storage Rules as shown in the screenshot below, “No Preference” (Default), “No space efficiency”, “Compression only”, and “Deduplication and compression”.

Now, let’s be clear, “Deduplication and compression” is not an option for ESA as “Deduplication” has not been implemented just yet. When you configure either of the other three options the outcome is as follows:
- No preference – Compression enabled
- No space efficiency – Compression disabled
- Compression only – Compression enabled
Can you validate this? Yes, you can, and of course, I did to show you how that works. I created three policies with the above options selected for each respectively. I also created three VMs, with each of them having the appropriate policy selected as you can see in the screenshot below. VM_CompDisabled has the policy “Comp_Disabled” associated with it, and of course, that policy had “No space efficiency” selected.

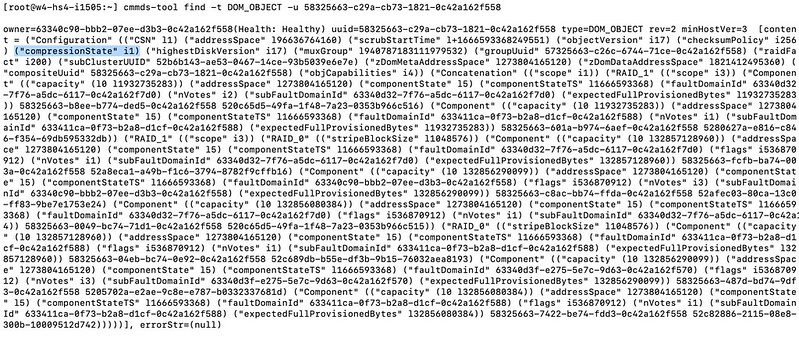
Now, where can you see if the object actually has compression enabled or disabled? Well, this is where it becomes a bit more complex, unfortunately (yes, I filed a feature request). If you want to validate it you will have to go to the command line and check the object itself. Simply copy the UUID you see in the screenshot above and use the command “cmmds-tool find -t DOM_OBJECT -u <UUID>“. When you run this command you will receive a lengthy output, and that output will contain the following string,("compressionState" i1), when compression is disabled.
One more thing I want to mention, as compression does not happen on a “physical” disk layer, or on the “disk group layer” as they do with vSAN OSA. If you switch between policies where compression is enabled/disabled, you will not see a massive rewrite of data occurring. When you switch from Disabled to Enabled only newly written data will be compressed! Same applies to when you switch back. Only newly written data will be impacted by the policy change.
For those who prefer to hear/see me going through the UI to disable compression on a per-VM basis, make sure to watch the below demo!
Running vSAN ESA? Change the default storage policy to RAID-5/6!
Most of you have read all about vSAN ESA by now. If you have not, you can find my article here, and a dozen articles on core.vmware.com by the Tech Marketing team. What is going to make a huge difference with the Express Storage Architecture is that you get RAID-5 efficiency at RAID-1 performance. This is discussed by Pete Koehler in this blog post in-depth, so no point in me reiterating it. On top of that, the animated gif below demonstrates how it actually works and shows why it not only performance well, but also why it is so efficient from a capacity stance. As we only have a single tier of flash, the system uses it in a smart way and introduces additional layers so that both reads and writes are efficient.
Now one thing I do want to point out is that if you create your ESA cluster, you will need to verify the default storage policy assigned to the vSAN Datastore. In my case this was the regular vSAN Storage Policy, which means RAID-1 configuration for the performance leg, and RAID-1 for the capacity leg. Now, I want to get the most of my system from a capacity perspective and I want to test this new level of performance for RAID-5, even though I only have 4 hosts (which gives me a 2+1 RAID-5 set).
Of course you can select a policy everytime you deploy a VM, but I prefer to keep things simple, so I change the default storage policy on my datastore. Simply click on the Datastore icon in the vSphere Client, then select your vSANDatastore and click on “Configure” and “General”. Next click on “Edit” where is says “Default Storage Policy” and then select the policy you want to have applied to VMs by default for this datastore. As shown below, for me that is RAID-5!
