• Skip to primary navigation
  • Skip to main content
  • Skip to primary sidebar

Yellow Bricks

by Duncan Epping

  • Home
  • Unexplored Territory Podcast
  • HA Deepdive
  • ESXTOP
  • Stickers/Shirts
  • Privacy Policy
  • About
  • Show Search
Hide Search

Data Recovery

vSphere HA restart times, how long does it actually take?

Duncan Epping · Mar 13, 2025 · Leave a Comment

I had a question today, and it was based on material I wrote years ago for the Clustering Deepdive. (read it here) The material talks about the sequence HA goes through when a failure has occurred. If you look at the sequence for instance where a “secondary” host has failed, it looks as follows:

  • T0 – Secondary host failure.
  • T3s – Primary host begins monitoring datastore heartbeats for 15 seconds.
  • T10s – The secondary host is declared unreachable and the primary will ping the management network of the failed secondary host. This is a continuous ping for 5 seconds.
  • T15s – If no heartbeat datastores are configured, the secondary host will be declared dead if there is no reply to the ping.
  • T18s – If heartbeat datastores are configured, the secondary host will be declared dead if there’s no reply to the ping and the heartbeat file has not been updated or the lock was lost.

So, depending on whether you have heartbeat datastores or not, this sequence takes either 15 or 18 seconds. Does that mean the VMs are then instantly restarted, and if so, how long does that take? Well no, they won’t instantly restart, because when this sequence has ended, the secondary host which has failed is actually declared dead. Now the potentially impacted VMs will need to be verified if they have actually failed, a list of “to be restarted” VMs will need to be created, and a placement request will need to be done.

The placement request will either go to DRS, or will be handled by HA itself, depending on whether DRS is enabled and if vCenter Server is available. After placement has been determined, the primary host will then request the individual hosts to restart the VMs which should be restarted. After the host(s) has received the list of VMs it needs to restart it will do this in batches of 32, and of course restart priority / order, will be applied. The whole aforementioned process can easily take 10-15 seconds (if not longer), which means that in a perfect world, the restart of the VM occurs after about 30 seconds. Now, this is when the restart of the VM is initiated, that does not mean that the VM, or the services it is hosting, will be available after 30 seconds. The power-on sequence of the VM can take anywhere from seconds, to minutes, depending of course on the size of the VM and the services that need to be started during the power-on sequence.

So, although it only takes 15 to 18 seconds for vSphere HA to determine and declare a failure, there’s much more to it, hopefully, this post provides a better understanding of all that is involved.

Why vSAN Max aka disaggregated storage?

Duncan Epping · Sep 6, 2024 · 2 Comments

At VMware Explore 2024 in Las Vegas I had many customer meetings. Last year my calendar was also swamped and one of the things we spend a lot of time on was explaining to customers where vSAN Max would fit into the picture. vSAN Max was originally positioned as a “storage only vSAN platform for petabyte scale use cases”. I guess this still somewhat applies, but since then a lot has changed.

First, the vSAN Max ReadyNode configurations have changed substantially, and you can start at a much smaller capacity scale than when originally launched. We start at 20TB for an XS ReadyNode configuration, which means that with a 4 node minimum you have 80TB. That is something completely different then the petabytes we originally discussed. The other big difference is also the networking requirements, depending on the capacity needs, those have also come down substantially.

Now was said, originally the platform was positioned as a solution for customers running at petabyte scale. The reason I wanted to write a quick blog is because that is not the main argument today customers have for adopting vSAN Max or considering vSAN Max in their environment. The reason is something I personally did not expect to hear, but it is all about operations and sometimes politics.

Why vSAN Max aka disaggregated storage?

In a traditional environment, of course, depending on the size, you typically see a separation of duties. You have virtualization admins, networking admins, and storage admins. We have worked hard over the past decade to try to create these full-stack engineers, but the reality is that many companies still have these silos, and they will likely still exist 20 years from now.

This is where vSAN Max can help. The HCI model typically means that the virtualization administrator takes on the storage responsibilities when they implement vSAN, but with vSAN Max this doesn’t necessarily need to be the case. As various customers mentioned last week, with vSAN Max you could have a fully separated environment that is managed by a different team. Funny how often this was brought up as a great use case for vSAN. Especially with the amount of vSAN capacity included in VCF this makes more and more sense!

You could even have a different authentication service connected to the vCenter Server, which manages your vSAN Max clusters! You could have other types of hosts, cluster sizes, best practices, naming schemes, etc. This will all be up to the team managing that particular euuh silo. I know, sometimes a silo is seen as something negative, but for a lot of organizations, this is how they operate, and prefer to operate for the foreseeable future. If so, vSAN Max can cater for that use case as well!

vSAN Data Protection, what can you do with it today?

Duncan Epping · Jul 2, 2024 · 13 Comments

Last week I posted a blog about how to get vSAN Data Protection up and running, but I never explained why you may want to do this in the first place? Before we dive into it, it probably is smart to also mention that vSAN Data Protection leverages the new snapshotting capability which is part of the vSAN Express Storage Architecture (vSAN ESA). vSAN ESA has a snapshotting capability that infinitely scales. It literally is 100x better than the snapshotting mechanism that is part of vSAN OSA. The reason for this is simple, with vSAN OSA (and VMFS for that matter) when you create a snapshot a new object is created and IO is redirected. With vSAN ESA we basically copy the meta data structure and keep using the existing objects for IO, which means we don’t need to traverse multiple files for reads for instance, and when we delete a snapshot we don’t need to copy data… As it is all about metadata changes / tracking.

Now in vSphere / vSAN 8.0 Update 3 we introduce a new capability called vSAN Data Protection. This provides you the ability to schedule snapshots, create immutable snapshots, clone snapshots, restore snapshots etc. All this through the vSphere Client interface, of which you can see an example below.

Now, in the above screenshot you see that half of the VMs are protected, and the other half is not. Why is that? Well, simply because I decided to only protect half of my VMs when I created my snapshot schedule. This is an “opt-in” mechanism, so you create a schedule, you decide which VMs are part of a schedule and which are not! Let’s take a look at the scheduling mechanism. You can find the mechanism at the cluster level under “Configuration -> vSAN -> Data Protection”. When you go there you see the above screen and you can click on “protection groups” and then “Create protection group”.

This will then present you a screen where you can define the name of the protection group, enable “immutability mode” and select the “Membership” of the protection group. Personally I like the Dynamic VM Patterns option. Just makes things easy. Like in this example as a pattern I used “*de*”, which means that all VMs with “de” in the name will be snapshotted whenever the schedule triggers a snaphot.

As mentioned, vSAN Data Protection includes ALL the virtual machines which match the pattern when the snapshot is taken. So if you create a schedule like for instance the following, it could take close to an hour before the VM is snapshotted for the very first time. If you feel this is too long then there’s of course also an option to manually snapshot the VM.

The schedules you can create can be really complex (up to 10 schedules), I just created an example of what is possible, but there’s many different options and combinations you can create. Note, a VM can be part of three different protection groups at most, and I also want to point out that the protection group is not a consistency group. Also note, you can have at most 200 snapshots per object/VM, so that is also something to take into consideration.

Now when the VMs are snapshotted you get a few extra options available, you have “snapshot management” at the VM level individually, and of course you can also manage things at the protection group level. You will see options like “restore” and “clone” and this is where it gets interesting, as this will allow you to go back to a particular point in time if needed from a particular snapshot, and also clone the VM from a particular snapshot. Why would you clone it? Well if you would want to test something against a specific dataset for instance, or if you want to do some type of digital forensics and analyze a VM for whatever reason.

One thing that is also good to mention is that with vSAN Data Protection, you can also recover VMs which have been deleted from vCenter Server. This is one of those must have features in my opinion, as this is one of those things that does occasionally happen, unfortunately. Power Off VM, delete … oops, wrong one! When it comes to the recovery of a VM, the process is just straight forward. You select the snapshot and click “restore VM”, or “clone VM”, depending on what you would expect as the outcome. Restore means the current instance is powered off, and the snapshot is the restore point when you power it on again. Of course, when you do a clone you simply get a second instance of that VM. Note that when  you create a clone, it is a linked clone, so it is extremely fast to instantiate.

The last thing I want to discuss is the immutability mode. I want to first caution people, this is what you think it is… it is IMMUTABLE! This means that you cannot delete the snapshots or change the schedule etc, let me quote the documentation:

Enable immutability mode on a protection group for additional security. You cannot edit or delete this protection group, change the VM membership, edit or delete snapshots. An immutable snapshot is a read-only copy of data that cannot be modified or deleted, even by an attacker with administrative privileges.

That is why I wanted to caution people, because if you create an immutable protection group with hundreds of VMs by accident… Yes, snapshots will be immutable, you cannot delete the protection group or the snapshots, or change the snapshot schedule. No, not even as an administrator. Do note, you can delete the VM if you want…

Anyway, I hope this gave a brief overview of what you can do with vSAN Data Protection at the moment. I’ll play around with it some more, and report back when there’s more to share 🙂


Where’s my vSAN Data Protection screen in 8.0 U3?

Duncan Epping · Jun 28, 2024 · Leave a Comment

The first time I deployed vSphere/vSAN 8.0 U3 I immediately looked for the vSAN Data Protection UI. I always get excited about new features, and simply want to test it. I mean who doesn’t like scalable snapshots and a great way of managing snapshot schedules? Finally available within the vSphere Client! Of course, I could not find it, but I figured that was because I was on some weird alpha build of the product. Now that the product has shipped it must be there out of the box right?

No it isn’t. You will need to deploy an appliance in order for this functionality to appear in the UI. The appliance can be found under “Drivers and Tools” under the vSphere Hypervisor download (Which is under VMware vSphere), it is called “VMware vSAN Snapshot Service Appliance”. The current version is named “snapservice_appliance-8.0.3.0-24057802_OVF10.ova”. You need to deploy this OVA, and I would highly recommend to request a DNS name for it and have it properly registered. I fiddled around with the hosts file on VCSA and forgot to add the name to my local host file on my laptop and had some weird issues as a result, which I am trying to reproduce at the moment, will report back if/when I can.

The other thing to point out is the following, the documentation tells you to download the certs and copy the text for the Appliance, it isn’t something most of us do daily either, you can simply open a web browser and use the following url “https://<name of your vCenter server>/certs/download.zip” to download the certs and then unzip the downloaded file. (More details to be found here.) It will contain the certs, and if you open the cert with a proper text editor you can copy/paste that into the deployment screen for the OVA. (Yes, I know there are other ways as well, but I found this one to be the easiest.)

Now when you deployed the OVA, and when everything was configured correctly you should see a successful task, or actually two: download plugin, deploy plug, as shown in the next screenshot.

If you do get the “error downloading plug-in” error message, it likely is one of two things:

  1. DNS / Hosts files are not correctly configured, resulting in the URL not being reachable. Make sure you can resolve the URL!
  2. Cert thumbprint was incorrectly copied/pasted, there’s a whole section on troubleshooting this here.

Okay, now that I got the appliance up and running, I will probably do a follow-up post on what you can do with it 🙂

RE: Re-Imagining Ransomware Protection with VMware Ransomware Recovery

Duncan Epping · Apr 13, 2023 ·

Last week a blog post was published on VMware’s Virtual Blocks blog on the topic of Ransomware Recovery. Some of the numbers shared were astonishing and hard to contextualize even. Global damages caused by ransomware for instance are estimated to exceed 42 billion dollars in 2024, and this is expected to be doubling every year. Also, 66% of all enterprises were hit by ransomware, of which 96% did not regain full access to their data.

Now, it explicitly mentions “enterprises”, but this does not mean that only enterprise organizations are prone to ransomware attacks. Ransomware attacks do not discriminate, every company, non-profit, and even individuals are at risk if you ask me. As a smart person once said, data is the new oil, and it seems that everyone is drilling for it, including trespassers who don’t own the land! Of course, depending on the type of organization, solutions and services are available to mitigate the risks of losing access to your company’s most valuable asset, data.

VMware, and many other vendors, have various solutions (and services) to protect your data center, your workloads, and essentially your data. But what do you do if you are breached? How do you recover? How fast can you recover, and how fast do you need to recover? How far back do you need to go, and are you allowed to go? Some of you may wonder why I ask these questions, well that has everything to do with the numbers shared at the start of this blog. Unfortunately, today, when organizations are breached malicious code is often only detected after a significant amount of time. Giving the attacker time to collect information about the environment, spread itself throughout the environment, activate the attack, and ultimately request the ransom.

This is when you, the administrator, the consultant, and the cloud admin, will get those questions. How fast can you recover? How far back do we need to go? Where do we recover to? And what about your data? All fair questions, but these shouldn’t be asked after an attack has occurred and ransom is demanded. These are questions we all need to ask constantly, and we should be aligning our Ransomware Recovery strategy with the answers to those questions.

Now, it is fair to say that I am probably somewhat biased, but it is also fair to say that I am as Dutch as it gets and I wouldn’t be writing this blog if I did not believe in this service. VMware’s Ransomware Recovery as a Service, which is part of VMware Cloud Disaster Recovery, provides a unique solution in my humble opinion. First, the service provided can just simply start as a cloud storage service to which you replicate your workloads, without needing to run a full (small but still) software-defined datacenter. This is especially useful for those organizations that can afford to take ~3hrs to spin up an SDDC when there’s a need to recover (or test the process). However, it is also possible to have an SDDC ready for recovery at all times, which will reduce the recovery time objective significantly.

Of course, VMware provides the ability to protect multiple environments, many different workloads, and many point-in-time copies (snapshots). But it also enables you to verify your recovery point (snapshot) in a fully isolated environment. What you will appreciate is that the solution will actually not only isolate the workloads, but on top of that also provide you insights at various levels about the probability of the snapshot being infected. First of all, while going through the recovery process, entropy and change rate are shown which provides insights of when potentially the environment was infected. (Or ransomware was activated for that matter.)

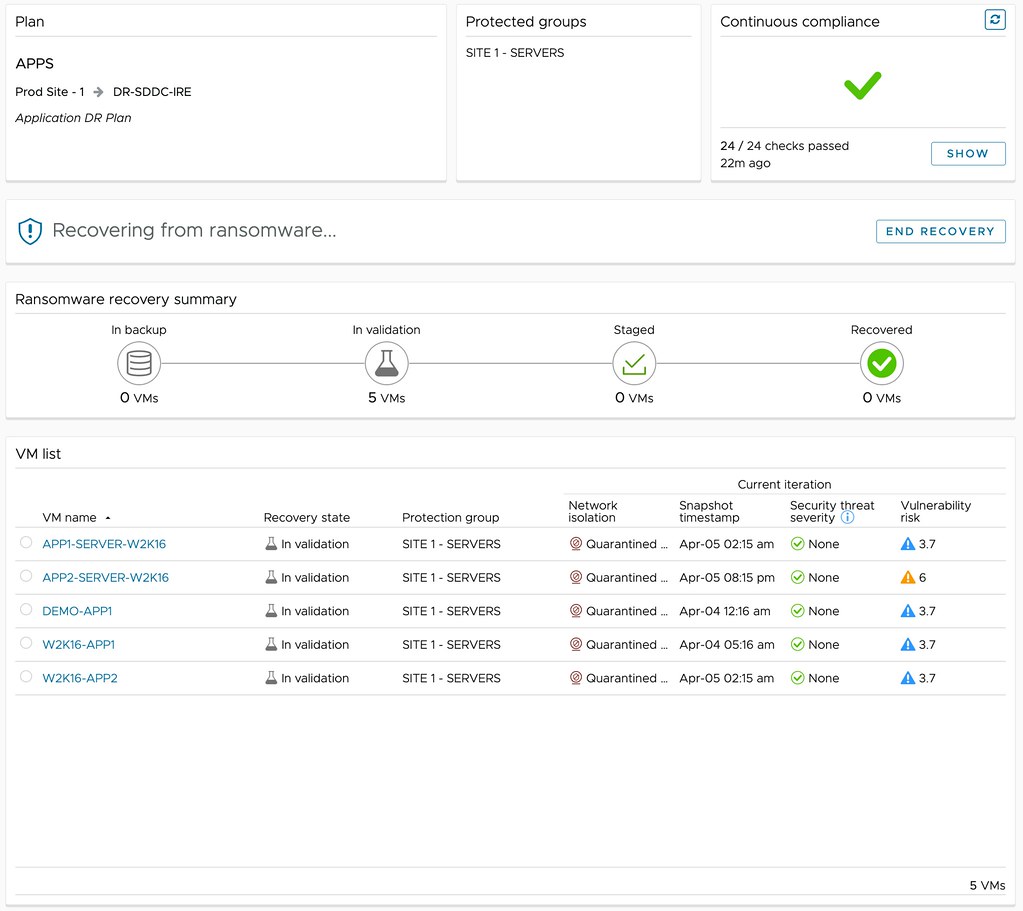
But maybe even more important, through the use of NSX and VMware’s Next Generation Anti-Virus software, a recovery point can be safely tried. A quarantined environment is instantiated and the recovery point can be scanned for vulnerabilities and threats, and an analysis of the workloads to be recovered can be provided, as shown below. This simplifies the recovery and validation process immensely, as it removes the need for many of the manual steps usually involved in this process. Of course, as part of the recovery process, the advanced runbook capabilities of VMware Cloud Disaster Recovery are utilized, enabling the recovery of a full data center, or simply a select group of VMs, by running a recovery plan. This recovery plan includes the order in which workloads need to be powered on and restored, but can also include IP customization, DNS registration, and more.

Depending on the outcome of the analysis, you can then determine what to do with the snapshot. Is the data not compromised? Are the workloads not infected? Are there any known vulnerabilities that we would need to mitigate first? If data is compromised, or the environment is infected in any shape or form, you can simply disregard the snapshot and clean the environment. Rinse and repeat until you find that recovery point that is not compromised! If there are known vulnerabilities, and the environment is clean, you can mitigate those and complete the recovery. Ultimately resulting in full access to your company’s most valuable asset, data.

  • Page 1
  • Page 2
  • Page 3
  • Interim pages omitted …
  • Page 6
  • Go to Next Page »

Primary Sidebar

About the Author

Duncan Epping is a Chief Technologist and Distinguished Engineering Architect at Broadcom. Besides writing on Yellow-Bricks, Duncan is the co-author of the vSAN Deep Dive and the vSphere Clustering Deep Dive book series. Duncan is also the host of the Unexplored Territory Podcast.

Follow Us

  • X
  • Spotify
  • RSS Feed
  • LinkedIn

Recommended Book(s)

Advertisements


Copyright Yellow-Bricks.com © 2025 · Log in