• Skip to primary navigation
  • Skip to main content
  • Skip to primary sidebar

Yellow Bricks

by Duncan Epping

  • Home
  • Unexplored Territory Podcast
  • HA Deepdive
  • ESXTOP
  • Stickers/Shirts
  • Privacy Policy
  • About
  • Show Search
Hide Search

take 3

Installing the NVIDIA software on an ESXi host and configuring for vGPU usage

Duncan Epping · Jan 22, 2020 ·

I have been busy in the lab with testing our VR workload within a VM and then streaming the output to a head-mounted display. Last week I received a nice new shiny NVIDIA RTX6000 to use in my Dell Precision workstation. I received a passively cooled RTX8000 at first, by mistake that is. And the workstation wouldn’t boot as it doesn’t support that card, great in hindsight as would have probably been overheated fast considering the lack of airflow in my home office. After adding the RTX6000 to my machine it booted and I had to install the NVIDIA vib on ESXi. I also had to configure the host accordingly. I did it through the command-line as that was the fastest for me. I started with copying the vib file to /tmp/ on the ESXi host using scp and then did the following:

esxcli system maintenanceMode set –e true
esxcli software vib install –v /tmp/NVIDIA**.vib
esxcli system maintenanceMode set –e false
reboot

The above places the host in maintenance mode, installs the vib, removes the host from maintenance mode and then reboots it. The other thing I had to do, as I am planning on using vGPU technology, is to set the host by default to “Shared Direct – Vendor shared passthrough graphics”. You can also do this through the command-line as follows:

esxcli graphics host set --default-type SharedPassthru

You can also set the assigned policy:

esxcli graphics host set --shared-passthru-assignment-policy <Performance | Consolidation>

I configured it set to “performance” as for my workload this is crucial, it may be different for your workload though. In other to ensure these changes are reflected in the UI you will either need to reboot the host, or you can restart Xorg the following way:

/etc/init.d/xorg stop
nv-hostengine -t
nv-hostengine -d
/etc/init.d/xorg start

That is what it took. I realized after the first reboot I could have configured the host graphics configuration and changed the default policy for the passthrough assignment first probably and then reboot the host. That would also avoid the need to restart Xorg as it would be restarted with the host.

If there’s a need for it, you can also change the NVIDIA vGPU scheduler being used. There are three options available: “Best Effort”, “Equal Share”, and “Fixed Share”. Using esxcli you can configure to use a particular scheduler. This is also documented here. I set my host to Equal Share with a 1 milisecond time slice, which you can do as shown below.

esxcli system module parameters set -m nvidia -p "NVreg_RegistryDwords=RmPVMRL=0x00010001"

And for those who care, you can see within vCenter which VM is associated with which GPU, but you can also check this via the command-line of course:

esxcli graphics vm list

And the following command will list all the devices present in the host:

esxcli graphics device list

On twitter I was just pointed to a script which lists the vGPU vib version across all hosts of your vCenter Server instances. Very useful if you have a larger environment. Thanks Dane for sharing.
Map head-mounted display to AMD ReLive VR instance

Duncan Epping · Jan 16, 2020 ·

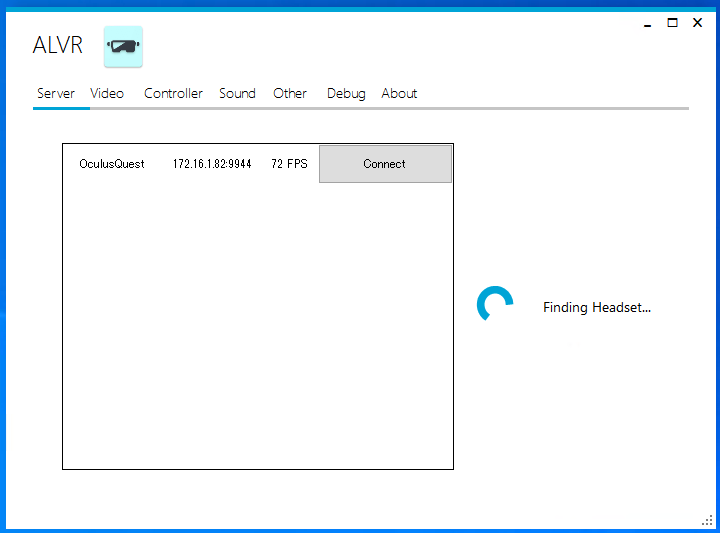
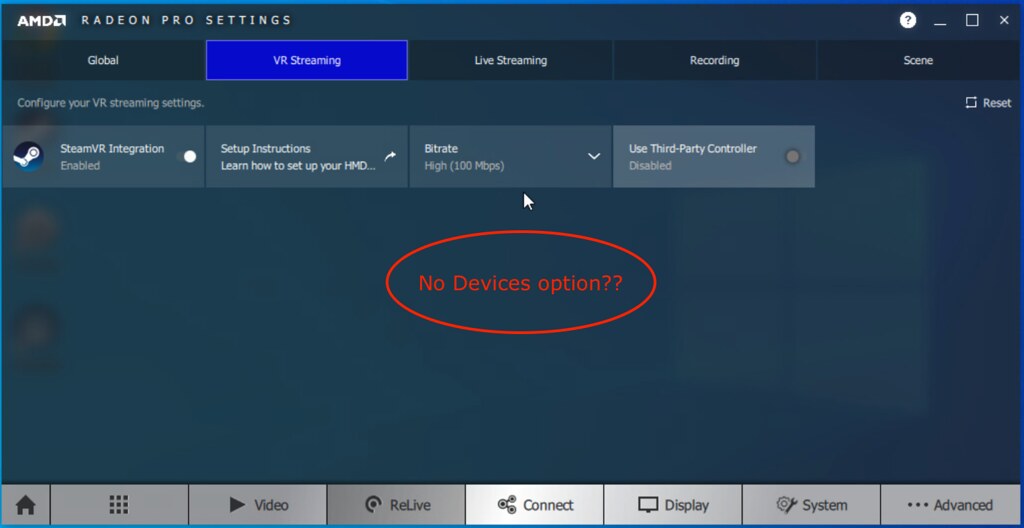
Warning before the post, I don’t have a good solution for you unfortunately at this time. One of the things I have been testing during my Take 3 is to have multiple head-mounted displays (VR goggles) on the same network connecting to multiple VMs. With ALVR this is pretty easy to do as the ALVR interface allows you to select the head-mounted display (HMD) you want to connect with as shown below. Very easy to use, and it allows you to always connect to the same head-mounted display as there’s an “auto-reconnect” option as well. (Which wasn’t always consistently reconnecting in my testing, unfortunately.)

I figured AMD would offer something similar, and it appears they do. After installing the AMD Radeon Pro software I couldn’t find the option that was described on Github. In the Radeon Pro software there’s no “devices” tab. Then I noticed that this is, unfortunately, only available for Adrenalin 2020, which is different then Radeon Pro software. So it seems that this functionality hasn’t been ported yet.

Can you get around it? Well, of course, you can have multiple VMs with ReLive VR instances running and have HMD’s connect to them, but this would be completely random. During normal behavior this wouldn’t be a problem, but when troubleshooting this would make life a lot more challenging. The way to get around it today would be to create different (wifi) networks and separate each pair (VM+ReLive VR instance and HMD) logically. This would work okay with a few head-mounted displays, but of course would not scale when you have more than a few. Let’s hope that AMD solves this problem soon. I reached out to AMD for a comment, they mentioned that you can use the Adenalin 2020 driver as well for the Pro cards, and that the feature for the Pro card is coming soon.

Can’t enable AMD ReLive VR during install of Radeon Pro Software?

Duncan Epping · Jan 8, 2020 ·

Yesterday I bumped into an issue where I wanted to enable AMD ReLive VR but the option didn’t show in the configuration window strangely enough. I remembered that the first time I installed the Radeon Pro Software for Enterprise I had an option to enable AMD ReLive VR during the process, but I couldn’t recall seeing the option this time during the install. I simply reinstalled Radeon Pro assuming the option would pop up but it didn’t. It seems that this was caused by the fact that there were already AMD drivers installed, a bit strange as all other AMD Radeon Pro components can be selected and installed when there’s a driver present, but ReLive simply won’t show up as an option.

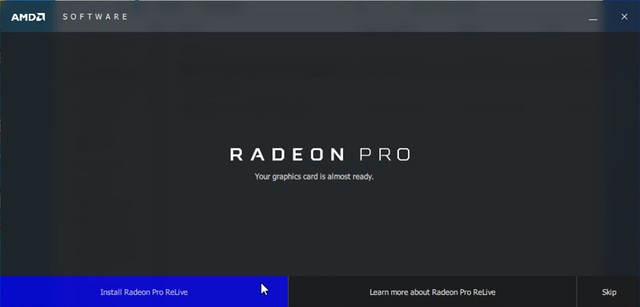
So I used the AMD provided tools to completely uninstall all AMD Radeon related software. When you do this and you reboot the VM you will be presented the following screen at the end of the install of the Radeon Pro software, this then allows you to install ReLive VR, which you can then configure and enable through the settings window as also shown below.

AMD Radeon settings window transparent in a VM?

Duncan Epping · Jan 6, 2020 ·

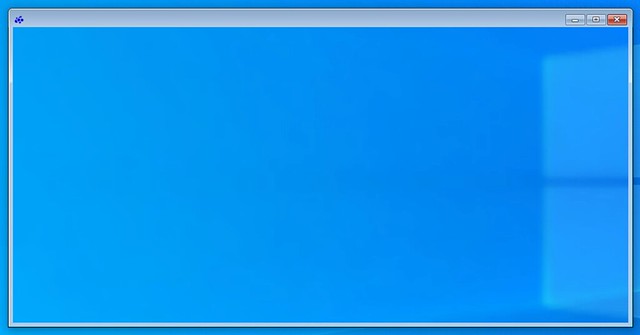
I have been playing with VR technology for the past month. The last couple of weeks my focus has been to install/configure a VM which streams the VR app over wifi to a headset. I ran into a problem with ALVR last week as documented here, but I also ran into an issue with the AMD Radeon software when I wanted to use the AMD tools to stream a VR app. When you install the AMD Radeon software within a VM and want to configure the (passthrough) graphics card or ReLive VR the Radeon configuration window shows up transparent, it looks as below. Which means you can’t configure it, you can’t enable things like ReLive VR.

The only way to get the window to show up normal is to remove the VMware SVGA device using Device Manager. Simply completely remove it and restart the VM and the problem is solved. If you have svga.present set to false you will need to click “view hidden devices” in Device Manager first before you can remove the installed software/driver by the way. When rebooted it will look normal again and it will allow you to enable and configure ReLive VR, or any other options you need to configure of course.

Seeing green only on your HMD when using ALVR to stream an app?

Duncan Epping · Jan 2, 2020 ·

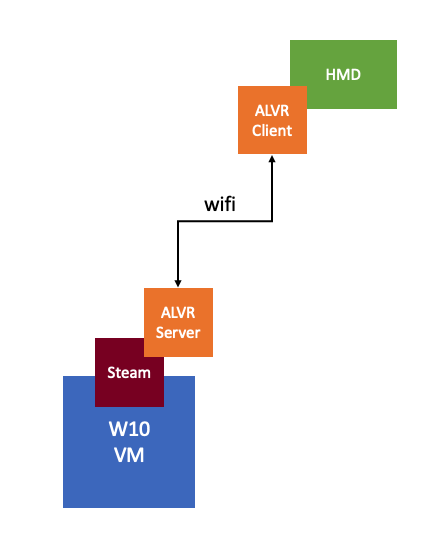
I have been testing various things as part of the Take 3 I started not too long ago. While I was setting up my environment I ran into a few issues. One of those issues was something very strange. Just so people understand what I am testing, I have an Oculus Quest headset to which I want to stream a VR app over WIFI from a powerful VM which has a passthrough GPU. Now by default, this isn’t possible. The Quest wasn’t intended for this particular usecase. In order to do this you need to setup some kind of remoting technology, which is where ALVR comes in to play. ALVR is an open source remoting/streaming solution for VR applications. Huh, what are you doing? Well as shown in the diagram below I am basically running an App using Steam within Windows and then streaming that output using ALVR from the server to the client, where the client runs as an app on the HMD (head-mounted display).

There’s also AMD ReLive VR and NVIDIA Cloud XR by the way, of which I have also tested AMD ReLive VR, which is embedded in the AMD Driver and can be enabled through the AMD advanced settings. Anyway, while testing this solution I had to disable the display head by setting “svga.present = false” in order for ALVR to work (otherwise I would get an error stating “could not create graphics device for adapter 0”), which means that as a result, I can’t access the VM using the Web/Remote Console, unfortunately.

So in order to launch the VR app and ALVR Server I have to RDP into the Windows 10 VM. When doing so I can launch the apps and connect the Headmount to ALVR Server, great… But when putting on the headset I would only see green, basically a big green screen. So why did this happen? Well, it appears that it is an artifact caused by the fact that I am launching the VR app from within an RDP session. When using RDP you end up using a specific video driver for the screen rendering, which is not something ALVR (or AMD ReLive VR) understands. So in order to get around it, you will need to log in from a “proper” console to the Windows VM and launch the app from there so that it is rendered by the AMD or NVIDIA driver instead. I used TightVNC to get around the problem, there are other solutions, but this was the fastest to implement for me.

  • « Go to Previous Page
  • Page 1
  • Page 2
  • Page 3
  • Go to Next Page »

Primary Sidebar

About the Author

Duncan Epping is a Chief Technologist and Distinguished Engineering Architect at Broadcom. Besides writing on Yellow-Bricks, Duncan is the co-author of the vSAN Deep Dive and the vSphere Clustering Deep Dive book series. Duncan is also the host of the Unexplored Territory Podcast.

Follow Us

  • X
  • Spotify
  • RSS Feed
  • LinkedIn

Recommended Book(s)

Advertisements


Copyright Yellow-Bricks.com © 2025 · Log in