Yesterday I received an email from someone. He wanted to know why he was limited to using either the “fixed” or “MRU” pathing policy for the LUNs attached to his MSCS cluster. In his environment they used round-robin for everything and not being able to configure all of them with the same policy was against their internal policy. The thing is that if round-robin would be used and the path would switch (by default every 1000 I/Os) the SCSI-2 reservation would need to be re-acquired on this LUN. (MSCS uses SCSI-2 reservations for their cluster devices) As you can imagine that could cause a lot of stress on your array and could lead to all sorts of problems. So please do not ignore this recommendation! Some extra details can be found in the following KB articles:
Storage
Using a CNAME (DNS alias) to mount an NFS datastore
I was playing around in my lab with NFS datastores today. I wanted to fail-over a replicated NFS datastore without the need to re-register the virtual machines running on them. I had mounted the NFS datastore using the IP address and as that is used to create the UUID it was obvious that it wouldn’t work. I figured there should be a way around it but after a quick search on the internet I still hadn’t found anything yet.
I figured it should be possible to achieve this using a CNAME but also recalled something around vCenter screwing this up again. I tested it anyway and with success. This is what I did:
- Added both NFS servers to DNS
- Create a CNAME (DNS Alias) and pointed to the “active” NFS server
- I used the name “nasdr” to make it obvious what it is used for
- Created an NFS share (drtest) on the NFS server
- Mount the NFS export using vCenter or though the CLI
- esxcfg-nas -a -o nasdr -s /drtest drtest
- Check the UUID using vCenter or through the CLI
- ls -lah /vmfs/volumes
- example output:
lrwxr-xr-x 1 root root 17 Feb 6 10:56 drtest -> e9f77a89-7b01e9fd - Created a virtual machine on the nfsdatastore
- Enabled replication to my “standby” NFS server
- I killed my “active” NFS server environment (after validating it had completed replication)
- Changed the CNAME to point to the secondary NFS server
- Unmounted the volume old volume
- esxcfg-nas -d drtest
- I did a vmkping to “nasdr” just to validate the destination IP had changed
- Rescanned my storage using “esxcfg-rescan -A”
- Mounted the new volume
- esxcfg-nas -a -o nasdr -s /drtest drtest
- Checked the UUID using the CLI
- ls -lah /vmfs/volumes
- example output:
lrwxr-xr-x 1 root root 17 Feb 6 13:09 drtest -> e9f77a89-7b01e9fd - Powered on the virtual machine now running on the secondary NFS server
As you can see, both volumes had the exact same UUID. After the fail-over I could power-on the virtual machine. No need to re-register the virtual machines within vCenter first. Before I wanted to share it with the world I reached out to my friends at NetApp. Vaughn Stewart connected me with Peter Learmonth who validated my findings and actually pointed me to a blog article he wrote about this topic. I suggest to head-over to Peter’s article for more details on this.
Resolved: Slow booting of ESXi 5.0 when iSCSI is configured
My colleague Cormac posted an article about this already, but I figured it was important enough to rehash some of content. As many of you have experienced there was an issue with ESXi 5.0 in iSCSI environments. Booting would take a fair amount of time due to the increase of the amount of retries in the case creating a connection to the array would fail.
This is what the log file would typically look like:
iscsid: cannot make a connection to 192.168.1.20:3260 (101,Network is unreachable)

iscsid: Notice: Reclaimed Channel (H34 T0 C1 oid=3)

iscsid: session login failed with error 4,retryCount=3

iscsid: Login Target Failed: iqn.1984-05.com.dell:powervault.md3000i.6002219000a14a2b00000000495e2886 if=iscsi_vmk@vmk8 addr=192.168.1.20:3260 (TPGT:1 ISID:0xf) err=4

iscsid: Login Failed: iqn.1984-05.com.dell:powervault.md3000i.6002219000a14a2b00000000495e2886 if=iscsi_vmk@vmk8 addr=192.168.1.20:3260 (TPGT:1 ISID:0xf) Reason: 00040000 (Initiator Connection Failure)
This is explained in KB 2007108 which also contains the download link. Make sure to download it and update your environment if you are running iSCSI.
vSphere Metro Storage Cluster solutions, what is supported and what not?
I started digging in to this yesterday when I had a comment on my Metro Cluster article. I found it very challenging to get through the vSphere Metro Storage Cluster HCL details and decided to write an article about it which might help you as well when designing or implementing a solution like this.
First things first, here are the basic rules for a supported environment?
(Note that the below is taken from the “important support information”, which you see in the “screenshot, call out 3”.)
- Only array-based synchronous replication is supported and asynchronous replication is not supported.
- Storage Array types FC, iSCSI, SVD, and FCoE are supported.
- NAS devices are not supported with vMSC configurations at the time of writing.
- The maximum supported latency between the ESXi ethernet networks sites is 10 milliseconds RTT.
- Note that 10ms of latency for vMotion is only supported with Enterprise+ plus licenses (Metro vMotion).
- The maximum supported latency for synchronous storage replication is 5 milliseconds RTT (or higher depending on the type of storage used, please read more here.)
How do I know if the array / solution I am looking at is supported and what are the constraints / limitations you might ask yourself? This is the path you should walk to find out about it:
- Go to : http://www.vmware.com/resources/compatibility/search.php?deviceCategory=san (See screenshot, call out 1)
- In the “Array Test Configuration” section select the appropriate configuration type like for instance “FC Metro Cluster Storage” (See screenshot, call out 2)
(note that there’s no other category at the time of writing) - Hit the “Update and View Results” button
- This will result in a list of supported configurations for FC based metro cluster solutions, currently only EMC VPLEX is supported
- Click name of the Model (in this case VPLEX) and note all the details listed
- Unfold the “FC Metro Cluster Storage” solution for the footnotes as they will provide additional information on what is supported and what is not.
- In the case of our example, VPLEX, it says “Only Non-uniform host access configuration is supported” but what does this mean?
- Go back to the Search Results and click the “Click here to Read Important Support Information” link (See screenshot, call out 3)
- Half way down it will provide details for ” vSphere Metro Cluster Storage (vMSC)in vSphere 5.0″
- It states that “Non-uniform” are ESXi hosts only connected to the storage node(s) in the same site. Paths presented to ESXi hosts from storage nodes are limited to local site.
- Note that in this case not only is “non-uniform” a requirement, you will also need to adhere to the latency and replication type requirements as listed above.
Yes I realize this is not a perfect way of navigating through the HCL and have already reached out to the people responsible for it.

Swap to host cache aka swap to SSD?
Before we dive in to it, lets spell out the actual name of the feature “Swap to host cache”. Remember that, swap to host cache!
I’ve seen multiple people mentioning this feature and saw William posting a hack on how to fool vSphere (feature is part of vSphere 5 to be clear) into thinking it has access to SSD disks while this might not be the case. One thing I noticed is that there seems to be a misunderstanding of what this swap to host cache actually is / does and that is probably due to the fact that some tend to call it swap to SSD. Yes it is true, ultimately your VM would be swapping to SSD but it is not just a swap file on SSD or better said it is NOT a regular virtual machine swap file on SSD.
When I logged in to my environment first thing I noticed was that my SSD backed datastore was not tagged as SSD. First thing I wanted to do was tag it as SSD, as mentioned William already described this in his article and it is well documented in our own documentation as well so I followed it. This is what I did to get it working:
- Check the NAA ID in the vSphere UI
- Opened up an SSH session to my ESXi host
- Validate which SATP claimed the device:
esxcli storage nmp device list
In my case: VMW_SATP_ALUA_CX - Verify it is currently not recognized as SSD by typing the following command:
esxcli storage core device list -d naa.60060160916128003edc4c4e4654e011
should say: “Is SSD : False” - Set “Is SSD” to true:
esxcli storage nmp satp rule add -s VMW_SATP_ALUA_CX –device naa.60060160916128003edc4c4e4654e011 –option=enable_ssd - I reloaded claim rules and ran them using the following commands:
esxcli storage core claimrule load
esxcli storage core claimrule run - Validate it is set to true:
esxcli storage core device list -d naa.60060160916128003edc4c4e4654e011 - Now the device should be listed as SSD
Next would be to enable the feature… When you go to your host and click on the “Configuration Tab” there should be a section called “Host Cache Configuration” on the left. When you’ve correctly tagged your SSD it should look like this:
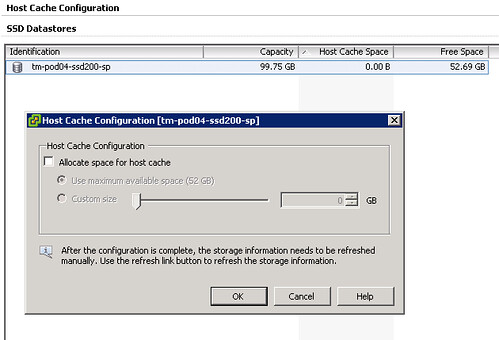
Please note that I already had a VM running on the device and hence the reason it is showing some of the space as being in use on this device, normally I would recommend using a drive dedicated for swap. Next step would be enabling the feature and you can do that by opening the pop-up window (right click your datastore and select “Properties”). This is what I did:
- Tick “Allocate space for host cache”
- Select “Custom size”
- Set the size to 25GB
- Click “OK”
Now there is no science to this value as I just wanted to enable it and test the feature. What happened when we enabled it? We allocated space on this LUN so something must have been done with it? I opened up the datastore browser and I noticed a new folder was created on this particular VMFS volume:
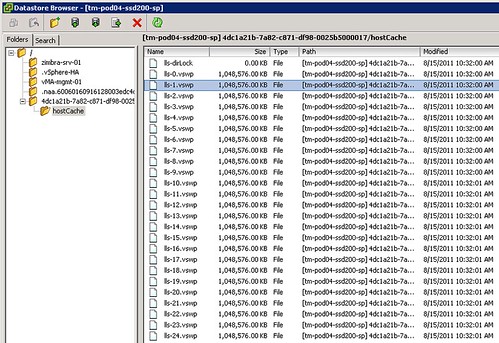
Not only did it create a folder structure but it also created 25 x 1GB .vswp files. Now before we go any further, please note that this is a per host setting. Each host will need to have its own Host Cache assigned so it probably makes more sense to use a local SSD drive instead of a SAN volume. Some of you might say but what about resiliency? Well if your host fails the VMs will need to restart anyway so that data is no longer relevant, in terms of disk resiliency you should definitely consider a RAID-1 configuration. Generally speaking SAN volumes are much more expensive than local volumes and using local volumes also removes the latency caused by the storage network. Compared to the latency of a SSD (less than 100 μs), network latency can be significant. So lets recap that in a nice design principal:
Basic design principle
Using “Swap to host cache” will severely reduce the performance impact of VMkernel swapping. It is recommended to use a local SSD drive to elimate any network latency and to optimize for performance.
How does it work? Well fairly straight forward actually. When there is severe memory pressure and the hypervisor needs to swap memory pages to disk it will swap to the .vswp files on the SSD drive instead. Each of these, in my case, 25 files are shared amongst the VMs running on this host. Now you will probably wonder how you know if the host is using this Host Cache or not, that can of course simply be validated by looking at the performance statistics within vCenter. It contains a couple of new metrics of which “Swap in from host cache” and “Swap out to host cache” (and the “rate”…) metrics are most important to monitor. (Yes, esxtop has metrics as well to monitor it namely LLSWR/s and LLSWW/s)
What if you want to resize your Host Cache and it is already in use? Well simply said the Host Cache is optimized to allow for this scenario. If the Host Cache is completely filled memory pages will need to be copied to the regular .vswp file. This could mean that the process takes longer than expected and of course it is not a recommended practice as it will decrease performance for your VMs as these pages more than likely at some point will need to be swapped in. Resizing however can be done on the fly, no need to vMotion away your VMs. Just adjust the slider and wait for the process to complete. If you decide to complete remove all host cache for what ever reason than all relevant data will be migrated to the regular .vswp.
What if the Host Cache is full? Normally it shouldn’t even reach that state, but when you run out of space in the host cache pages will be migrated from your host cache to your regular vswap file and it is first in first out in this case, which should be the right policy for most workloads. Now chances of course of having memory pressure to the extend where you fill up a local SSD are small, but it is good to realize what the impact is. If you are going down the path of local SSD drives with Host Cache enabled and will be overcommitting it might be good to do the math and ensure that you have enough cache available to keep these pages in cache rather than on rotating media. I prefer to keep it simple though and would probably recommend to equal the size of your hosts memory. In the case of a host with 128GB RAM that would be a 128GB SSD. Yes this might be overkill, but the price difference between 64GB and 128GB is probably neglect-able.
Basic design principle
Monitor swap usage. Although “Swap to host cache” will reduce the impact of VMkernel swapping it will not eliminate it. Take your expected consolidation ratio into account including your HA (N-X) strategy and size accordingly. Or keep it simple and just use the same size as physical memory.
One interesting use case could be to place all regular swap files on very cheap shared storage (RAID5 of SATA drives) or even local SATA storage using the “VM swapfile location” (aka. Host local swap) feature. Then install a host cache for any host these VMs can be migrated to. This should give you the performance of a SSD while maintaining most of the cost saving of the cheap storage. Please note that the host cache is a per-host feature. Hence in the time of a vMotion all data from the cache will need to be transferred to the destination host. This will impact the time a vMotion takes. Unless your vMotions are time critical, this should not be an issue though. I have been told that VMware will publish a KB article with advise how to buy the right SSDs for this feature.
Summarizing, Swap to SSD is what people have been calling this feature and that is not what it is. This is a mechanism that caches memory pages to SSD and should be referred to as “Swap to host cache”. Depending on how you do the math all memory pages can be swapped to and from SSD. If there is insufficient space available memory pages will move over to the regular .vswp file. Use local SSD drives to avoid any latency associated with your storage network and to minimize costs.