• Skip to primary navigation
  • Skip to main content
  • Skip to primary sidebar

Yellow Bricks

by Duncan Epping

  • Home
  • Unexplored Territory Podcast
  • HA Deepdive
  • ESXTOP
  • Stickers/Shirts
  • Privacy Policy
  • About
  • Show Search
Hide Search

vSphere

Storage capacity for swap files and TPS disabled

Duncan Epping · Dec 8, 2016 ·

A while ago (2014) I wrote an article on TPS being disabled by default in future release. (Read KB 2080735 and 2097593 for more info) I described why VMware made this change from a security perspective and what the impact could be. Even today, two years later, I am still getting questions about this and what for instance the impact is on swap files. With vSAN you have the ability to thin provision swap files, and with TPS being disabled is this something that brings a risk?

Lets break it down, first of all what is the risk of having TPS enabled and where does TPS come in to play?

With large pages enabled by default most customers aren’t actually using TPS to the level they think they are. Unless you are using old CPUs which don’t have EPT or RVI capabilities, which I doubt at this point, it only kicks in with memory pressure (usually) and then large pages get broken in to small pages and only then will they be TPS’ed, if you have severe memory pressure that usually means you will go straight to ballooning or swapping.

Having said that, lets assume a hacker has managed to find his way in to you virtual machine’s guest operating system. Only when memory pages are collapsed, which as described above only happens under memory pressure, will the hacker be able to attack the system. Note that the VM/Data he wants to attack will need to be on the located on the same host and the memory pages/data he needs to breach the system will need to be collapsed. (actually, same NUMA node even) Many would argue that if a hacker gets that far and gets all the way in to your VM and capable of exploiting this gap you have far bigger problems. On top of that, what is the likelihood of pulling this off? Personally, and I know the VMware security team probably doesn’t agree, I think it is unlikely. I understand why VMware changed the default, but there are a lot of “IFs” in play here.

Anyway, lets assume you assessed the risk and feel you need to protect yourself against it and keep the default setting (intra-VM TPS only), what is the impact on your swap file capacity allocation? As stated when there is memory pressure, and ballooning cannot free up sufficient memory and intra-VM TPS is not providing the needed memory space either the next step after compressing memory pages is swapping! And in order for ESXi to swap memory to disk you will need disk capacity. If and when the swap file is thin provisioned (vSAN Sparse Swap) then before swapping out those blocks on vSAN will need to be allocated. (This also applies to NFS where files are thin provisioned by default by the way.)

What does that mean in terms of design? Well in your design you will need to ensure you allocate capacity on vSAN (or any other storage platform) for your swap files. This doesn’t need to be 100% capacity, but should be more than the level of expected overcommitment. If you expect that during maintenance for instance (or an HA event) you will have memory overcommitment of about 25% than you could ensure you have 25% of the capacity needed for swap files available at least to avoid having a VM being stunned as new blocks for the swap file cannot be allocated and you run out of vSAN datastore space.

Let it be clear, I don’t know many customers running their storage systems in terms of capacity up to 95% or more, but if you are and you have thin swap files and you are overcommitting and TPS is disabled, you may want to re-think your strategy.
All-Flash HCI is taking over fast…

Duncan Epping · Nov 23, 2016 ·

Two weeks ago I tweeted about All-Flash HCI taking over fast, maybe I should have said All-Flash vSAN as I am not sure every vendor is seeing the same trend. Reason for it being of course is the price of flash dropping while capacity goes up. At the same time with vSAN 6.5 we introduced “all-flash for everyone” by dropping the “all-flash” license option down to vSAN Standard.

I love getting these emails about huge vSAN environments… this week alone 900TB and 2PB raw capacity in a single all-flash vSAN cluster

— Duncan Epping (@DuncanYB) November 10, 2016

So the question naturally came, can you share what these customers are deploying and using, I shared those later via tweets, but I figured it would make sense to share it here as well. When it comes to vSAN there are two layers of flash used, one for capacity and the other for caching (write buffer to be more precise). For the write buffer I am starting to see a trend, the 800GB and 1600 NVMe devices are becoming more and more popular. Also the write-intensive SAS connected SSDs are often used. I guess it largely depends on the budget which you pick, needless to say but NVMe has my preference when budget allows for it.

For the capacity tier there are many different options, most people I talk to are looking at the read intensive 1.92TB and 3.84TB SSDs. SAS connected are a typical choice for these environments, but it does come at a price. The SATA connected S3510 1.6TB (available at under 1 euro per GB even) seems to be a choice many people make who have a tighter budget, these devices are relatively cheap compares to the SAS connected devices. With the downside being the shallow queue depth though, but if you are planning on having multiple devices per server than this probably isn’t a problem. (Something I would like to see at some point is a comparison between SAS and SATA connected for real life workloads for drives with similar performance capabilities to see if there actually is an impact.)

With prices still coming down and capacity still going up it will be interesting to see how the market shifts in the upcoming 12-18 months. If you ask me hybrid is almost dead, of course there are still situations where it may make sense (low $ per GB requirements), but in most cases all-flash just makes more sense these days.

I would interested in hearing from you as well, if you are doing all-flash HCI/vSAN, what are the specs and why are you selecting specific devices/controllers/types?

The difference between VM Encryption in vSphere 6.5 and vSAN encryption

Duncan Epping · Nov 7, 2016 ·

More and more people are starting to ask me what the difference is between VMCrypt aka VM Encryption and the beta feature we announced not to long ago called vSAN Encryption. (Note, we announced a beta, no promises were made around dates or actual releases or releasing of the feature.) Both sounds very much the same and essential both end up encrypting the VM but there is a big difference in terms of how it is implemented. There are advantages and disadvantages to both solutions. Lets look at VM Encryption first.

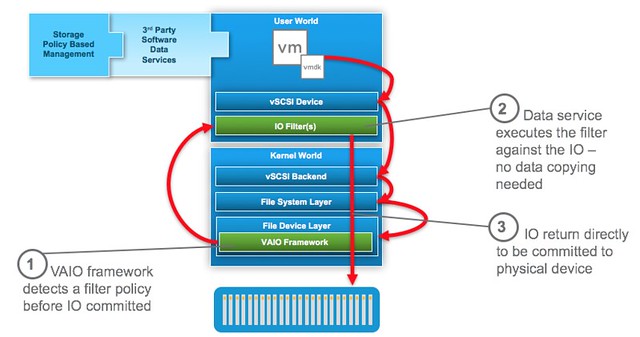
VM Encryption is implemented through VAIO (vSphere APIs for IO Filters). The VAIO framework allows a filter driver to do “things” to/with the IO that a VM sends down to a device. One of these things is encryption. Now before I continue, take a look at this picture of where the filter driver sits.

As you can see the filter driver is implemented in the User World and the action against the IO is taken at the top level. If this for instance is encryption then any data send across the wire is already encrypted. Great in terms of security of course. And all of this can be enabled through policy. Simply create the policy, select the VM or VMDK you want to encrypt and there you go. So if it is that awesome, why vSAN Encryption?

Well the problem is that all IO is encrypted at the top level. This means that it is received in the vSAN write buffer fully encrypted, then the data at some point needs to be destaged and is deduplicated and compressed (in all-flash). As you can imagine, encrypted blocks do not dedupe (or compress) well. As such in an all-flash environment with deduplication and compression enabled any VM that has VM Encryption through VAIO enabled will not provide any space savings.

With vSAN Encryption this will be different. The way it will work is that it will provide “encryption at rest”. The data travels to the destination unencrypted then when it reaches its destination it is written encrypted to the cache tier, then it is decrypted before it is destaged, and it will be encrypted after it is deduplicated and/or compressed again. This means that you will benefit from space saving functionality, however encryption in this case is a cluster wide option, which means that every VM will be encrypted, which may not be desirable.

So in short:

  • VM Encryption (VAIO)
    • Policy based (enable per VM)
    • Data travels encrypted
    • No/near zero dedupe
  • vSAN Encryption
    • Enabled on a cluster level
    • Data travels unencrypted, but it is written encrypted to the cache layer
    • Full compatibility with vSAN data services

I hope that clarifies why we announced the beta of vSAN Encryption and what the difference is with VM Encryption that is part of vSphere 6.5.

vSphere 6.5 what’s new – Storage IO Control

Duncan Epping · Oct 26, 2016 ·

There are many enhancements in vSphere 6.5, an overhaul of Storage IO Control is one of them. In vSphere 6.5 Storage IO Control has been reimplemented by leveraging the VAIO framework. For those who don’t know VAIO stands for vSphere APIs for IO Filtering. This is basically a framework that allows you to filter (storage) IO and do things with it. So far we have seen caching and replication filters from 3rd party vendors, and now a Quality of Service filter from VMware.

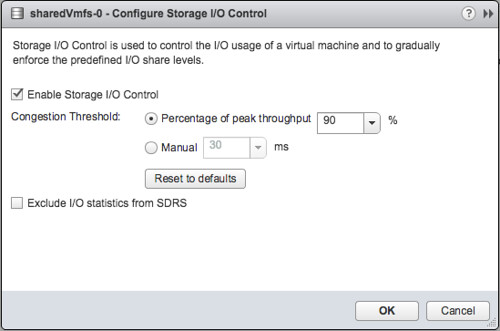
Storage IO Control has been around for a while and hasn’t really changed that much since its inception. It is one of those features that people take for granted and you actually don’t know you have turned on in most cases. Why? Well Storage IO Control (SIOC) only comes in to play when there is contention. When it does come in to play it ensure that every VM gets its fair share of storage resources. (I am not going to explain the basics, read this posts for more details.) Why the change in SIOC design/implementation? Well fairly simple, the VAIO framework enabled policy based management. This goes for caching, replication and indeed also QoS. Instead of configuring disks or VMs individually, you will now have the ability to specify configuration details in a VM Storage Policy and assign that policy to a VM or VMDK. But before you do, make sure you enable SIOC first on a datastore level and set the appropriate latency threshold. Lets take a look at how all of this will work:

  • Go to your VMFS or NFS Datastore and right click datastore and click “Configure SIOC” and enable SIOC
  • By default the congestion threshold is set to 90% of peak throughput you can change this percentage or specify a latency threshold manually by defining the number of miliseconds latency
  • Now go to the VM Storage Policy section
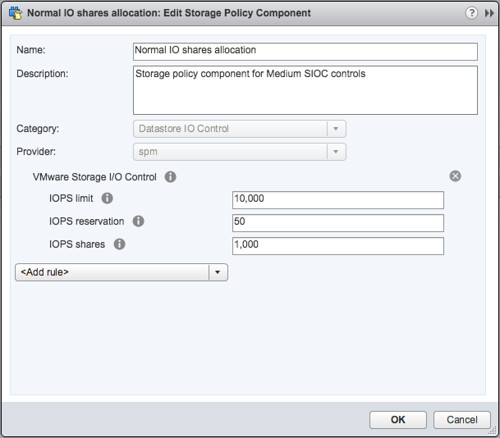
  • Go to Storage Policy Components section first and check out the pre-created policy components, below I show “Normal” as an example
  • If you want you can also create a Storage Policy Component yourself and specify custom shares, limits and a reservation. Personally I would prefer to do this when using SIOC and probably remove the limit if there is no need for it. Why limit a VM on IOPS when there is no contention? And if there is contention, well then SIOC shares based distribution of resource will be applied.
  • Next you will need to do is create a VM Storage Policy, click that tab and click “create VM storage policy”
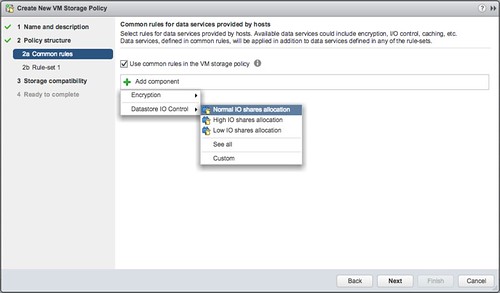
  • Give the policy a name and next you can select which components to use
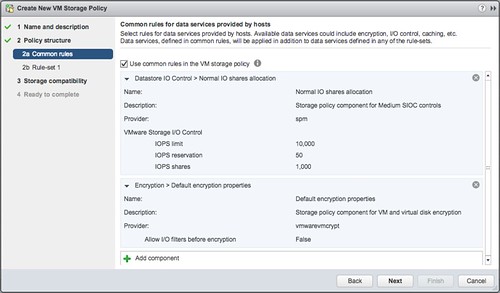
  • In my case I select the “Normal IO shares allocation” and I also add Encryption, just so we know what that looks like. If you have other data services, like replication for instance, you could even stack those on top. That is what I love about the VAIO Framework.
  • Now you can add rules, I am not going to do this. And next the compatible datastores will be presented and that is it.
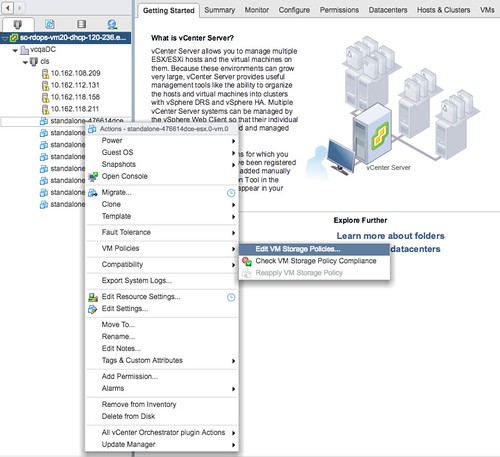
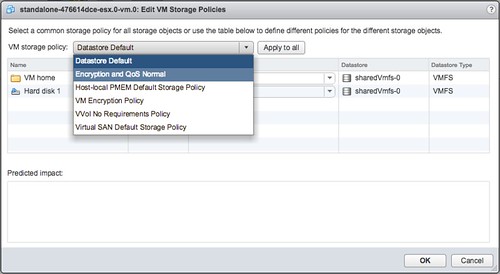
  • You can now assign the policy to a VM. You do this by right clicking a particular VM and select “VM Policies” and then “Edit VM Storage Policies”
  • Now you can decide which VM Storage Policy to apply to the disk. Select your policy from the dropdown and then click “apply to all”, at least when that is what you would like to do.
  • When you have applied the policy to the VM you simply click “OK” and now the policy will be applied to the VM and for instance the VMDK.

And that is it, you are done. Compared to previous versions of Storage Policy Based Management this may all be a bit confusing with the Storage Policy Components, but believe me it is very powerful and it will make your life easier. Mix and match whatever you require for a workload and simply apply it.

Before I forget, note that the filter driver at this point is used to enforce limits only. Shares and the Reservation still leverages the mClock scheduler.


vSphere 6.5 what’s new – HA

Duncan Epping · Oct 19, 2016 ·

Here we go, one of my favourite features in vSphere… What’s new for HA in vSphere 6.5. To be honest, a lot! Many new features have been introduced, and although it took a while, I am honoured to say that many of these features are the results of discussions I had with the HA engineering team in the past. On top of that, your comments and feedback on some of my articles about HA futures have resulted in various changes to the design and implementation, my thanks for that! Before we get started, one thing I want to point out, in the Web Client under “Services” it now states “vSphere Availability” instead of HA, the reason for this is that because a new feature was stuck in to this section which is all about Availability but not implemented through HA.

  • Admission Control
  • Restart Priority enhancements
  • HA Orchestrated Restart
  • ProActive HA

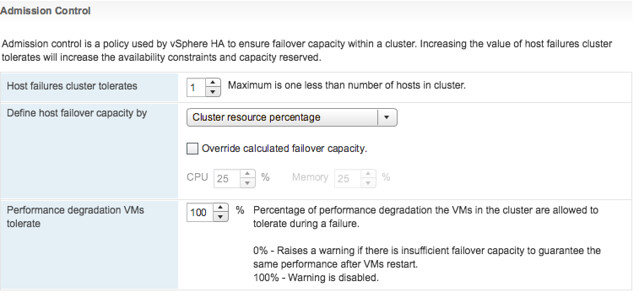
Lets start with Admission Control first. This has been completely overhauled from a UI perspective, but essential still offers the same functionality but in an easy way and some extras. Let take a look at the UI first and then break it down.

In the above screenshot we see “Cluster Resource Percentage” while above that we have specified the “Host failures cluster tolerates” as “1”. What does this mean? Well this means that in a 4 host cluster we want to be capable of losing 1 host worth of resources which equals 25%. The big benefit of this is that when you add a host to the cluster, the amount of resources set aside will then be automatically changed to 20%. So if you scale up, or down, the percentage automatically adjusts based on the selected number of failures you want to tolerate. Very very useful if you ask me as you won’t end up wasting resources any longer simply because you forgot to change the percentage when scaling the cluster. And the best, this doesn’t use “slots” but is the old “percentage based” solution still. (You can manually select the slot policy under “Define host failover capacity by” though if you prefer that.

Second part of enhancements around Admission Control is the “VM resource reduction event threshold” section. This is a new section and this is based on the fling that was out there for a while. I am very proud to see this being released as it is a feature I was closely involved with and actually had two patents awarded for recently. What does it do? It allows you to specify the performance degradation you are willing to incur if a failure happens. It is set to 100% by default, but I can imagine you want to change this to for instance 25% or 50%, depending on your SLA with the business. Setting it is very simple, you just change the percentage and you are done. So how does this work? Well first of all, you need DRS enabled as HA leverages DRS to get the cluster resource usage. But lets look at an example:

75GB of memory available in 3 node cluster
1 host failure to tolerate specifed
60GB of memory actively used by VMs
0% resource reduction tolerated

This results in the following:
75GB – 25GB (1 host worth of memory) = 50GB
We have 60GB of memory used, with 0% resource reduction to tolerate
60GB needed, 50GB available after failure >> Warning issued to Admin

Very useful if you ask me, as finally you can guarantee that the performance for you workloads after a failure event is close or equal to the performance before a failure event! Next up, Restart Priority enhancements. We have had this option in the UI for the longest time. It allowed you to specify the startup priority for VMs and that is what HA used during scheduling, however the restarts would happen so fast that in reality no one really noticed the difference between high, medium or low priority. In fact, in many cases the small “low priority” VMs would be powered up long before the larger “high priority” database machines. With 6.5 we introduce some new functionality. Lets show you how this works:

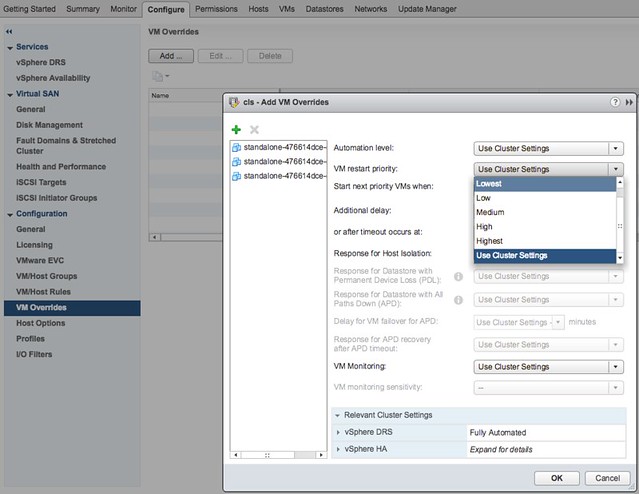
Go to your vSphere HA cluster and click on the configure tab and then select VM Overrides, next click Add. You are presented with a screen where you can select VMs by clicking the green plus and then specify their relative startup priority. I selected 3 VMs and then pick “lowest”, the other options are “low, medium, high and highest”. Yes the names are a bit funny, but this is to ensure backwards compatibility with the previous priority options.

After you have specified the priority you can also specify if there needs to be an additional delay before the next batch can be started, or you can specify even what triggers the next priority “group”, this could for instance be the VMware Tools guest heartbeat as shown in the screenshot below. The other option is “resources allocated” which is purely the scheduling of the batch itself, the power-on event completion or the “app heartbeat” detection. That last one is most definitely the most complex as you would need to have App HA enabled and services defined etc. I expect that if people use this they will mostly set it to “Guest Heartbeats detected” as that is easy and pretty reliable.

If for whatever reason by the way there is no guest heartbeat ever, or it simply takes a long time then there is also a timeout value that can be specified. By default this is 600 seconds, but this can be decreased or increased, depending on what you prefer. Now this functionality is primarily intended for large groups of VMs, so if you have a 1000 VMs you can select those 10/20 VMs that have the highest priority and let them power-on first. However, if you for instance have a 3-tier app and you need the database server to be powered on before the app server then you can also use VM/VM rules as of vSphere 6.5, this functionality is referred to as HA Orchestrated Restart.

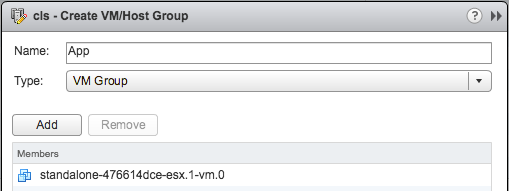
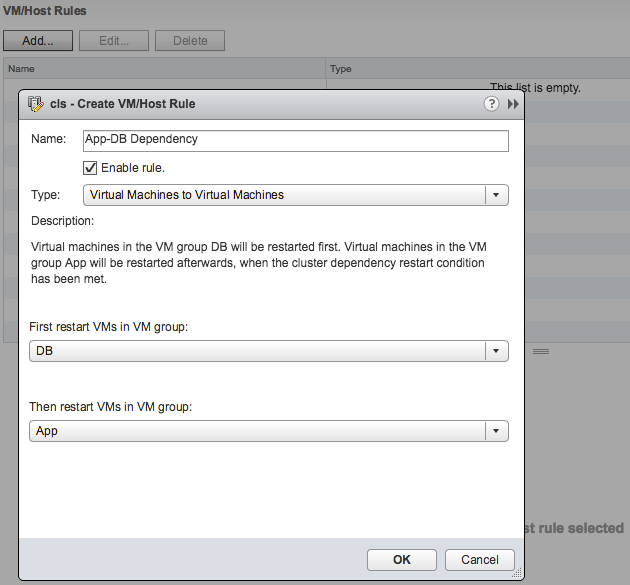
You can configure HA Orchestrated Restarts by simply creating “VM” Groups. In the example below I have created a VM group called App with the Application VM in there. I have also created a DB group with the Database VM in there.

This application has a dependency on the Database VM to be fully powered-on, so I specify this in a rule as shown in the below screenshot.

Now one thing to note here is that in terms of dependency, the next group of VMs in the rule will be powered on when the cluster wide set “VM Dependency Restart Condition” is met. If this is set to “Resources Allocated”, which is the default, then the VMs will be restarted literally a split second later. So you will need to think about how to set the “VM Dependency Restart Condition” as other wise the rule may be useless. Another thing is that these rules are “hard rules”, so if the DB VM in this example does not power on, then the App VM will also not be powered on. Yes, I know what you would like to see, and yes we are planning more enhancements in this space.

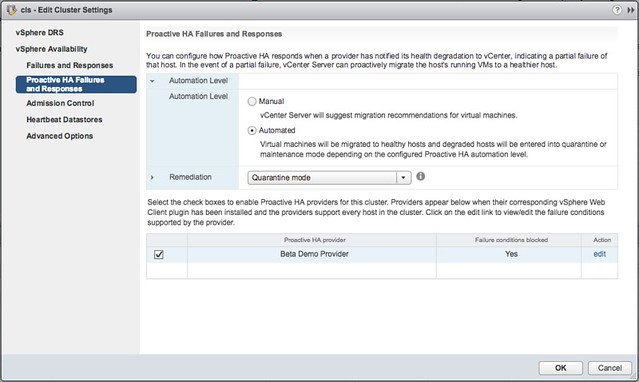
Last up “Pro-Active HA“… Now this is the odd one, it is not actually a vSphere HA feature, but rather a function of DRS. However, as it is stuck in the “Availability” section of the UI I figured I would stick it in this article as that is probably where most people will be looking. So what does it do? Well in short, it allows you to configure actions for events that may lead to VM downtime. What does that mean? Well you can imagine that when a power-supply goes down your host is in a so called “degraded state”, when this event occurs an evacuation of the host could be triggered, meaning all VMs will be migrated to any of the remaining healthy hosts in the cluster.

But how do we know the host is in a degraded state? Well that is where the Health Provider comes in to play. The health provider reads all the sensor data and analyze the results and then serve the state of the host up to vCenter Server. These states are “Healthy”, “Moderate Degration”, “Severe Degradation” and “Unknown”. (Green, Yellow, Red) When vCenter is informed DRS can now take action based on the state of the hosts in a cluster, but also when placing new VMs it can take the state of a host in to consideration. The actions DRS can take by the way is placing the host in Maintenance Mode or Quarantine Mode. So what is this quarantine mode and what is the difference between Quarantine Mode and Maintenance Mode?

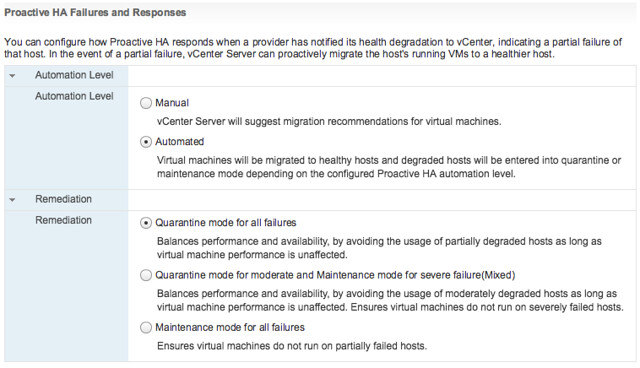
Maintenance Mode is very straight forward, all VMs will be migrated off the host. With Quarantine Mode this is not guaranteed. If for instance the cluster is overcommitted then it could be that some VMs are left on the quarantined host. Also, when you have VM-VM rules or VM/Host rules which would conflict when the VM is migrated then the VM is not migrated either. Note that quarantined hosts are not considered for placement of new VMs. It is up to you to decide how strict you want to be, and this can simply be configured in the UI. Personally I would recommend setting it to Automated with “Quarantine mode for moderate and Maintenance mode for sever failure(Mixed)”. This seems to be a good balance between up time and resource availability. Screenshot below shows where this can be configured.

Pro-Active HA can respond to different types of failures, at the start of this section I mentioned power supply, but it can also respond to memory, network, storage and even a fan failure. Which state this results in (severe or moderate) is up to the vendor, this logic is built in to the Health Provider itself. You can imagine that when you have 8 fans in a server that the failure of one or two fans results in “moderate”, whereas the failure of for instance 1 out of 2 NICs would result in “severe” as this leaves a “single point of failure”. Oh and when it comes to the Health Provider, this comes with the vendor Web Client plugins.

  • « Go to Previous Page
  • Page 1
  • Interim pages omitted …
  • Page 31
  • Page 32
  • Page 33
  • Page 34
  • Page 35
  • Interim pages omitted …
  • Page 159
  • Go to Next Page »

Primary Sidebar

About the Author

Duncan Epping is a Chief Technologist and Distinguished Engineering Architect at Broadcom. Besides writing on Yellow-Bricks, Duncan is the co-author of the vSAN Deep Dive and the vSphere Clustering Deep Dive book series. Duncan is also the host of the Unexplored Territory Podcast.

Follow Us

  • X
  • Spotify
  • RSS Feed
  • LinkedIn

Recommended Book(s)

Advertisements


Copyright Yellow-Bricks.com © 2025 · Log in