• Skip to primary navigation
  • Skip to main content
  • Skip to primary sidebar

Yellow Bricks

by Duncan Epping

  • Home
  • Unexplored Territory Podcast
  • HA Deepdive
  • ESXTOP
  • Stickers/Shirts
  • Privacy Policy
  • About
  • Show Search
Hide Search

vSphere

Module MonitorLoop power on failed error when powering on VM on vSphere

Duncan Epping · Jun 12, 2018 ·

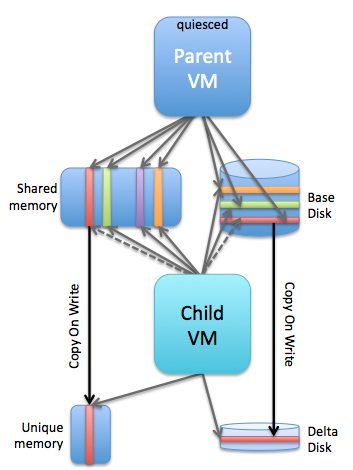
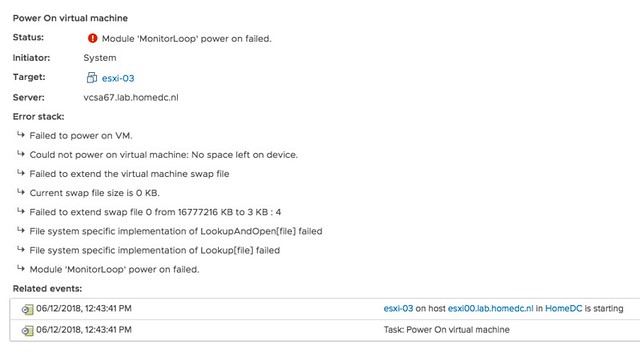
I was playing in the lab for our upcoming vSphere Clustering Deepdive book and I ran in to this error when powering on a VM. I had never seen it before myself, so I was kind of surprised when I figured out what it was referring to. The error message is the following:

Module MonitorLoop power on failed when powering on VM

Think about that for a second, if you have never seen it I bet you don’t know what it is about? Not strange as the message doesn’t give a clue.

f you go to the event however there’s a big clue right there, and that is that the swap file can’t be extended from 0KB to whatever it needs to be. In other words, you are probably running out of disk space on the device the VM is stored on. In this case I removed some obsolete VMs and then powered on the VM that had the issue without any problems. So if you see this “Module MonitorLoop power on failed when powering on VM” error, check your free capacity on the datastore the VM sits on!

More details:

Strange error message, for a simple problem. Yes, I will file a request to get this changed.


Customer Experience Improvement Program: where, when and what?

Duncan Epping · May 28, 2018 ·

I got a question on my post about the Customer Experience Improvement Program (ceip) demo, the questions boiled down to the following:

  • What is being send to VMware
  • Where is the data stored by VMware
  • When is the data send to VMware (how often)

The “what” question was easy to answer, as this was documented by John Nicholson on Storagehub.vmware.com for vSAN specifically. Realizing that it isn’t easy to find anywhere what ceip data is stored I figured I would add a link here and also repeat the summary of that article, assuming by now everyone uses a VCSA (if not go to the link):

  1. SSH into VCSA
  2. Run command: cd /var/log/vmware/vsan-health/
  3. Data collected by online health checks is written and gzipped to files " <uuid>cloud_health_check_data.json.gz" and " <uuid>vsan_perf_data.json.gz
  4. You can extract the json content by calling " gunzip -k <gzipped-filename> " or view the contents by calling " zcat <gzipped-filename> "

So that is how you view what is being stored, John also posted an example of the dataset on github for those who just want to have a quick peek. Note that you need an “obfuscation map” (aka key) to make sense out of the data in terms of host-names / VM names / ip-addresses etc. Without that you can stare at the dataset all you want, but you won’t be able to relate it back to a customer. I would also add that we are not storing any VM/Workload data, it is configuration data / feature usage / performance data. Hopefully that will answer the “what” question for you.

Where is the data stored? The data is send to “https://vcsa.vmware.com” and it ends up in VMware’s analytics cloud, which is hosted in secure data centers in the US. The frequency is a bit difficult to answer, as this fully depends on which products are in use, but to my knowledge with vSAN/vSphere it is on an hourly basis. I have asked the VMware team who owns this to create a single page/document with all of the required details needed in it so that security teams can simply be pointed to it.

Hopefully I will have a follow up soon.

How to simplify vSAN Support!

Duncan Epping · May 25, 2018 ·

Last week I presented at the Tech Support Summit in Cork with Cormac. Our session was about the evolution of vSAN, where are we today but more importantly which directly will we be going. One thing that struck me when I discussed vSAN Support Insight, the solution we announced not to long ago, is that not too many people seemed to understand the benefit. When you have vSAN and you enable CEIP (Customer Experience Improvement Program) then you have a phone home solution for your vSphere and vSAN environment automatically. What this brings is fairly simple to explain: less frustration! Why? Well the support team will have, when you provide them your vCenter UUID, instant access to all of the metadata of your environment. What does that mean? Well the configuration for instance, the performance data, logs, health check details etc. This will allow them to instantly get a good understanding of what your environment looks like, without the need for you as a customer to upload your logs etc.

At the event I demoed the Support Insight interface, which is what the Support Team has available, and a lot of customers afterwards said: now I see the benefit of enabling this, I will do this for sure when I get back to the office. So I figured I would take the demo, do a voice over and release it to the public. We need more people to join the customer experience improvement program, so watch the video to see what this gives the support team. Note by the way that everything is anonymized, without you providing a UUID it is not possible to correlate the data to a customer. Even when you provide a UUID the support team can only see the host, vm, policy and portgroup (etc) names when you provide them with what is called an obfuscation map (key). Anyway, watch the demo and join now!

Instant Clone in vSphere 6.7 rocks!

Duncan Epping · May 1, 2018 ·

I wrote a blog post a while back about VMFork, which then afterwards got rebranded to Instant Clone. In the vSphere 6.7 release there has been a major change to the architecture of VMFork aka Instant Clone, so I figured I would do an update on the post. As an update doesn’t stand out from the rest of the content I am sharing it as a new post.

Instant Clone was designed and developed to provide a mechanism that allows you to instantaneously create VMs. In the early days it was mainly used by folks who want to deploy desktops, by the desktop community this was often referred to as “just in time” desktops. These desktops would literally be created when the user tried to login, it is indeed that fast. How did this work? Well a good way to describe it is that it is essentially a “vMotion” of a VM on the same host with a linked clone disk. This essentially leads to a situation which looks as follows:

On a host you had a parent VM and a child VM associated with it. You would have a shared base disk, shared memory and then of course unique memory pages and a delta disk for (potential) changes written to disk. The reason customers primarily used this only with VDI at first was the fact that there was no public API for it. Of course folks like Alan Renouf and William Lam fought hard for public APIs internally and they managed to get things like the PowerCLI cmdlets and python vSphere SDK pushed through. Which was great, but unfortunately not 100% fully supported. On top of that there were some architectural challenges with the 1.0 release of Instant Clones. Mainly caused by the fact that VMs were pinned to a host (next to their parent VM) and as such things like HA, DRS, vMotion wouldn’t work. Now with version 2.0 this all changes. William already wrote an extensive blog post about it here. I just went over all of the changes and watched some internal training, and I am going to write some of my findings/learnings down as well, just so that it sticks… First let’s list the things that stood out to me:

  • Targeted use cases
    • VDI
    • Container hosts
    • Big data / hadoop workers
    • DevTest
    • DevOps
  • There are two workflows for instant clone
    • Instant clone a running a VM, source and generated VMs continue running
    • Instant clone a frozen VM, source is frozen using guestRPC at point in time defined by customer
  • No UI yet, but “simple API” available
  • Integration with vSphere Features
    • Now supported: HA, DRS, vMotion (Storage / XvMotion etc)
  • Even when TPS is disabled (default) VMFork still leverages the P-Share technology to collapse the memory pages for efficiency
  • There is no explicit parent-child relationship any longer

Let’s look at the use cases first, I think the DevTest / DevOps is interesting. You could for instance do an Instant Clone (live) of a VM and then test an upgrade for instance for the application running within the VM. For this you would use the first workflow that I mentioned above: instant clone a running VM. What happens here in the workflow is fairly straight forward. I am using William’s screenshots of the diagrams the developers created to explain it. Thanks William, and dev team 🙂

instant clone

Now note that above when the first clone is created the source gets a delta disk as well. This is to ensure that the shared disk doesn’t change as that would cause problems for the target. Now when a 2nd VM is created and a 3 the source VM gets additional delta’s. This as you can imagine isn’t optimal and will over time even potentially slow down the source VM. Also one thing to point out is that although the mac address changes for the generated VM, you as the admin still need to make sure the Guest OS picks this up. As mentioned above, as there’s no UI in vSphere 6.7 for this functionality you need to use the API. If you look at the MOB you can actually find the InstantClone_Task and simply call that, for a demo scroll down. But as said, be careful as you don’t want to end up with the same VM with the same IP on the same network multiple times. You can get around the Mac/IP conflict issue rather easy and William has explained how in his post here. You can even change the port group for the NIC, for instance switch over to an isolated network only used for testing these upgrade scenarios etc.

That second workflow would be used for the following use cases: VDI, Container Hosts, Hadoop workers… all more or less the same type of use case. Scale out identical VMs fast! In this case, well lets look at the diagram first:

instant clone

In the above scenario the Source VM is what they call “frozen”. You can freeze a VM by leveraging the vmware-rpctool and run it with “instantclone.freeze”. This needs to happen from within the guest, and note that you need to have VMware tools installed to have vmware-rpctool available. When this is executed, the VM goes in to a frozen state, meaning that no CPU instructions are executed. Now that you froze the VM you can go through the same instant clone workflow. Instant Clone will know that the VM is frozen. After the instant clone is create you will notice that there’s a single delta disk for the source VM and each generated VM will have its own delta disk as shown above. Big benefit is that the source VM won’t have many delta disks. Plus, you know for sure that every single VM you create from this frozen VM is 100% identical as they all resume from the exact same point in time. Of course when the instant clone is created the new VM is “unfrozen / resumed”, the source will remain frozen. Note that if for whatever reason the source is restarted / power cycled then the “frozen state” is lost. Another added benefit of the frozen VM is that you can automate the “identity / IP / mac” issue when leveraging the “frozen source VM” workflow. How do you do this? Well you disable the network, freeze it, instant clone it (unfreezes automatically), make network changes, enable network. William just did a whole blog post on how to do various required Guest changes, I would highly recommend reading this one as well!

So before you start using Instant Clone, first think about which of the two workflows you prefer and why. So what else did I learn?

As mentioned, and this is something I never realized, but even when TPS is disabled Instant Clone will still share the memory pages through the P-Share mechanism. P-Share is the same mechanism that TPS leverages to collapse memory pages. I always figured that you needed to re-enable TPS again (with or without salting), but that is not the case. You can’t even disable the use of P-Share at this point in time… Which personally I don’t think is a security concern, but you may think different about it. Either way, of course I tested this, below you see the screenshot of the memory info before and after an instant clone. And yes, TPS was disabled. (Look at the shares / saving values…)

Before:

After:

Last but not least, the explicit parent-child relationship caused several problems from a functionality stance (like HA, DRS, vMotion etc not being supported). Per vSphere 6.7 this is no longer the case. There is no strict relationship, and as such all the features you love in vSphere can be fully leveraged even for your Instant Clone VMs. This is why they call this new version of Instant Clone “parentless”.

If you are wondering how you can simply test it without diving in to the API too deep and scripting… You can use the Managed Object Browser (MOB) to invoke the method as mentioned earlier. I recorded this quick demo that shows this, which is based on a demo from one of our Instant Clone engineers. I recommend watching it in full screen as it is much easier to follow that way. (or watch it on youtube in a larger window…) Pay attention, as it is a quick demo, instant clone is extremely fast and the workflow is extremely simple.

And that’s it for now. Hope that helps those interested in Instant Clone / VMFork, and maybe some of you will come up with some interesting use cases that we haven’t thought about it. Would be good if you have use cases to share those in the comment section below. Thanks,

vSphere 6.7 announced!

Duncan Epping · Apr 17, 2018 ·

It is that time of the year again, a new vSphere release announcement! (For those interested in what’s new for vSAN make sure to read my other post.) vSphere 6.7, what’s in a name / release? Well a bunch of stuff, and I am not going to address all of the new functionality as the list would simply be too long. So this list features what I think is worth mentioning and discussing.

  • vSphere Client (HTML-5) is about 95% feature complete
  • Improved vCenter Appliance monitoring
  • Improved vCenter Backup Management
  • ESXi Single Reboot Upgrades
  • ESXi Quick Boot
  • 4K Native Drive Support
  • Max Virtual Disks increase from 60 to 256
  • Max ESXi number of Devices from 512 to 1024
  • Max ESXi paths to Devices from 2048 to 4096
  • Support for RDMA
  • vSphere Persistent Memory
  • DRS initial placement improvements

Note that there’s a whole bunch of stuff missing from this list, for instance there were many security enhancements, but I don’t see the point of me pretending to be an expert on that topic, while I know some of the top experts will have a blog out soon.

Not sure what I should tell about the vSphere Client (h5) at this point. Everyone has been waiting for this, and everyone has been waiting for it to reach ~90/95% feature complete. And we are there. I have been using it extensively for the past 12 months and I am very happy with how it turned out. I think the majority of you will be very very happy with what you will see and with the overall experience. It just feels fast(er) and seems more intuitive.

When it comes to management and monitoring of the vCenter Appliance (https://ip of vcenter:5480) there are a whole bunch of improvements. For me personally the changes in the monitoring tab are very useful and also the services tab is useful. Now you can immediately see when a particular disk is running out of space, as shown in the screenshot below. And you can for instance restart a particular service in the “Services” tab.

Next is vCenter Backup Management, a lot of people have been asking for this. We introduced Backup and Recovery of the appliance a while ago, very useful, but unfortunately it didn’t provide a scheduling mechanism. Sure you could create a script that would do this for you on a regular cadence, but not everyone wants to bother with that. Now in the Appliance Management UI you can simply create a schedule for backup. This is one of those small enhancements, which to me is a big deal! I’m sure that Emad or Adam will have a blog out soon on the topic of vCenter enhancements, so make sure to follow their blogs.

Another big deal is the fact that we shaved off a reboot for major upgrades. As of 6.7 you now only have 1 reboot with ESXi. Again, a tiny thing going from 2 back to 1, but when you have servers taking 10-15 minutes to go through the reboot process and you have dozens to of servers to reboot it makes Single Reboot ESXi Upgrades a big thing. For those on 6.5 right now, you will be able to enjoy the single reboot experience when upgrading to 6.7!

One feature I have personally been waiting for is ESXi Quick Boot. I saw a demo of this last year at our internal R&D conference at VMware and I was impressed. I don’t think many people at that stage saw the importance of the feature, but I am glad it made it in to the release. So what is it? Well basically it is a way to restart the hypervisor without going through the physical hardware reboot process. This means that you are now removing that last reboot, of course this only applies when your used server hardware supports it. Note that with the first release only a limited set of servers will support it, nevertheless this is a big thing. Not just for reboots, but also for upgrades / updates. A second ESXi memory image can be created and updated and when rebooting simply switched over to the latest and greatest instead of doing a full reboot. It will save, again, a lot time. I looked at a pre-GA build and noticed the following platforms are supported, this should be a good indication:

Of course you can also see if the host is supported in the vSphere Client, I found it in the Web Client but not in the H5 Client, maybe I am overlooking it, that could of course be the case.

Then up next are a bunch of core storage enhancements. First 4K Native Drive Support, very useful for those who want to use the large capacity devices. Not much else to say about it other than that it will also be supported by vSAN. I do hope that those using it for vSAN do take the potential performance impact in to account. (High capacity, Low IOPS >> low iops per GB!) Up next is the increase of a bunch of “max values“. Number of virtual disks going from 60 to 256 virtual disks for PVSCSI. And on top of that the number of Paths and Devices is also going up. Number of devices doubled from 512 to 1024 per host, and so has the number of paths as it is going from 2048 to 4096. Some of our largest customers will definitely appreciate that!

Then there’s also the support for RDMA, which is great for applications requiring extremely low latency and very high bandwidth! Note that when RDMA is used most of the ESXi Network stack is skipped, and when used in pass-through mode this also means that vMotion is not available. So that will only be useful for scale-out applications which have their own load balancing and high availability functionality. For those who can tolerate a bit more latency a paravirtualized RDMA adaptor will be available, you will need HW version 13 for this though.​

vSphere Persistent Memory is something that I was definitely excited about. Although there aren’t too many supported server configurations, or even persistent memory solutions, it is something that introduces new possibilities. Why? Well this will provide you performance much higher than SSD at a cost which is lower than DRAM. Think less than 1 microsecond of latency. Where nanoseconds is for DRAM and Flash typically is low milliseconds under load. I have mentioned this in a couple of my sessions so far, NVDIMM will be big, which is the name commonly used for Persistent Memory. For those planning on buying persistent memory, do note that your operating system also needs to understand how to use it. There is a Virtual NVDIMM device in vSphere 6.7 and if the Guest OS has support for it then it will be able to use this byte addressable device. I believe a more extensive blog about vSphere Persistent Memory and some of the constraints will appear on the Virtual Blocks blog soon, so keep an eye on that as well. Cormac already has his fav new 6.7 features up on his blog, make sure to read that as well.

And last but not least, there was a significant improvement done in the initial placement process for DRS. Some of this logic was already included in 6.5, but only worked when HA was disabled. As of 6.7 it is also available when HA is enabled, making it much more likely that you will be able to benefit from the 3x decrease in time that it takes for the initial placement process to complete. A big big enhancements in the DRS space. I am sure though that Frank Denneman will have more to say about this.

  • « Go to Previous Page
  • Page 1
  • Interim pages omitted …
  • Page 20
  • Page 21
  • Page 22
  • Page 23
  • Page 24
  • Interim pages omitted …
  • Page 159
  • Go to Next Page »

Primary Sidebar

About the Author

Duncan Epping is a Chief Technologist and Distinguished Engineering Architect at Broadcom. Besides writing on Yellow-Bricks, Duncan is the co-author of the vSAN Deep Dive and the vSphere Clustering Deep Dive book series. Duncan is also the host of the Unexplored Territory Podcast.

Follow Us

  • X
  • Spotify
  • RSS Feed
  • LinkedIn

Recommended Book(s)

Advertisements


Copyright Yellow-Bricks.com © 2025 · Log in