• Skip to primary navigation
  • Skip to main content
  • Skip to primary sidebar

Yellow Bricks

by Duncan Epping

  • Home
  • Unexplored Territory Podcast
  • HA Deepdive
  • ESXTOP
  • Stickers/Shirts
  • Privacy Policy
  • About
  • Show Search
Hide Search

vcenter

vCenter and Memory metrics

Duncan Epping · Dec 20, 2010 ·

I received a question last week from a former colleague around vCenter Memory Metrics. There are a couple of places where memory details are shown on a “VM level” within the vCenter client. The first tab that we will discuss is the Summary tab. It shows “General” and “Resources”. It appears that there is a lot of confusion around this topic and that probably comes from the fact that some of the Performance Metrics are named similarly but don’t always refer to the same.

Lets start with “General”:

In the screenshot above you can see 2 fields related to memory:

  • Memory (2048MB)
  • Memory Overhead (110.63MB)

The first one, Memory, is an easy one. This is the amount of memory you provisioned your VM with, in this case 2048MB. The second field is Memory Overhead. Memory Overhead is the amount of memory the VMkernel thinks it will need to run the virtualized workload, in this case 110.63MB. This typicall would include things like page tables, frame buffers etc.

That brings us to the Resources sections:

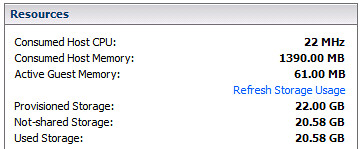
This section shows again two fields related to memory:

  • Consumed Host Memory (1390.00MB)
  • Active Guest Memory (61.00MB)

Consumed and Active is where it becomes a bit less obvious but again it isn’t rocket science. Consumed Host Memory is the amount of physical memory that has been allocated to the virtual machine. This also includes things like memory overhead, that also means that Consumed can be larger than what has been provisioned. To make it a bit more complex it should be noted that in the “Performance Tab” the “Consumed” Counter doesn’t actually include Memory Overhead!

Active Memory more or less already explains it, it is what the VMkernel believes is currently being actively used by the VM. Now it should be pointed out here that this is an estimate calculated by a form of statistical sampling.

The second tab that contains details around memory is “Resource Allocation”. Looking at the tab I guess it is obvious that this one contains more details and is more complex than the summary tab:

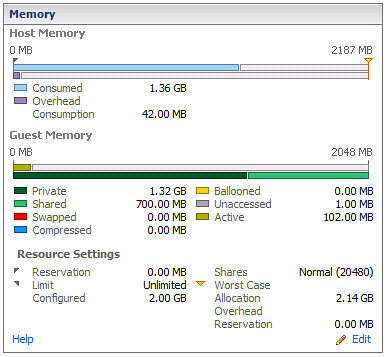
The Memory section contains three sub-sections and I have carved them up as such:

The first section is the host memory:

  • Consumed (1.36GB)
  • Overhead Consumption (42.00MB)

Again, Consumed is the amount of machine memory currently allocated to the VM. In other words, out of the 2GB provisioned currently 1.36GB is being consumed by that VM. The Overhead Consumption is the amount of memory being consumed for the virtualization overhead, as you can see it is less than what the VMkernel expected to use as mentioned in the first screenshot. I guess you could do the math easily:
Consumed = Private + Overhead Consumption

Guest Memory

  • Private (1.32GB)
  • Shared (700.00MB)
  • Swapped (0.00MB)
  • Compressed (0.00MB)
  • Ballooned (0.00MB)
  • Unaccessed (1.00MB)
  • Active (102.00MB)

This is the part where it gets slightly more complicated. Private is the amount of memory that is physically backed by the Host. In other words 1.32GB is physically stored. Shared is the total amount of memory shared by TPS. Swapped, Compressed and Ballooned speak for itself in my opinion but lets be absolutely clear here. Swapped the amount of memory reclaimed by VMkernel swapping, Compressed is the amount of memory stored in the VMs compression cache and Ballooned is the amount of memory reclaimed by the Balloon Driver. Ultimately all of these should be 0.

There’s one which I couldn’t really explain which is Unaccessed. The documentation describes it as “the amount of memory that has never been referenced by the guest”. Active is the amount of memory actively used, again it is an estimate done by statistical sampling. (Did you notice it changed from 61MB to 102MB.)

The last section is Resource Settings, I guess most are obvious (like Reservation, Limit, Configured, Shares) but the two that might not be are:

  • Worst Case Allocation (2.14GB)
  • Overhead Reservation (0.00MB)

Worst Case Allocation is the amount of memory that the virtual machine can allocate when ALL virtual machines consume the full amount of allocated resources. Basically when there is severe overcommitment this is what the VM will get in the worst possible case. This is also one of the key metrics to keep an eye on in my opinion. Especially when you are over-committing and over-provisioning your systems this metric will be a key-indicator. Overhead Reservation is the amount of Overhead Memory reserved, not much to say about that one.

Creating a vCD Lab on your Mac/Laptop

Duncan Epping · Sep 13, 2010 ·

I was just building a vCD Lab and thought I would document the process. I know Hany has done something similar recently but mine is slightly different. I wanted to have a slim config from a memory perspective and virtual machine count perspective. Before I start, let’s give a warning… ***this is totally unsupported***

Pre-requisites:

  • CentOS 5 – 64 Bit
  • Oracle 10g Express
  • Windows 2008 – 64 Bit
  • ESXi 4.1
  • vCenter 4.1
  • vCD 1.0
  • vShield 4.1

We will be creating multiple VMs but for the sake of simplicity will be combining functionality where possible. First you will need to install multiple ESXi hosts and a vCenter server. I am assuming all of you know how to do this so I won’t go into detail here. If you don’t drop me a comment. I did list some of the recommendations/requirements:

vCenter / DNS / ESXi

  • Create a VM with 1 vCPU and 1 GB of memory. I used a 20GB thin disk, which should be more than sufficient as we will not be using VUM.
  • Connect the Windows 2008 – 64 Bit ISO and walk through the standard installation process. I will not describe every step, as all of you should be able to install an OS. However the following is recommended:
    • Fixed IP Address
    • I changed the host name to “vcenter”
    • Install DNS
      • pre-populate DNS with records for your two esxi hosts, vShield Manager and your vCD server.
  • I will not tell you how to install ESXi or vCenter for that matter. Just ensure you have two ESXi hosts with shared storage in a DRS enabled cluster, those are the requirements. Preferably with some memory resource. I gave both my ESXi hosts 3GB. There are a couple of options for shared storage:
    • You could use Openfiler as your iSCSI target for ESXi hosts (preferred), if you don’t know how to set it up read this excellent this article by Kiwi_Si.
    • You could enable NFS on your CentOS which also hosts your vCD and Oracle database
    • If you are using VMware Workstation enable “clustering” of disks… I haven’t tested this in a while though.

Result: vCenter Server, 1 Cluster containing at least 2 ESXi hosts with DRS enabled.

vShield Manager

You could run vShield Manager as a VM within your virtualized ESXi host, but from a performance perspective that is probably not the smartest thing to do. So we are going to import it into Fusion. For those using Windows VMware Workstation is also fine, or even Player.

I guess this is the most tricky part of the whole setup, you will need to convert the vShield OVA to a VM. Now this is not a must, you can also run the vShield on your virtual ESXi hosts, but I like to avoid this for performance reasons. So this is how I converted it:

  • Go to the folder which contains the OVA and go into the OVA and copy all files included into a separate folder
  • Download the OVF Tool to convert the vShield Manager OVF Files to a format that Fusion supports
    • Open a terminal window and “cd” to the folder which contains “VMware-ovftool-2.0.1-260188-mac.i386.sh”
    • Make the script executable by typing the following:
      chmod +x VMware-ovftool-2.0.1-260188-mac.i386.sh
    • Run the installer script by typing the following:
      ./VMware-ovftool-2.0.1-260188-mac.i386.sh
    • Confirm the installation with “yes”
    • Accept the EULA with “yes”
    • Confirm the path by pressing enter/return
    • The install should complete literally within seconds
    • Go to the folder that contains the “OVF” file and type the following:
      /opt/vmware/ovftool/ovftool.bin “VSM.ovf” .
    • Accept the EULA by typing “yes”
    • The conversion should now start and when it is completed a new folder should be created which contains your VMX file and your VMDK files. These can be imported into Fusion.
    • Copy the VSM Folder to the place you store your local VMs and open the VM within Fusion and fire it up
  • Now that you have VSM running on your Laptop/Macbook you will need to configure it. These steps are pretty straight forward, but they will need to happen in order for VSM to function correctly:
    • Open the vShield Manager console and login with user “admin” and password “default”
    • Type “enable”, enter the password “default” again and type “setup” to configure your VSM
    • Enter your IP, Subnet, Gateway and DNS details and exit to ensure these are active
  • That is it! Now you can use your internet browser to see if you can login to your VSM “https://<ipaddress”

Result: vShield Manager running within Fusion.

vCD VM

  • Create a VM with 1 vCPU and 1 GB of memory. I used a 20GB thin disk, which should be more than sufficient.
  • Connect the CentOS 5 – 64 Bit ISO and walk through the standard installation process. I will not describe every step, as all of you should be able to install an OS. However the following is recommended:
    • Default partitioning scheme
    • Fixed IP Address
    • Disable IP v6
    • Server GUI install
  • After the install is done you will need to reboot the VM and configure the OS. I recommend the following:
    • Disable the Firewall
    • Disable SELinux
    • Enable NTP
    • Create an additional user
  • Now that the VM has rebooted again we will need to upgrade all packages to the latest version and install VMware Tools all the required packages:
    • Install VMware Tools (extract the files from the archive and run the installer via a terminal window by going to the path where you extracted it and type:
      ./vmware-install.sh
      use all the default settings
    • Open a terminal window and type the following:
      yum update
      yum upgrade
    • Now install all the Oracle and vCD required packages:
      yum install alsa-lib bash chkconfig compat-libcom_err coreutils findutils glibc grep initscripts krb5-libs libgcc libICE libSM libstdc libX11 libXau libXdmcp libXext libXi libXt libXtst module-init-tools net-tools pciutils procps sed tar which
  • Install Oracle 10g Express (again note that this isn’t officially supported):
    • Copy the Oracle RPM file to your vCD VM
    • Open a terminal window and go to the path where you copied the Oracle RPM file
    • rpm -i oracle-xe-10.2.0.1-1.0.i386.rpm
    • /etc/init.d/oracle-xe configure
    • Use the default ports (8080 and 1521)
    • Enter the password twice
    • Select “y” to ensure the database daemon is started when the VM restarts
  • After the Oracle 10g Express server has been installed test if you can actually access it by opening a web browser. Try http://<ipaddress>:8080/apex
  • I would recommend to create a new user for the vCD environment:
    • Click “Administration”
    • Go to “Database Users” and click “Create User”
    • I would recommend to give it the name “vcloud” and an easy to remember password. Also make sure you tick the “DBA” tick box.
    • Click “Create”
  • Now it is time to install vCD (copy the bin file to your vCD VM)
    • First we need to create a virtual interface so that we have two IP addresses that vCD can use. Of course you can also add a second NIC, but I use this method to keep the VM configuration as simple as I possibly can:
      • Open a terminal windows and type the following:
        nano /etc/sysconfig/network-scripts/ifcfg-eth0:1
      • Add the following to the file you just opened, of course add the approriate IP address and net mask!
        BOOTPROTO=static
        DEVICE=eth0:1
        IPADDR=<ip address>
        NETMASK=<net mask>
        ONBOOT=yes
      • Save the file and restart the network by typing the following:
        service network restart
      • When you do an “ifconfig” it should show you two devices…
    • Open a terminal window and go to the path where you copied the vCD BIN file and make the bin file executable:
      chmod +x vmware-cloud-director-1.0.0-285979.bin
    • type the following to do the install
      ./vmware-cloud-director-1.0.0-285979.bin
    • It will ask you if you want to run the installer on an unsupported distro, type “y”
    • It will ask you if you want to run the configuration script, type “n”
    • Next we will create self signed certificates, open a terminal window and do the following:
    • Go to /etc and copy and paste the following:
      /opt/vmware/cloud-director/jre/bin/keytool -keystore certificates.ks -storetype JCEKS -storepass password -genkey -keyalg RSA -alias http -dname “cn=vcloud,  ou=vmware, o=vmware, c=US” -keypass password
      /opt/vmware/cloud-director/jre/bin/keytool -keystore certificates.ks -storetype JCEKS -storepass password -genkey -keyalg RSA -alias consoleproxy -dname “cn=vcloud,  ou=vmware, o=vmware, c=US” -keypass password
    • Now you should have a file called “certificates.ks” in /etc
    • Next we will need to configure vCD, type the following to start the configuration:
      /opt/vmware/cloud-director/bin/configure
    • Select your first IP address, this will be the IP address which is used for vCD Portal access
    • Select your second IP address, this will be the IP address which is used for the VM Remote Console
    • Type the path to your certificates store, which is “/etc/certificates.ks
    • Type the password, which is password
    • Press enter to skip the “syslog server”
    • Enter the host (or IP address) for the database
      127.0.0.1
    • Press enter/return to use default database port (1521)
    • Type the database service name
      xe
    • Type the database username, in my case:
      vcloud
    • Type the database password, in my case:
      vmware
    • Now the database will be initialized and the vCD install will be  completed
    • Type “y” to start the vCD service
    • You can monitor the progress of the vCD service start up as follows
      tail -f /opt/vmware/cloud-director/log/cell.log
    • It will show you the percentage of the initialization of the application that has completed. Of course it should say “Application Initialization: Complete. Server is ready in” at some point.

Result: VM with both Oracle 10g Express and vCloud Director 1.0.

Final Steps

That is it for the command-line stuff… All we need to do now is configure vCD through the web interface… here we go:

  • Open a browser and point it to “https://<vCloud Director Address>/cloud/
  • Click “Next” on the welcome screen
  • “Accept” the License Agreement
  • Type your license key and click “Next”
  • Create an Administrator account and type a password and click “Next”
  • Give the system a name, I called it “vCD”, and click “Next”
  • Review your settings and click “Finish” if they look okay

Now you should be presented with the following screen and you should be good to go!

So what’s next? Hany has listed a nice set of videos in his article that will describe how to create a Provider vDC, how to attach a vCenter server etc. Go ahead play around, have fun… enjoy the vCloud!

vCenter Resiliency?

Duncan Epping · Aug 12, 2010 ·

After the whole MSCS’ed vCenter support discussion VMware Technical Marketing reached out to me. Lets be clear, the intention of this article is not to change support. The intention of this article is to get an idea of how many of you would be interested in seeing a whitepaper on vCenter resiliency with MSCS/VCS which could be supported on best effort by GSS.

I was asked to figure out what would most interest you. I appreciate any comments around this but specifically would love to have answers on the following:

  • Based on which technology would you prefer to see a whitepaper? MSCS or Veritas Clustering?
  • Would you be looking for a total solution including VMware Update Manager and Orchestrator or just purely vCenter Server? In case of the total package, why?
  • Are there any other components that would need to be included in a whitepaper?

Again, any help / answer / comment is very much appreciated.

Storage Filters

Duncan Epping · Aug 11, 2010 ·

I was reading about Storage Filters last week and wanted to do a short write up. I totally forgot about it until I noticed this new KB article. The KB article only discusses the LUN filters though and not the other filters that are available today.

Currently 4 filters have been made public:

  1. config.vpxd.filter.hostRescanFilter
  2. config.vpxd.filter.vmfsFilter
  3. config.vpxd.filter.rdmFilter
  4. config.vpxd.filter.SameHostAndTransportsFilter

The first filter on the list is one I discussed roughly a year ago. The “Host Rescan Filter” makes it possible to disable the automatic storage rescan that occurs on all hosts after a VMFS volume has been created. The reason you might want to avoid this is when you adding multiple volumes and want to avoid multiple rescans but just initiate a single rescan after you create your final volume. By setting “config.vpxd.filter.hostRescanFilter” to false the automatic rescan is disabled. In short the steps needed:

  1. Open up the vSphere Client
  2. Go to Administration -> vCenter Server
  3. Go to Settings -> Advanced Settings
  4. If the key “config.vpxd.filter.hostRescanFilter” is not available add it and set it to false

To be honest this is the only storage filter I would personally recommend using. For instance “config.vpxd.filter.rdmFilter” when set to “false” will enable you to add a LUN as an RDM to a VM while this LUN is already used as an RDM by a different VM. Now that can be useful in very specific situations like when MSCS is used, but in general should be avoided as data could be corrupted when the wrong LUN is selected.

The filter “config.vpxd.filter.vmfsFilter” can be compared to the RDM filter as when set to false it would enable you to overwrite a VMFS volume with VMFS or re-use as an RDM. Again, not something I would recommend enabling as it could lead to loss of data which has a serious impact on any organization.

Same goes for “config.vpxd.filter.SameHostAndTransportsFilter”. When it is set to “False” you can actually add an “incompatible LUN” as an extend to an existing volume. An example of an incompatible LUN would for instance be a LUN which is not presented to all hosts that have access to the VMFS volume it will be added to. I can’t really think of a single reason to change the defaults on this setting to be honest besides troubleshooting, but it is good to know they are there.

Most of the storage filters have its specific use cases. In general storage filters should be avoided, except for “config.vpxd.filter.hostRescanFilter” which has proven to be useful in specific situations.

Standby vCenter Server for disaster recovery

Duncan Epping · Aug 9, 2010 ·

I was reading through some documentation and found a piece on creating a cold Standby vCenter server. This used to be a common practice with vCenter 2.5 and it worked well as vCenter itself was more or less stateless.

With vSphere 4.0 something changed. Although at first it might not seem substantial it actually is. As of vSphere 4.0 VMware started using ADAM. ADAM is most commonly referred to as the component which enables Linked Mode. Linked Mode gives you the opportunity to manage multiple vCenter Server from a single pane of glass.

Not only will you have a single pane of glass you will also have a central store for roles and permissions. This is key! Roles and permissions are stored in ADAM.

Lets assume you have just a single vCenter Server and are not using Linked Mode. This will not impact the way vCenter Server stores its roles and permissions… it will still use ADAM. Even when cloned daily full consistency can not be guaranteed and as such I would personally not recommend using a cold Standby vCenter Server unless you are willing to take the risks and have fully tested it.

  • « Go to Previous Page
  • Page 1
  • Interim pages omitted …
  • Page 10
  • Page 11
  • Page 12
  • Page 13
  • Page 14
  • Interim pages omitted …
  • Page 27
  • Go to Next Page »

Primary Sidebar

About the Author

Duncan Epping is a Chief Technologist and Distinguished Engineering Architect at Broadcom. Besides writing on Yellow-Bricks, Duncan is the co-author of the vSAN Deep Dive and the vSphere Clustering Deep Dive book series. Duncan is also the host of the Unexplored Territory Podcast.

Follow Us

  • X
  • Spotify
  • RSS Feed
  • LinkedIn

Recommended Book(s)

Also visit!

For the Dutch-speaking audience, make sure to visit RunNerd.nl to follow my running adventure, read shoe/gear/race reviews, and more!

Do you like Hardcore-Punk music? Follow my Spotify Playlist!

Do you like 80s music? I got you covered!

Copyright Yellow-Bricks.com © 2026 · Log in