• Skip to primary navigation
  • Skip to main content
  • Skip to primary sidebar

Yellow Bricks

by Duncan Epping

  • Home
  • Unexplored Territory Podcast
  • HA Deepdive
  • ESXTOP
  • Stickers/Shirts
  • Privacy Policy
  • About
  • Show Search
Hide Search

esxcli

How to disable ESXi firewall

Duncan Epping · Jan 23, 2013 ·

For a project I had to disable the ESXi firewall on a host permanently. To be honest, it isn’t something I would do normally or would recommend even. It wasn’t listed in “chkconfig”, which kinda makes sense, so I looked at the networking section of esxcli. What an awesome command by the way! Quickly after “tab’ing” through esxcli I figured out how to disable it permanently:

esxcli network firewall set --enabled false

I figured I would write it down, because this is the stuff I tend to forget easily.

PS: If you ever need anything around esxcli, the vSphere Blog is a good place to check as most of the relevant posts are tagged with “esxcli”.
Faking an SSD in your virtualized vSphere lab

Duncan Epping · Jan 11, 2013 ·

I have written about this before (and so has William Lam, so all credits go to William), but I wanted to note down these commands for my own use as I find myself digging around often for the same commands these days. So what is my goal: Faking an SSD in my virtualized vSphere lab.

In my lab I have a bunch of virtualized ESXi hosts. Those hosts have multiple disks and I want to mark one of those disks as SSD. To keep things simple I set things up as follows. Just to point out, I use 0:0 / 1:0 / 2:0 so that each device gets a new controller and is easy to identifiy:

  • First Disk – ESXi install disk – 5GB – SCSI 0:0
  • Second Disk – Fake SSD – 40GB – SCSI 1:0
  • Third Disk – Large disk – 1TB – SCSI 2:0

When I boot all disks are recognized as regular disks and in some cases as non-local. In my testing I need local disks and need SSD. So this is what I did to get exactly that. With the first command I mark the “second disk” as SSD and local. With the second command I mark the third disk as local. Next I reclaim the devices so that the new SATP rules are applied.

esxcli storage nmp satp rule add --satp VMW_SATP_LOCAL --device mpx.vmhba2:C0:T0:L0 --option "enable_local enable_ssd"
esxcli storage nmp satp rule add --satp VMW_SATP_LOCAL --device mpx.vmhba3:C0:T0:L0 --option "enable_local"
esxcli storage core claiming reclaim -d mpx.vmhba2:C0:T0:L0
esxcli storage core claiming reclaim -d mpx.vmhba3:C0:T0:L0

Next you can simply validate if it has worked by typing the following for device vmhba2 and 3 (if you replace the 2 with a 3 ofcourse) :

esxcli storage core device list --device=mpx.vmhba2:C0:T0:L0

As you can see, faking an SSD is fairly straight forward. Note that even if you have an SSD drive you still might need to do this. In some cases the SSD drive is not recognized and you will need to create a rule for it manually.

Some more nuggets about handling VIB files

Duncan Epping · Nov 30, 2011 ·

After I posted my article yesterday Jason Boche posted a comment about the reboot that was required according to the screenshot. I looked in to it and quickly realized that if I would alter my “descriptor.xml” I would not get this message. In other words, it depends on the package that is installed if a reboot is required or not, in my case I made the following simple changes to install the package without the need to reboot:

<live-install-allowed>true</live-install-allowed>
<live-remove-allowed>true</live-remove-allowed>

In other words, I am allowed to install it without a reboot and remove it without a reboot. Simple huh? Of course I tested it and this is the result:

~ # esxcli software vib install -v /test.vib
Installation Result
   Message: Operation finished successfully.
   Reboot Required: false
   VIBs Installed: Duncan_bootbank_firewallrule_1.0
   VIBs Removed:
   VIBs Skipped:
~ #

After clicking refresh in the vCenter client the firewall rule I created pops up as expected.

Now if you would like to know before installing what the package contains and what the requirements are you can simply figure that out by doing the following:

~ # esxcli software sources vib get -v file:/test.vib
Duncan_bootbank_firewallrule_1.0
   Name: firewallrule
   Version: 1.0
   Type: bootbank
   Vendor: Duncan
   Acceptance Level: CommunitySupported
   Summary: Firewall rule
   Description: Firewall rule
   Release Date: 2011-06-01
   Depends:
   Conflicts:
   Replaces:
   Provides:
   Maintenance Mode Required: False
   Hardware Platforms Required:
   Live Install Allowed: True
   Live Remove Allowed: True
   Stateless Ready: False
   Overlay: False
   Tags: driver, module
   Payloads: test
~ #

As you can see in this case, “live install allowed” is set to true. The vendor is “Duncan” and the Acceptance Level is “CommunitySupported”, these are important details in my opinion! Another one to keep an eye on is if the package is “Stateless Ready” or not. In my case I defined it as “false”.

Of course you can also remove a VIB file after installing it. This is pretty straight forward, first of all list all the installed VIBs:

~ # esxcli software vib list
Name                  Version                             Vendor  Acceptance Level  Install Date
--------------------  ----------------------------------  ------  ----------------  ------------
ata-pata-amd          0.3.10-3vmw.500.0.0.456551          VMware  VMwareCertified   2011-06-06
ata-pata-atiixp       0.4.6-3vmw.500.0.0.456551           VMware  VMwareCertified   2011-06-06
ata-pata-cmd64x       0.2.5-3vmw.500.0.0.456551           VMware  VMwareCertified   2011-06-06

After listing all installed VIBs you can easily remove them by using the following command:

~ # esxcli software vib remove -n ata-pata-amd

This would remove the VIB named “ata-pata-amd”. You could even do a “dry-run” to see what the result would be:

~ # esxcli software vib remove -n ata-pata-amd --dry-run
Removal Result
   Message: Dryrun only, host not changed. The following installers 
   will be applied: [BootBankInstaller]
   Reboot Required: true
   VIBs Installed:
   VIBs Removed: VMware_bootbank_ata-pata-amd_0.3.10-3vmw.500.0.0.456551
   VIBs Skipped:
~ #

I hope this provides some more details around how to handle VIB files. Don’t hesitate to leave a comment if you have any questions at all.

How to create your own .vib files

Duncan Epping · Nov 29, 2011 ·

** Be warned, this is totally unsupported. Only for educational purposes should this be used **

Today I was asked the question on how to create a VIB file (.vib). In our documentation it is mentioned that you can create a VIB file to add firewall rules to your ESXi host. As the .vib tool is not available yet to the general public I decided to dig in to it. I want to stress that I tested this in my own lab, it is not supported at all, but might give a nice insight in how these VIB are constructed. Before you read how I created my own VIB file I suggest reading this excellent article on what a .vib file is and contains by my colleague Kyle Gleed.

First thing I did was download an existing VIB file. I downloaded a tiny LSI SCSI driver. I did a “more” of the .vib file and I noticed the following:

!<arch>
debian-binary

That was my first lead, it appears to be a debian-binary, which is a format that the Linux distribution Debian uses to package software / drivers etc. I knew it should be possible to check what was included in this package. So I did a quick search and stumbled on some procedures on how to do this using some standard commands provided by my Debian virtual machine. (Links at the bottom) So I did the following on the package I downloaded:

ar tv file.vib

This showed me that the .vib file contained three files:

descriptor.xml
sig.pkcs7
scsi-meg

This seemed pretty obvious to me after reading Kyle’s article. The descriptor contained the metadata, the “sig*” file contained the signature and the “scsi-meg” was the actual driver. I decided to extract the VIB file to look at the content of these files:

ar vx file.vib

As the permissions on the files didn’t allow me to look at them I changed the permissions on those by using “chmod”. Now what? Well let’s look at the “scsci-meg” file first. What is it? I looked at what was in the file by using the following command:

tar -tzvf scsi-meg

It contained a list of files and that is it. I decided to extract it using “tar -xzvf” and as expected it was the folder structure and files part of this driver. I figured that it wouldn’t be too difficult to create a simple package. Why not try it… Here we go. First I deleted everything in the “sig.pkcs7” file. As Kyle mentioned in his article that community support packages can have an empty signature. I also deleted all the files and folders that were extracted from the “scsi-meg” package that I did not need. I then created a folder underneath the “/etc/vmware” structure as I wanted to create a firewall rule. (Added the folder “firewall”.)

I copied a firewall rule from my existing ESXi host and which is created by HA to my Debian VM and edited the file, the original file was “fdm.xml”. I edited and and renamed it to test.xml. I changed all ports to 7000 and changed the <id> of the service that would need to be added and saved the file in “etc/vmware/firewall”.

Now it was time to package it all up and see if it would work. I guessed that the steps required would simply be the reverse of what I did to extract it all.

tar -czvf etc/ test

I then opened up the descriptor.xml file and changed some of the fields around, most don’t seem to matter much except for the following:

Change the following key to:
<acceptance-level>certified</acceptance-level>
<acceptance-level>community</acceptance-level>
Add your list of files:
<file-list>
<file>path-to-file</file>
</file-list>
Change the name of your package and the size accordingly:
<payload name="test" type="vgz" size="809">

I wasn’t sure if that would work, but I would find out eventually I guess (yes I also tried “communitysupport” as the acceptance-level but that doesn’t work!). I also removed the checksum details from the descriptor file just in case it would be used. This is what my full descriptor file looked like:

<vib version="5.0">
<type>bootbank</type>
<name>firewallrule</name>
<version>1.0</version>
<vendor>Duncan</vendor>
<summary>Firewall rule</summary>
<description>Firewall rule</description>
<release-date>2011-06-01T22:16:31.062257+00:00</release-date>
<urls/>

<relationships>
<depends>
</depends>
<conflicts/>
<replaces/>
<provides/>
<compatibleWith/>
</relationships>

<software-tags>
<tag>driver</tag>
<tag>module</tag>
</software-tags>

<system-requires>
<maintenance-mode>true</maintenance-mode>
</system-requires>

<file-list>
<file>etc/vmware/firewall/test.xml</file>
</file-list>

<acceptance-level>community</acceptance-level>
<live-install-allowed>false</live-install-allowed>
<live-remove-allowed>false</live-remove-allowed>
<cimom-restart>false</cimom-restart>
<stateless-ready>false</stateless-ready>
<overlay>false</overlay>

<payloads>
<payload name="test" type="vgz" size="809">
</payload>
</payloads>
</vib>

Next up would be making a single .vib file out of these three components again:

ar -r test.vib test descriptor.xml sig.pkcs7

Now I need to ‘scp’ the file to my ESXi host and see if I can install it:

scp test.vib root@esxi:test.vib
esxcli software vib install -v /test.vib

I received an error that the ImageProfile acceptance level needed to be changed. That was my next step:

esxcli software acceptance set --level CommunitySupported

After repeating the “esxcli software vib install” command I received the following output:

~ # esxcli software vib install -v /test.vib
Installation Result
   Message: The update completed successfully, but the system needs to be rebooted for the changes to be effective.
   Reboot Required: true
   VIBs Installed: Duncan_bootbank_firewallrule_1.0
   VIBs Removed:
   VIBs Skipped:
~ #

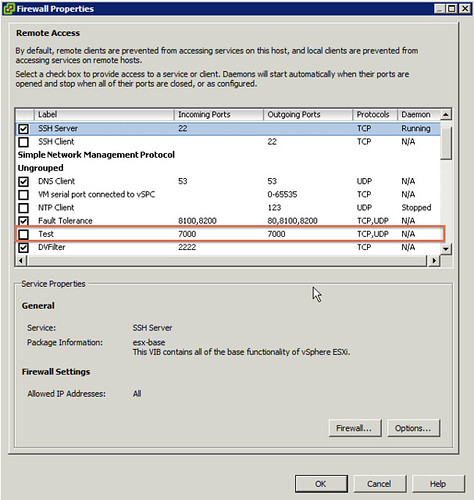
I rebooted the host and here’s a screenshot of the ESXi firewall with the newly added custom service “Test”:

Once again, I want to point out that this is currently unsupported. Don’t use this in your production environment!

The following articles helped me figuring this out and producing this article:

http://tldp.org/HOWTO/html_single/Debian-Binary-Package-Building-HOWTO/

http://linuxtrove.com/wp/?p=78

ESXi 5.0 and Scripted Installs

Duncan Epping · Jul 19, 2011 ·

When I was playing with ESXi 5.0 in my lab I noticed some changes during the installation process. Of course I had not bothered to read the documentation but when I watched the installer fail I figured it might make sense to start reading. I’ve documented the scripted installation procedure multiple times by now.

With ESXi 5.0 this has been simplified, this is what it looks like today:

I also want to point out that many of the standard installation commands have been replaced, removed or are not supported anymore. I created a simple script to automatically install an ESXi 5.0 host. It creates a second vSwitch and a second VMkernel for vMotion. It enables both the local and remote TSM and sets the default PSP for the EMC VMAX to Round Robin. As you can see there is a huge shift in this script towards esxcli. Although some of the old “esxcfg-*” commands might still be working they are deprecated and no longer supported. The new standard is esxcli, make sure you get familiarized with it and start using it today as over time this will be the only CLI tool available.


# Sample scripted installation file
# Accept the VMware End User License Agreement
vmaccepteula
# Set the root password for the DCUI and ESXi Shell
rootpw mypassword
# Install on the first local disk available on machine
install --firstdisk --overwritevmfs
# Set the network to DHCP on the first network adapater, use the specified hostname and do not create a portgroup for the VMs
network --bootproto=dhcp --device=vmnic0 --addvmportgroup=0
# reboots the host after the scripted installation is completed
reboot


%firstboot --interpreter=busybox
# Add an extra nic to vSwitch0 (vmnic2)
esxcli network vswitch standard uplink add --uplink-name=vmnic2 --vswitch-name=vSwitch0
#Assign an IP-Address to the first VMkernel, this will be used for management
esxcli network ip interface ipv4 set --interface-name=vmk0 --ipv4=192.168.1.41 --netmask=255.255.255.0 --type=static
# Add vMotion Portgroup to vSwitch0, assign it VLAN ID 5 and create a VMkernel interface
esxcli network vswitch standard portgroup add --portgroup-name=vMotion --vswitch-name=vSwitch0
esxcli network vswitch standard portgroup set --portgroup-name=vMotion --vlan-id=5
esxcli network ip interface add --interface-name=vmk1 --portgroup-name=vMotion
esxcli network ip interface ipv4 set --interface-name=vmk1 --ipv4=192.168.2.41 --netmask=255.255.255.0 --type=static
# Enable vMotion on the newly created VMkernel vmk1
vim-cmd hostsvc/vmotion/vnic_set vmk1
# Add new vSwitch for VM traffic, assign uplinks, create a portgroup and assign a VLAN ID
esxcli network vswitch standard add --vswitch-name=vSwitch1
esxcli network vswitch standard uplink add --uplink-name=vmnic1 --vswitch-name=vSwitch1
esxcli network vswitch standard uplink add --uplink-name=vmnic3 --vswitch-name=vSwitch1
esxcli network vswitch standard portgroup add --portgroup-name=Production --vswitch-name=vSwitch1
esxcli network vswitch standard portgroup set --portgroup-name=Production --vlan-id=10
# Set DNS and hostname
esxcli system hostname set --fqdn=esxi5.localdomain
esxcli network ip dns search add --domain=localdomain
esxcli network ip dns server add --server=192.168.1.11
esxcli network ip dns server add --server=192.168.1.12
# Set the default PSP for EMC V-MAX to Round Robin as that is our preferred load balancing mechanism
esxcli storage nmp satp set --default-psp VMW_PSP_RR --satp VMW_SATP_SYMM
# Enable SSH and the ESXi Shell
vim-cmd hostsvc/enable_ssh
vim-cmd hostsvc/start_ssh
vim-cmd hostsvc/enable_esx_shell
vim-cmd hostsvc/start_esx_shell

For more deepdive information read William’s post on ESXCLI and Scripted Installs.

  • « Go to Previous Page
  • Page 1
  • Page 2
  • Page 3
  • Go to Next Page »

Primary Sidebar

About the Author

Duncan Epping is a Chief Technologist and Distinguished Engineering Architect at Broadcom. Besides writing on Yellow-Bricks, Duncan is the co-author of the vSAN Deep Dive and the vSphere Clustering Deep Dive book series. Duncan is also the host of the Unexplored Territory Podcast.

Follow Us

  • X
  • Spotify
  • RSS Feed
  • LinkedIn

Recommended Book(s)

Advertisements


Copyright Yellow-Bricks.com © 2025 · Log in