• Skip to primary navigation
  • Skip to main content
  • Skip to primary sidebar

Yellow Bricks

by Duncan Epping

  • Home
  • Unexplored Territory Podcast
  • HA Deepdive
  • ESXTOP
  • Stickers/Shirts
  • Privacy Policy
  • About
  • Show Search
Hide Search

powerCLI

Memory Speeds?

Duncan Epping · Oct 10, 2011 ·

I was just checking out some of the VMworld Sessions and one that I really enjoyed was the one on “Memory Virtualization” session by Kit Colbert and YP Chien (#VSP2447). This session has a lot of nuggets but something I wanted to share is this script that YP Chien / Kingston showed up on stage. This script basically shows you at what speed your memory is capable of runing at. I asked Alan Renouf if he could test it as my lab is undergoing heavy construction. He tested it and mailed me back the output of the following script:

$cred = Get-Credential
$sessOpt = New-WSManSessionOption -SkipCACheck -SkipCNCheck -SkipRevocationCheck
$rsrcURI = "http://schemas.dmtf.org/wbem/wscim/1/cim-schema/2//CIM_PhysicalMemory"
foreach ($h in (Get-VMHost)) {
Write-Output $h.Name
Get-WSManInstance -ConnectionURI ("https`://" + $h.Name + "/wsman") -Authentication basic -Credential $cred -Enumerate -Port 443 -UseSSL -SessionOption $sessOpt -ResourceURI $rsrcURI | Select ElementName, @{N="Capacity (GB)";E={$_.Capacity / 1073741824.}}, MaxMemorySpeed
}

The output will look like this:

hostname01.local
ElementName    : DIMM1
Capacity (GB)  : 2
MaxMemorySpeed : 800

hostname02.local
ElementName    : DIMM1
Capacity (GB)  : 2
MaxMemorySpeed : 800

For those wondering what more you can get from CIM I would suggest reading this great article on the VMware PowerCLI blog.

Cool, listed in the top 50 “Must-Read IT Blogs” by BizTech!

Duncan Epping · Sep 7, 2011 ·

I just noticed I am listed as one of the top 50 “Must-Read IT Blogs” by BizTech. It is a great honor to be part of a list which features some of the most brilliant people in IT and some of the largest corporate blogs out there. Make sure to read the Top 50 and add these blogs to your RSS reader as there are some real gems in there! Thanks BizTech!

Must-read IT Blog
BizTech’s Must-Read IT Blogs

Cheat sheet – Auto deploy

Duncan Epping · Sep 5, 2011 ·

When I finished my article about auto deploy I figured it was really lengthy and wanted to write down the bare minimum which can be used as a quick cheat sheet when setting up auto-deploy. Of course you will need to install vCenter, PowerCLI, Auto-Deploy and TFTP first, but I am guessing most of you will know how to do that. Here’s what you will need to do when you have all of the requirements up and running:

  1. Add-EsxSoftwareDepot c:\tmp\VMware-Esxi-5.0.0-<buildnumber>-depot.zip
  2. Add-EsxSoftwareDepot http://<vcenter server>/vSphere-HA-depot
  3. New-EsxImageProfile -CloneProfile "ESXi-5.0.0-<buildnumber>-standard" -name "ESXiStatelessImage"
  4. Add-EsxSoftwarePackage -ImageProfile "ESXiStatelessImage" -SoftwarePackage vmware-fdm
  5. New-DeployRule -Name "FirstBoot" -Item "ESXiStatelessImage" -AllHosts
  6. Add-DeployRule -DeployRule "FirstBoot"
  7. Boot one of the hosts
  8. Configure the host
  9. Create Host Profile based on “first host” named “ESXiHostProfile”
  10. New-DeployRule -name "ProductionBoot" -item "ESXiStatelessImage", ESXiHostProfile, <target_cluster> -Pattern "vendor=<unique hw identifier>"
  11. Add-DeployRule -DeployRule "ProductionBoot"
  12. Remove-DeployRule -DeployRule FirstBoot -delete
  13. Boot all hosts
  14. Assign Host Profiles to all hosts
  15. Provide the “user input” aka create an Answer File per host
  16. Reboot hosts –> done
  17. Before you leave your PowerCLI session make sure you save your newly create image profile as a Software Depot so you can make changes later if and when needed! Otherwise the data will be saved in your image profile cache but you will not be able to make changes!
    Export-EsxImageProfile -ImageProfile "ESXiStatelessImage" -ExportToBundle -FilePath c:\tmp\ESXiStatelessImage.zip

That seems a bit more simplistic than my previous post doesn’t it.


** update: added step 17 **

VMworld – Day 2

Duncan Epping · Aug 31, 2011 ·

VMworld Day 2 started off with a great keynote by no one less than Dr Steve Herrod. Steve spoke about all the changes we introduced with the launch of the Cloud Infrastructure Suite and all the change which are coming up… including sneak peeks of not release products. I live blogged the session and I don’t want to blog just to blog, so for more details read it here. There are a couple of things though I want to stress which in my opinion stood out:

  • VMware Appblast –> New project which allows you to start any app in a HTML5 compatible browser on any device.
  • VXLAN –> Provides a Layer 2 abstraction to virtual machines, independent of where they are located. (quote from Steve’s article)
  • VMware Octopus –> Probably best described as an enterprise level “Dropbox” service

After the keynote I headed over to the VMware Storage Booth and introduced many attendees to the cool new storage features which are part of vSphere 5. There were a couple of things which stood out for me, everyone loved Storage DRS! Profile-Driven Storage is hot and the changes in VMFS-5 were very very welcome.

Next stop was the infamous #VSP1425 aka “Ask the Expert vBloggers”. We had roughly 200 attendees. The panel was formed as follows: Scott Lowe, Frank Denneman, Chad Sakac and I. It was moderated by Rick Scherer (Thanks for buzzing out Chad :-)) and as we had an empty seat we decided to pull up a person from the audience… I forgot the name of this person (please identify yourself), but once again thanks for joining this session and thanks for your great contribution, much appreciated! This session did extremely well in my opinion. We had great questions from the audience but especially the interaction between the panel members worked great. Definitely something we will do again next year. (We scored 4.8 out of 5 on the survey.)

Next up was a meeting with Tintri. We met up with Kieran Harty and Pratik Wadher and got a demo of the current platform and discussed futures. I already discussed their product in-depth on my blog so I will not repeat our whole discussion or my thoughts. I just want to add that I was impressed by their UI now that we got to play around with it and I expect them to do really well in Europe due to the simplicity of the set up.

After having random chats with other vendors we (when I say we I mean Frank and I) headed over to my Group Discussion (#GD43). Now this was the first Group Discussion I ever hosted… I LOVED IT! This is the best format for a session and can I say thanks to Richard Garsthagen who came up with this excellent concept! I had prepared a couple of slides with questions around VMware Clustering solutions. These questions formed the basis of the discussion. The participation of the audience was excellent. Frank helped driving this session and one of our lead HA engineers, Keith Farkas, joined as well… Believe me when I say that Keith was happy with all the excellent feedback we received from the audience during this session. Next year, and in Copenhagen, I want to do more sessions like these… This is what VMworld should be like, small discussion sessions with lots of interaction with the audience!

Before I head out to breakfast there are a couple of things I would like to mention… Did everyone see PowerCLI-Man? I don’t know who he is or where he all of a sudden came from, but he is my new favorite super hero! What an amazing guy, dropping in on a session hosted by Luc Dekens and Alan Renouf while you know he is fighting operational wars on a day to day basis… amazing. (He even has Facebook?!)

I also forgot to mention VMworld TV in my “Day 1” report… Sorry Richard here you go. In all seriousness check the VMworld TV youtube channel and watch the great interviews and summaries that Richard and his team produced. It is a great way of getting an impression of what is going on at VMworld. Believe me, it is a madhouse.

Another day at VMworld about to start… hopefully I will have bit more time to watch some sessions myself today. If you are attending I would ask all of you to please fill out the session surveys. Keep in mind that all speakers, and the VMworld organizational, love to feedback on what worked well and what can be improved. Please provide constructive feedback, keep in mind that many of the people presenting at VMworld are just technical people like you and me and not professional “marketing” type speakers! My respect to each and everyone of you who does not do this on a day-to-day basis and presented a session at VMworld. I know it is a huge step and I know it is not easy to get up in front of literally hundreds of people!

Using vSphere 5 auto-deploy in your home lab

Duncan Epping · Aug 25, 2011 ·

I was just playing around with auto-deploy and I figured I would quickly scribble down the steps required to configure it. The documentation is okay but it often refers me back and forth in the document which makes it difficult to read at times. Here is what I did to get it working. I was in doubt if I would add screenshots, but that would make this article fairly lengthy and I am sure that most of you wouldn’t need it any way. I have my complete lab virtualized at home, so this whole setup is running in VMware Workstation.

  • Download vCenter Server 5
  • Download the ESXi 5.0 Offline Bundle
  • Install vCenter Server 5
  • Install Powershell 2.0 (installed it on the vCenter Server)
  • Install PowerCLI (installed it on the vCenter Server)
  • Install Auto-deploy (also located on vCenter iso) (installed it on the vCenter Server)
  • Install TFTP Server (I used Solarwinds) (installed it on the vCenter Server)
    • Click “File” and “Configure” and start the TFTP Server
    • A folder C:\TFTP-Root will be created
    • Make sure if you are running this on Windows that the Firewall is open for TFTP
  • Open up your vCenter Client
  • Go to the Home screen and click “Auto Deploy”
  • Click “Download TFTP Boot Zip”
    • I temporarily disabled IE ESC to be able to quickly download the zip file (Control Panel –> Add / Remove Programs –> Turn Windows Features On/Off –> Look for “Configure IE ESC in the Security Information section)
  • Unzip the TFTP Boot Zip file in your TFTP-Root folder
  • Copy the location of “BIOS DHCP File Name as mentioned in your Auto Deploy screen. This will be “undionly.kpxe.vmw-hardwired”.
  • Go to your DHCP Server and add the filename and the ip address of the
    • In my case this is what I added to the advanced settings in my Tomato Router/DHCP server:
      dhcp-boot=undionly.kpxe.vmw-hardwired,,192.168.1.45
    • In the case of a MS DHCP Server you will need to follow this MS KB article. (#66 and #67 should be sufficient)
  • Now it should be possible to boot your host, however you should see a screen that tells you that there no ESXi image associated yet. Now we need to do some PowerCLI magic…
  • First of all we will need to set the execution policy to “remotesigned” if you haven’t done so already, in my case I haven’t as this is a brand new installed Windows VM:
    Set-ExecutionPolicy RemoteSigned
  • Now you can open up PowerCLI and connect to your vCenter Server:
    Connect-VIServer <vcenter name>
  • Next we will need to add a software depot, this is the Offline Bundle file you downloaded at the beginning:
    Add-EsxSoftwareDepot c:\tmp\VMware-ESXi-5.0.0-469512-depot.zip
  • Now that you’ve added the depot you will need to identify the ImageProfile you wan to use. Run the following command to list the image profiles:
    Get-EsxImageProfile
  • In my case it returns the following:
    Name
    ——-
    ESXi-5.0.0-469512-no-tools ….
    ESXi-5.0.0-469512-standard ….
  • We will use the “Standard” image profile as we want to be able to install VMware Tools as well through vCenter. In order to use it we will need to define a rule. This basically tells the client which image it should pick up during the PXE Boot. No key thing with this command is the “-Pattern” as that basically defines which machines will get boot the image. In my case everything is running within VMware Workstation and the vendor will always be “VMware Virtual Platform” so I decided to use that is the identifier for this specific rule.
    New-DeployRule –Name “FirstTimeBoot” –Item “ESXi-5.0.0-469512-standard” –Pattern “model=VMware Virtual Platform”
  • This will take a while as it is unzipping and uploading the required packages. When it has successfully completed we will need to make this deploy rule active:
    Add-DeployRule -DeployRule FirstTimeBoot
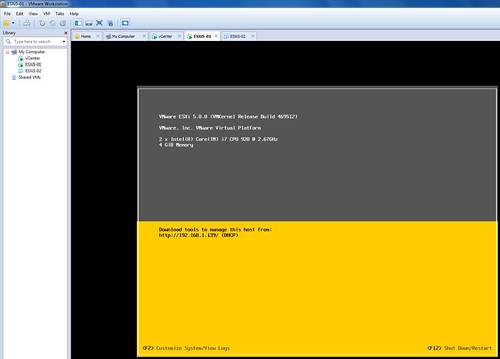
  • That’s it, now the host should be able to boot up using the assigned image profile. See the screenshot below of my PXE booted ESXi host within VMware Workstation
    Using vSphere 5 auto-deploy in your home lab

Now if you would go to vCenter and check your Datacenter you will see a host appearing. This host however will still need to be configured and that is the second portion of this exercise…

What we creating here is a stateless configuration. That means we will need to use host profiles in order to configure this host correctly after reach reboot. These are the steps I took to create a host profile for my Lab hosts:

  • Configure the host as needed. Don’t forget things like NTP, Storage, Networking, Scratch etc.
  • Go to Host Profiles
  • Create a New Profile from an existing host
  • Select the host you just configured
  • Give it a name that you will remember, I used “ESXiLabHostProfile”
  • After creating the host profile you will need to attach the host to the profile and check for compliancy. This test should fail as you will need to create an answer file first.
    • Right click the host and select “Update Answer File”
    • Check all settings (ip-address etc) and when finished click “update”
    • Right click the host and select “Check Answer File”, result should be “x”
    • Select the host and click “Check Compliance”, result should be “compliant”
  • Before we will create a new deploy rule we will want to add the HA depot and create a new image profile which includes the HA agent as we will want our hosts to be part of that. If you don’t add it the “new-deployrule” statement will throw a message that you will need to add it. First we will add the vSphere HA depot. The ip-address should of course be replace with the ip-address of your own vCenter server:
    Add-EsxSoftwareDepot http://192.168.1.45:80/vSphere-HA-depot
  • Now we will need to clone the ESXi Standard depot and add the HA agent to it:
    New-EsxImageProfile -CloneProfile ESXi-5.0.0-469512-standard -name “ESXiHA”
    Add-EsxSoftwarePackage -ImageProfile “ESXiHA” -SoftwarePackage vmware-fdm
  • Now we will create a new deploy rule and associate it with the just created host profile called “ESXiLabHostProfile”. We will also directly enable this new rule. Note that “HA-DRS” is the name of my cluster in this case. First we will remove the old rule to make sure we start with a clean slate:
    Remove-DeployRule -DeployRule FirstTimeBoot -delete
    New-DeployRule –Name “ProductionBootRule” –Item “ESXiHA”, ESXiLabHostProfile, HA-DRS –Pattern “model=VMware Virtual Platform”
    Add-DeployRule -DeployRule “ProductionBootRule”
  • Now you can restart the ESXi host and it should end up in the cluster (HA-DRS) with the correct host profile (ESXiLabHostProfile) and completely configured ready for action! (Note that for the next host you will need to create the answer file as well initially for it to work correctly.)

That’s it for today… Hope it helps, I had a lot of fun exploring this cool new feature! I love it but boy do I feel like a n00b playing around with PowerCLI after having seen some of Alan‘s or Luc‘s magic. Gabe also has a nice article on this topic… check it out, worth reading!


Changelog:
Edit 1: Changed naming scheme

  • « Go to Previous Page
  • Page 1
  • Page 2
  • Page 3
  • Go to Next Page »

Primary Sidebar

About the Author

Duncan Epping is a Chief Technologist and Distinguished Engineering Architect at Broadcom. Besides writing on Yellow-Bricks, Duncan is the co-author of the vSAN Deep Dive and the vSphere Clustering Deep Dive book series. Duncan is also the host of the Unexplored Territory Podcast.

Follow Us

  • X
  • Spotify
  • RSS Feed
  • LinkedIn

Recommended Book(s)

Advertisements


Copyright Yellow-Bricks.com © 2025 · Log in