• Skip to primary navigation
  • Skip to main content
  • Skip to primary sidebar

Yellow Bricks

by Duncan Epping

  • Home
  • ESXTOP
  • Stickers/Shirts
  • Privacy Policy
  • About
  • Show Search
Hide Search

Desktop

Instant Clone in vSphere 6.7 rocks!

Duncan Epping · May 1, 2018 ·

I wrote a blog post a while back about VMFork, which then afterwards got rebranded to Instant Clone. In the vSphere 6.7 release there has been a major change to the architecture of VMFork aka Instant Clone, so I figured I would do an update on the post. As an update doesn’t stand out from the rest of the content I am sharing it as a new post.

Instant Clone was designed and developed to provide a mechanism that allows you to instantaneously create VMs. In the early days it was mainly used by folks who want to deploy desktops, by the desktop community this was often referred to as “just in time” desktops. These desktops would literally be created when the user tried to login, it is indeed that fast. How did this work? Well a good way to describe it is that it is essentially a “vMotion” of a VM on the same host with a linked clone disk. This essentially leads to a situation which looks as follows:

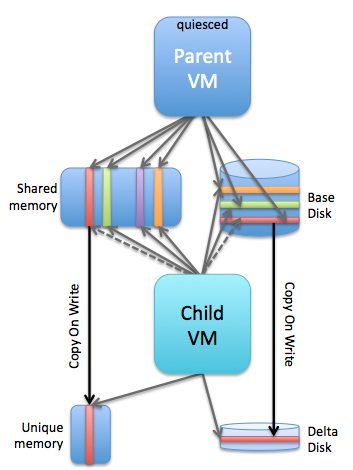
On a host you had a parent VM and a child VM associated with it. You would have a shared base disk, shared memory and then of course unique memory pages and a delta disk for (potential) changes written to disk. The reason customers primarily used this only with VDI at first was the fact that there was no public API for it. Of course folks like Alan Renouf and William Lam fought hard for public APIs internally and they managed to get things like the PowerCLI cmdlets and python vSphere SDK pushed through. Which was great, but unfortunately not 100% fully supported. On top of that there were some architectural challenges with the 1.0 release of Instant Clones. Mainly caused by the fact that VMs were pinned to a host (next to their parent VM) and as such things like HA, DRS, vMotion wouldn’t work. Now with version 2.0 this all changes. William already wrote an extensive blog post about it here. I just went over all of the changes and watched some internal training, and I am going to write some of my findings/learnings down as well, just so that it sticks… First let’s list the things that stood out to me:

  • Targeted use cases
    • VDI
    • Container hosts
    • Big data / hadoop workers
    • DevTest
    • DevOps
  • There are two workflows for instant clone
    • Instant clone a running a VM, source and generated VMs continue running
    • Instant clone a frozen VM, source is frozen using guestRPC at point in time defined by customer
  • No UI yet, but “simple API” available
  • Integration with vSphere Features
    • Now supported: HA, DRS, vMotion (Storage / XvMotion etc)
  • Even when TPS is disabled (default) VMFork still leverages the P-Share technology to collapse the memory pages for efficiency
  • There is no explicit parent-child relationship any longer

Let’s look at the use cases first, I think the DevTest / DevOps is interesting. You could for instance do an Instant Clone (live) of a VM and then test an upgrade for instance for the application running within the VM. For this you would use the first workflow that I mentioned above: instant clone a running VM. What happens here in the workflow is fairly straight forward. I am using William’s screenshots of the diagrams the developers created to explain it. Thanks William, and dev team 🙂

instant clone

Now note that above when the first clone is created the source gets a delta disk as well. This is to ensure that the shared disk doesn’t change as that would cause problems for the target. Now when a 2nd VM is created and a 3 the source VM gets additional delta’s. This as you can imagine isn’t optimal and will over time even potentially slow down the source VM. Also one thing to point out is that although the mac address changes for the generated VM, you as the admin still need to make sure the Guest OS picks this up. As mentioned above, as there’s no UI in vSphere 6.7 for this functionality you need to use the API. If you look at the MOB you can actually find the InstantClone_Task and simply call that, for a demo scroll down. But as said, be careful as you don’t want to end up with the same VM with the same IP on the same network multiple times. You can get around the Mac/IP conflict issue rather easy and William has explained how in his post here. You can even change the port group for the NIC, for instance switch over to an isolated network only used for testing these upgrade scenarios etc.

That second workflow would be used for the following use cases: VDI, Container Hosts, Hadoop workers… all more or less the same type of use case. Scale out identical VMs fast! In this case, well lets look at the diagram first:

instant clone

In the above scenario the Source VM is what they call “frozen”. You can freeze a VM by leveraging the vmware-rpctool and run it with “instantclone.freeze”. This needs to happen from within the guest, and note that you need to have VMware tools installed to have vmware-rpctool available. When this is executed, the VM goes in to a frozen state, meaning that no CPU instructions are executed. Now that you froze the VM you can go through the same instant clone workflow. Instant Clone will know that the VM is frozen. After the instant clone is create you will notice that there’s a single delta disk for the source VM and each generated VM will have its own delta disk as shown above. Big benefit is that the source VM won’t have many delta disks. Plus, you know for sure that every single VM you create from this frozen VM is 100% identical as they all resume from the exact same point in time. Of course when the instant clone is created the new VM is “unfrozen / resumed”, the source will remain frozen. Note that if for whatever reason the source is restarted / power cycled then the “frozen state” is lost. Another added benefit of the frozen VM is that you can automate the “identity / IP / mac” issue when leveraging the “frozen source VM” workflow. How do you do this? Well you disable the network, freeze it, instant clone it (unfreezes automatically), make network changes, enable network. William just did a whole blog post on how to do various required Guest changes, I would highly recommend reading this one as well!

So before you start using Instant Clone, first think about which of the two workflows you prefer and why. So what else did I learn?

As mentioned, and this is something I never realized, but even when TPS is disabled Instant Clone will still share the memory pages through the P-Share mechanism. P-Share is the same mechanism that TPS leverages to collapse memory pages. I always figured that you needed to re-enable TPS again (with or without salting), but that is not the case. You can’t even disable the use of P-Share at this point in time… Which personally I don’t think is a security concern, but you may think different about it. Either way, of course I tested this, below you see the screenshot of the memory info before and after an instant clone. And yes, TPS was disabled. (Look at the shares / saving values…)

Before:

After:

Last but not least, the explicit parent-child relationship caused several problems from a functionality stance (like HA, DRS, vMotion etc not being supported). Per vSphere 6.7 this is no longer the case. There is no strict relationship, and as such all the features you love in vSphere can be fully leveraged even for your Instant Clone VMs. This is why they call this new version of Instant Clone “parentless”.

If you are wondering how you can simply test it without diving in to the API too deep and scripting… You can use the Managed Object Browser (MOB) to invoke the method as mentioned earlier. I recorded this quick demo that shows this, which is based on a demo from one of our Instant Clone engineers. I recommend watching it in full screen as it is much easier to follow that way. (or watch it on youtube in a larger window…) Pay attention, as it is a quick demo, instant clone is extremely fast and the workflow is extremely simple.

And that’s it for now. Hope that helps those interested in Instant Clone / VMFork, and maybe some of you will come up with some interesting use cases that we haven’t thought about it. Would be good if you have use cases to share those in the comment section below. Thanks,

XenDesktop/XenApp 7.12 MCS works with vSAN

Duncan Epping · Jan 25, 2017 ·

This is something that has kept me busy for a while. For the past 2 years there were some challenges with regards to the use of MCS and XenDesktop/XenApp in combination with vSAN. In fact, Citrix never supported vSAN and MCS, and it actually did not work either. PVS worked great in combination with vSAN however. Some customers though prefer to use MCS. After various discussions, emails and engineering discussions it seems that the problem customers faced has finally been resolved.

Citrix recently announced a hotfix that will allow you to use MCS with XenDesktop/XenApp 7.12 and vSAN version 6.0, 6.2 or 6.5. You can find the hotfix and details here: https://support.citrix.com/article/CTX219670

I would like to thank a couple of folks for making this happen, from Citrix: Christian Reilly (Thanks for connecting me to everyone!), Vishal Ganeriwala, Paul Browne, Yuhua Lu, Rick Dehlinger, Amanda Austin and from VMware Weiguo He, Tony Kuo and Sophie Ting Yin. Thanks everyone for making this happen in between releases. I am certain our joint customers will appreciate this! Note, that it is not a full statement of support (yet), but a great step in the right direction!

For those interested in XenDesktop/XenApp with vSAN, make sure to read this great reference paper by Sophie Yin. It provides a lot of detail around performance etc.


VSAN Healthcheck: Read Cache Reservations test failed

Duncan Epping · Jul 26, 2016 ·

** Please note: this has been solved in vSAN/vSphere 6.5GA and 6.0 p04 **

I’ve seen this popping up a bunch of times now, and it seems that the problem and solution is not easy to find for people so I thought I would give it a try as well. When running VSAN all-flash and Horizon View it can happen that you see a failed test for Read Cache Reservations in the VSAN Healthcheck. The reason for this failed test is simple: you are using read cache reservations but All-Flash has no read cache. So this is why the read cache reservations test failed. You can see the error below.

The solution is even easier, you change the policy that you are using on those objects. Change the policy to state 0% read cache and apply this policy to all objects! When applied you click “retest” on the Healthcheck and the error should go away. If you want to know more about Horizon View and policies make sure to read Cormac’s post here. There is also a KB on this topic, which can be found here.

(Inter-VM) TPS Disabled by default, what should you do?

Duncan Epping · Oct 27, 2014 ·

We’ve all probably seen the announcement around inter-VM(!!) TPS (transparent page sharing) being disabled by default in future releases of vSphere, and the recommendation to disable it in current versions. The reason for this is the fact there was a research paper published which demonstrates how it is possible to get access to data under certain highly controlled conditions. As the KB article describes:

Published academic papers have demonstrated that by forcing a flush and reload of cache memory, it is possible to measure memory timings to determine an AES encryption key in use on another virtual machine running on the same physical processor of the host server if Transparent Page Sharing is enabled. This technique works only in a highly controlled environment using a non-standard configuration.

There were many people who blogged about what the potential impact is on your environment or designs. Typically in the past people would take a 20 to 30% memory sharing in to account when sizing their environment. With inter-VM TPS disabled of course this goes out of the window. Frank described this nicely in this post. However, as Frank also described and I mentioned in previous articles when large pages are being used (usually the case) then TPS is not used by default and only under pressure…

The under pressure part is important if you ask me as TPS is the first memory reclaiming technique used when a host is under pressure. If TPS cannot sufficiently reduce the memory pressure then ballooning is leveraged, followed by compression and swapping ultimately. Personally I would like to avoid swapping at all costs and preferably compression as well. Ballooning typically doesn’t result in a huge performance degradation so it could be acceptable, but TPS is something I prefer as it just breaks up large pages in to small pages and collapses those when possible. Performance loss is hardly measurable in that case. Of course TPS would be way more effective when pages between VMs can be shared rather then just within the VM.

Anyway, the question remains should you have (inter-VM) TPS disabled or not? When you assess the risk you need to ask yourself first who has access to your virtual machines as the technique requires you to login to a virtual machine. Before we look at the scenarios, not that I mentioned “inter-VM” a couple of times now, TPS is not completely disabled in future versions. It will be disabled for inter-VM sharing by default, but can be enabled. More to be found on that in this article on the vSphere blog.

Lets explore 3 scenarios:

  1. Server virtualisation (private)
  2. Public cloud
  3. Virtual Desktops

In the case of “Server virtualisation”, in most scenarios I would expect that only the system administrators and/or application owners have access to the virtual machines. The question then is, why would they go to this level when they have access to the virtual machines anyway? So in the scenario where Server Virtualization is your use case, and access to your virtual machines is restricted to a limited number of people, I would definitely reconsider enabling inter-VM TPS.

In a public cloud environment this however is different of course. You can imagine that a hacker could buy a virtual machine and try to retrieve the AES encryption key. What he (the hacker) does with it next of course is even then still the question. Hopefully the cloud provider ensures that that the tenants are isolated from each other from a security/networking point of view. If that is the case there shouldn’t be much they could do with it. Then again, it could be just one of the many steps they have to take to break in to a system so I would probably not want to take the risk, although the risk is low. This is one of the scenarios where I would leave inter-VM TPS disabled.

Third and last scenario is Virtual Desktops. In the case of a virtual desktop many different users have access to virtual machines… The question though is if you are running any applications or accessing applications which are leveraging AES encryption or not. I cannot answer that for you, so I will leave that up in the air… you will need to assess that risk.

I guess the answer to whether you should or should not disable (inter-VM) TPS is as always: it depends. I understand why inter-VM TPS was disabled, but if the risk is low I would definitely consider enabling it.

Running CoreOS on Fusion

Duncan Epping · Jun 11, 2014 ·

I wanted to play around with CoreOs and Docker a bit so I went to the CoreOS website but unfortunately they do not provide an OVF or OVA download. The CoreOS website doesn’t really explain how to do this, they do show how to do it for ESXi where they show how to create an OVF/OVA. I figured I would do a quick write-up on how to get the latest version up and running quickly in Fusion, without jumping through hoops.

  • Download the latest version here: coreos_production_vmware_insecure.zip (~180MB)
  • Unzip the file after downloading
  • If you look in the folder you will see a “.vmx” file and a “.vmdk” file
  • Move the whole folder in to the “Virtual Machines” folder under “Documents”
  • Now simply right click the VMX file and “open” it
  • You may be asked if you want to upgrade the hardware, I recommend doing this
  • Boot

After you are done booting you can “simply” connect to is as follows:

  • Look at the VM console for the IP Address
  • Now change your directory to the folder where the virtual machine is stored as there should be a key in that folder
  • Now run the following command, where 192.168.1.19 is the IP of the VM in my environment:
    ssh -i insecure_ssh_key [email protected]

Note that the key is highly insecure and you should replace it of course. More details can be found here.

PS: Dear CoreOS, please create an OVA or OVF… It will make life even easier for your customers.

  • Go to page 1
  • Go to page 2
  • Go to page 3
  • Interim pages omitted …
  • Go to page 16
  • Go to Next Page »

Primary Sidebar

About the author

Duncan Epping is a Chief Technologist in the Office of CTO of the Cloud Platform BU at VMware. He is a VCDX (# 007), the author of the "vSAN Deep Dive", the “vSphere Clustering Technical Deep Dive” series, and the host of the "Unexplored Territory" podcast.

Upcoming Events

May 24th – VMUG Poland
June 1st – VMUG Belgium

Recommended Reads

Sponsors

Want to support Yellow-Bricks? Buy an advert!

Advertisements

Copyright Yellow-Bricks.com © 2023 · Log in