• Skip to primary navigation
  • Skip to main content
  • Skip to primary sidebar

Yellow Bricks

by Duncan Epping

  • Home
  • Unexplored Territory Podcast
  • HA Deepdive
  • ESXTOP
  • Stickers/Shirts
  • Privacy Policy
  • About
  • Show Search
Hide Search

u1

VSAN and the AHCI controller (hint: not supported!)

Duncan Epping · Mar 17, 2014 ·

I have seen multiple people reporting this already so I figured I would write a quick blog post. Several folks are going from Beta to GA release for VSAN and so far people have been very successful, except for those using disk controllers which are not on the HCL like the on-board AHCI controller. For whatever reason it appeared on the HCL for a short time during the beta, but it is not supported (and not listed) today. I have had similar issues in my lab, and as far as I am aware there is no workaround at the moment. The errors you will see appear in the various logfiles have the keywords: “APD”, “PDL”, “Path lost” or “NMP device <xyz> is blocked”.

Before you install / configure Virtual SAN I highly want to recommend validating the HCL: http://vmwa.re/vsanhcl (I figured I will need this URL a couple of times in the future so I created this nice short url)

Update: with 5.5 U2 it is reported AHCI works, however still not supported!
Rebuilding your Virtual SAN Lab? Wipe the disks first!

Duncan Epping · Mar 12, 2014 ·

** You can do this in the vSphere UI these days, read William’s article on how to! **

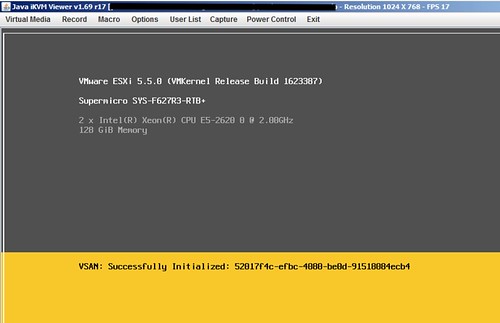
Are you ready to start rebuilding your Virtual SAN lab from beta builds to GA code, vSphere 5.5 U1? One thing I noticed is that the installer is extremely slow when there are Virtual SAN partitions on disk. It sits there at “VSAN: successfully initialized” for a long time and when you get to the “scanning disks” part it takes equally as long. Eventually I succeeded, but it just took a long time. Could be because I am running with an uncertified disk controller of course, either way if you are stuck in the following screen there is a simple solution.

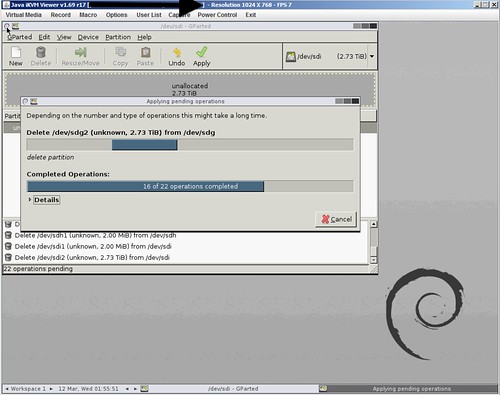
Just wipe ALL disks first before doing the installation. I used the Gparted live ISO to wipe all my disks clean, just delete all partitions and select “apply”. Takes a couple of minutes, but saved me at least 30 minutes waiting during the installation.

Virtual SAN GA aka vSphere 5.5 Update 1

Duncan Epping · Mar 12, 2014 ·

Just a quick note for those who hadn’t noticed yet. Virtual SAN went GA today, so get those download engines running and pull-in vSphere 5.5 Update 1. Below the direct links to the required builds:

  • vCenter Server Update 1 downloads | release notes
  • ESXi 5.5 Update 1 | release notes
  • Horizon View 5.3.1 (VSAN specific release!) | release notes
  • Horizon Workspace 1.8 | release notes

It looks like the HCL is being updated as we speak. The Dell T620 was just added as the first Virtual SAN ready node, and I expect many more to follow in the days to come. (Just published a white paper with multiple configurations.) Also the list of supported disk controllers has probably quadrupled.

A couple of KB Articles I want to call out:

  • Horizon View 5.3.1 on VMware VSAN – Quickstart Guide
  • Adding more than 16 hosts to a Virtual SAN cluster
  • Virtual SAN node reached threshold of opened components
  • Virtual SAN insufficient memory
  • Storing ESXi coredump and scratch partitions in Virtual SAN

Two things I want to explicitly call out, first is around upgrades from Beta to GA:

Upgrade of Virtual SAN cluster from Virtual SAN Beta to Virtual SAN 5.5 is not supported.
Disable Virtual SAN Beta, and perform fresh installation of Virtual SAN 5.5 for ESXi 5.5 Update 1 hosts. If you were testing Beta versions of Virtual SAN, VMware recommends that you recreate data that you want to preserve from those setups on vSphere 5.5 Update 1. For more information, see Retaining virtual machines of Virtual SAN Beta cluster when upgrading to vSphere 5.5 Update 1 (KB 2074147).

The second is around Virtual SAN support when using unsupported hardware:

KB reference
Using uncertified hardware may lead to performance issues and/or data loss. The reason for this is that the behavior of uncertified hardware cannot be predicted. VMware cannot provide support for environments running on uncertified hardware.

Last but not least, a link to the documentation , a ;and of course a link to my VSAN page (vmwa.re/vsan) which holds a lot of links to great articles.

VSAN Design Consideration: Booting ESXi from USB with VSAN?

Duncan Epping · Mar 10, 2014 ·

** Update, as of November 21st we also support SD/USB boot with higher memory configurations when core dump partition is increased. Also read this KB article on the topic of increasing the ESXi diagnostic partition size **

One thing most probably won’t realize is that there is a design consideration with VSAN when it comes to installing ESXi. Many of you have probably been installing ESXi on USB or SD and this is also still supported with VSAN. There is one caveat however and this caveat is around the total number of GBs of memory in a host. The design consideration is fairly straight forward and also documented in the VSAN Design and Sizing Guide. Just to make it a bit easier to find it I copied/pasted it here for your convenience:

  • Use SD, USB, or hard disk devices as the installation media whenever ESXi hosts are configured with as much as 512GB memory. Minimum size for USB/SD card is 4GB, recommended 8GB.
  • Use a separate magnetic disk or solid-state disk as the installation device whenever ESXi hosts are configured with more than 512GB memory.

You may wonder what the reason is, the reason for this is that VSAN will use the core dump partition to store VSAN traces that can be used by VMware Global Support Services and the VMware Engineering team for root cause analysis when needed. So make sure when configuring host to keep this in mind when going above 512GB of memory.

Please note that this is what has been tested by VMware and will be supported, so this is not just any recommendation but could have impact on support!

Virtual SAN GA update: Flash vs Magnetic Disk ratio

Duncan Epping · Mar 7, 2014 ·

With the announcement of Virtual SAN 1.0 a change in recommended practice when it comes to SSD to Magnetic Disk capacity ratio was also introduced (page 7) has been introduced. (If you had not spotted it yet, the Design and Sizing Guide for VSAN was updated!) The rule was straight forward: Recommended SSD to Magnetic Disk capacity ratio is 1:10. This recommendation has been changed to the following:

The general recommendation for sizing flash capacity for Virtual SAN is to use 10 percent of the anticipated consumed storage capacity before the number of failures to tolerate is considered.

Lets give an example to show the differences:

  • 100 virtual machines
  • Average size: 50GB
  • Projected VM disk utilization: 50%
  • Average memory: 5GB
  • Failures to tolerate = 1

Now this results in the following from a disk capacity perspective:

100 VMs * 50GB * 2 = 10.000GB
100 VMs * 5GB swap space * 2 = 1000GB
(We multiplied by two because FTT was set to 1)

This means we will need 11TB to run all virtual machines. As explained in an earlier post I prefer to add additional capacity for slack space (snapshots etc) and meta data overhead, so I suggest to add 10% at a minimum.This results in ~12TB of total capacity.

From an SSD point of view this results in:

  • Old rule of thumb: 10% of 12TB = 1.2TB of cache. Assuming 4 hosts, this is 300GB of SSD per host.
  • New rule of thumb: 10% of ((50% of (100 * 50GB)) + 100 * 5GB) = 300GB. Assuming 4 hosts this is 75GB per host.

Now lets dig some deeper, 70% read cache and 30% write buffer. On a per host basis that means:

  • Old rule: 210GB Read Cache, 90GB Write Buffer
  • New rule: 52,5GB Read Cache, 22,5GB Write Buffer

Sure from a budgetary perspective this is great, only 75GB versus 300GB per host. Personally, I would prefer to spend more money and make sure you have a larger read cache and write buffer… Nevertheless, with this new recommendation you have the option to go lower without violating any of the recommendations.

Note, this is my opinion and doesn’t reflect VMware’s statement. Read the Design and Sizing Guide for more specifics around VSAN sizing.

  • « Go to Previous Page
  • Page 1
  • Interim pages omitted …
  • Page 5
  • Page 6
  • Page 7
  • Page 8
  • Page 9
  • Page 10
  • Go to Next Page »

Primary Sidebar

About the Author

Duncan Epping is a Chief Technologist and Distinguished Engineering Architect at Broadcom. Besides writing on Yellow-Bricks, Duncan is the co-author of the vSAN Deep Dive and the vSphere Clustering Deep Dive book series. Duncan is also the host of the Unexplored Territory Podcast.

Follow Us

  • X
  • Spotify
  • RSS Feed
  • LinkedIn

Recommended Book(s)

Advertisements


Copyright Yellow-Bricks.com © 2025 · Log in