• Skip to primary navigation
  • Skip to main content
  • Skip to primary sidebar

Yellow Bricks

by Duncan Epping

  • Home
  • ESXTOP
  • Stickers/Shirts
  • Privacy Policy
  • About
  • Show Search
Hide Search

stateless

Creating an Image Profile without manually downloading a bundle! (stateless ESXi)

Duncan Epping · Sep 15, 2011 ·

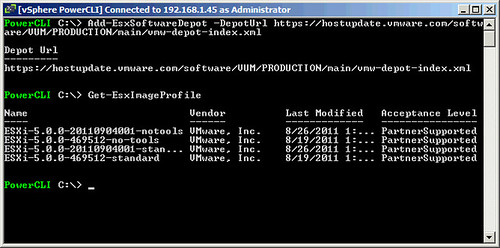
Just like the past couple of days I’ve been playing around with stateless ESXi. I’ve downloaded multiple ESXi bundles / depots and remembered that there was an easier way of creating an Image Profile.  The image profiles are also available as part of an online depot at vmware.com. So I figured I would start using that one instead of downloading the bundle manually every single time. It is fairly simple to add the online source as a depot:

Add-EsxSoftwareDepot -DepotUrl https://hostupdate.vmware.com/software/VUM/PRODUCTION/main/vmw-depot-index.xml

If you would do a “Get-EsxImageProfile” next you would see all image profiles (see screenshot below) which are part of the depot.

Now you could even compare the two image profiles which would tell you if the image profiles are equal and which VIB has changed. In this case it is one of the primary VIBs “esx-base”:

Compare-EsxImageProfile ESXi-5.0.0-469512-no-tools ESXi-5.0.0-20110904001-notools

Equal               : False
PackagesEqual       : False
RefAcceptanceLevel  : PartnerSupported
CompAcceptanceLevel : PartnerSupported
OnlyInRef           : {}
OnlyInComp          : {}
UpgradeFromRef      : {VMware_bootbank_esx-base_5.0.0-0.3.474610}
DowngradeFromRef    : {}

If you figure by now that all this PowerCLI stuff is not your cup of tea I would like to suggest to check out Alan Renouf’s brand new PowerPack. Alan has GUI’fied the most common tasks which will enable you to click and point instead.

Patching your Image Profile (stateless ESXi)

Duncan Epping · Sep 14, 2011 ·

The first patch for ESXi has been released so I figured this was a great time to create and article around how to patch your Image Profile with a new update. The process is fairly straight forward as in this case you will need to create a new image-profile (described here) and link it to a new rule (New-DeployRule and make that rule active (Add-DeployRule). That is what I like about Stateless. You can just prepare a new Image Profile, create a new rule and you are good to go. A reboot of your ESXi host will load up the latest Image Profile. I did this within a couple of minutes and I’m now running build 474610 of ESXi.

While I was playing around I decided to do things in an incorrect order to see if I could break it, and of course I did manage to break it… I managed to fix all of it though. The first thing I did was testing the rule set and repairing it as documented below.

Now if you run into any issues you can repair the ruleset by using the following command:

Get-VMHost <esxi host> | Test-DeployRuleSetCompliance | Repair-DeployRuleSetCompliance

Now if your host boots and mentions that there’s no rule associated you might want to try the following:

Get-DeployRule

If your newly created rule is returned you will want to make sure it is active:

Get-DeployRuleSet

If there’s nothing listed it means no rules are currently active (active ruleset is what the documentation will refer to). You you can set the rule as active as follows:

Set-DeployRuleSet -DeployRule <name of rule>

Everyone who is considering using Auto-Deploy I would most definitely recommend to explore these commands and to try to break things and fix it. Document your steps along the way, I am certain it will be valuable at some point!

Stripping your Stateless image

Duncan Epping · Sep 9, 2011 ·

I was just playing around with Stateless again, aka auto-deploy, and I was wondering how far I could strip the image down to the bare minimum and what the difference would be. I loaded the standard software depot and cloned an existing image profile to a new image profile, for more details on how to do this check the post I published a couple of days ago. I figured I would export this newly create image profiles first so I could see the size of the bundle when exported. I cloned and exported the “ESXi-5.0.0-469512-no-tools” image profile and checked the details:

ESXiStateless.zip 137,869 KB

Now the first thing to do was figuring out which VIBs were part of this image profile, you can do this fairly simple by using the command below. Note that I exported the results to a CSV file just to make it easier if I would need to add VIBs later:

Get-EsxImageProfile <image profile name>  | Select-Object -ExpandProperty VibList | Select name | export-csv c:\tmp\VIBs.csv

Now this returns the full list of all the VIBs in a CSV file with just the names of the VIBs. There are 2 core VIBs (esx-base and esx-tboot) which are required for booting. I also kept the e1000 VIB as I knew I needed it. The e1000 VIB requires the “misc-drivers” VIB so I was left with 4 VIBs:

esx-base
esx-tboot
e1000
misc-drivers

Stripping the rest of the VIBs is fairly simple. Note that you will need to replace <image profile name> with the actual name of your image profile and <package name> with the name of the package you would like to remove:

Remove-EsxSoftwarePackage -ImageProfile <image profile name> -SoftwarePackage <package name>

So I stripped it completely and exported the image profile again and this was the result:

Thinner.zip 131,457 KB

Note that you can actually check which VIBs are part of your image profile, which is what I used to validate I removed all unnecesarry VIBs:

Get-esximageprofile <image profile name> | Select-Object -ExpandProperty VibList

That is a whopping 6MB shaved off! (By the way this is without the HA-Agent. The size of the completely stripped image profile with the HA agent is 143,679KB) Was it a useful exercise? Yes it was as it helped me understanding the process a lot better… Is it useful to strip all the drivers from your image profile? No it is not, you will only save 6MB which is close to nothing compared to the overall size of 131 MB. I did manage to boot the image correctly, but once again there’s really no point from a memory perspective to go through this exercise.

The thing that does make a huge difference is using the no-tools image profile, but there is a serious implication. When you do not include VMware Tools you will need to have a different mechanism for distributing VMware Tools which will probably complicate things from an operational perspective. I guess you will need to decide if the reduction in MBs is worth the effort and is worth the risk of having a “1 of a kind” environment. I know I will keep it vanilla from now on,


Cheat sheet – Auto deploy

Duncan Epping · Sep 5, 2011 ·

When I finished my article about auto deploy I figured it was really lengthy and wanted to write down the bare minimum which can be used as a quick cheat sheet when setting up auto-deploy. Of course you will need to install vCenter, PowerCLI, Auto-Deploy and TFTP first, but I am guessing most of you will know how to do that. Here’s what you will need to do when you have all of the requirements up and running:

  1. Add-EsxSoftwareDepot c:\tmp\VMware-Esxi-5.0.0-<buildnumber>-depot.zip
  2. Add-EsxSoftwareDepot http://<vcenter server>/vSphere-HA-depot
  3. New-EsxImageProfile -CloneProfile "ESXi-5.0.0-<buildnumber>-standard" -name "ESXiStatelessImage"
  4. Add-EsxSoftwarePackage -ImageProfile "ESXiStatelessImage" -SoftwarePackage vmware-fdm
  5. New-DeployRule -Name "FirstBoot" -Item "ESXiStatelessImage" -AllHosts
  6. Add-DeployRule -DeployRule "FirstBoot"
  7. Boot one of the hosts
  8. Configure the host
  9. Create Host Profile based on “first host” named “ESXiHostProfile”
  10. New-DeployRule -name "ProductionBoot" -item "ESXiStatelessImage", ESXiHostProfile, <target_cluster> -Pattern "vendor=<unique hw identifier>"
  11. Add-DeployRule -DeployRule "ProductionBoot"
  12. Remove-DeployRule -DeployRule FirstBoot -delete
  13. Boot all hosts
  14. Assign Host Profiles to all hosts
  15. Provide the “user input” aka create an Answer File per host
  16. Reboot hosts –> done
  17. Before you leave your PowerCLI session make sure you save your newly create image profile as a Software Depot so you can make changes later if and when needed! Otherwise the data will be saved in your image profile cache but you will not be able to make changes!
    Export-EsxImageProfile -ImageProfile "ESXiStatelessImage" -ExportToBundle -FilePath c:\tmp\ESXiStatelessImage.zip

That seems a bit more simplistic than my previous post doesn’t it.


** update: added step 17 **

Using vSphere 5 auto-deploy in your home lab

Duncan Epping · Aug 25, 2011 ·

I was just playing around with auto-deploy and I figured I would quickly scribble down the steps required to configure it. The documentation is okay but it often refers me back and forth in the document which makes it difficult to read at times. Here is what I did to get it working. I was in doubt if I would add screenshots, but that would make this article fairly lengthy and I am sure that most of you wouldn’t need it any way. I have my complete lab virtualized at home, so this whole setup is running in VMware Workstation.

  • Download vCenter Server 5
  • Download the ESXi 5.0 Offline Bundle
  • Install vCenter Server 5
  • Install Powershell 2.0 (installed it on the vCenter Server)
  • Install PowerCLI (installed it on the vCenter Server)
  • Install Auto-deploy (also located on vCenter iso) (installed it on the vCenter Server)
  • Install TFTP Server (I used Solarwinds) (installed it on the vCenter Server)
    • Click “File” and “Configure” and start the TFTP Server
    • A folder C:\TFTP-Root will be created
    • Make sure if you are running this on Windows that the Firewall is open for TFTP
  • Open up your vCenter Client
  • Go to the Home screen and click “Auto Deploy”
  • Click “Download TFTP Boot Zip”
    • I temporarily disabled IE ESC to be able to quickly download the zip file (Control Panel –> Add / Remove Programs –> Turn Windows Features On/Off –> Look for “Configure IE ESC in the Security Information section)
  • Unzip the TFTP Boot Zip file in your TFTP-Root folder
  • Copy the location of “BIOS DHCP File Name as mentioned in your Auto Deploy screen. This will be “undionly.kpxe.vmw-hardwired”.
  • Go to your DHCP Server and add the filename and the ip address of the
    • In my case this is what I added to the advanced settings in my Tomato Router/DHCP server:
      dhcp-boot=undionly.kpxe.vmw-hardwired,,192.168.1.45
    • In the case of a MS DHCP Server you will need to follow this MS KB article. (#66 and #67 should be sufficient)
  • Now it should be possible to boot your host, however you should see a screen that tells you that there no ESXi image associated yet. Now we need to do some PowerCLI magic…
  • First of all we will need to set the execution policy to “remotesigned” if you haven’t done so already, in my case I haven’t as this is a brand new installed Windows VM:
    Set-ExecutionPolicy RemoteSigned
  • Now you can open up PowerCLI and connect to your vCenter Server:
    Connect-VIServer <vcenter name>
  • Next we will need to add a software depot, this is the Offline Bundle file you downloaded at the beginning:
    Add-EsxSoftwareDepot c:\tmp\VMware-ESXi-5.0.0-469512-depot.zip
  • Now that you’ve added the depot you will need to identify the ImageProfile you wan to use. Run the following command to list the image profiles:
    Get-EsxImageProfile
  • In my case it returns the following:
    Name
    ——-
    ESXi-5.0.0-469512-no-tools ….
    ESXi-5.0.0-469512-standard ….
  • We will use the “Standard” image profile as we want to be able to install VMware Tools as well through vCenter. In order to use it we will need to define a rule. This basically tells the client which image it should pick up during the PXE Boot. No key thing with this command is the “-Pattern” as that basically defines which machines will get boot the image. In my case everything is running within VMware Workstation and the vendor will always be “VMware Virtual Platform” so I decided to use that is the identifier for this specific rule.
    New-DeployRule –Name “FirstTimeBoot” –Item “ESXi-5.0.0-469512-standard” –Pattern “model=VMware Virtual Platform”
  • This will take a while as it is unzipping and uploading the required packages. When it has successfully completed we will need to make this deploy rule active:
    Add-DeployRule -DeployRule FirstTimeBoot
  • That’s it, now the host should be able to boot up using the assigned image profile. See the screenshot below of my PXE booted ESXi host within VMware Workstation
    Using vSphere 5 auto-deploy in your home lab

Now if you would go to vCenter and check your Datacenter you will see a host appearing. This host however will still need to be configured and that is the second portion of this exercise…

What we creating here is a stateless configuration. That means we will need to use host profiles in order to configure this host correctly after reach reboot. These are the steps I took to create a host profile for my Lab hosts:

  • Configure the host as needed. Don’t forget things like NTP, Storage, Networking, Scratch etc.
  • Go to Host Profiles
  • Create a New Profile from an existing host
  • Select the host you just configured
  • Give it a name that you will remember, I used “ESXiLabHostProfile”
  • After creating the host profile you will need to attach the host to the profile and check for compliancy. This test should fail as you will need to create an answer file first.
    • Right click the host and select “Update Answer File”
    • Check all settings (ip-address etc) and when finished click “update”
    • Right click the host and select “Check Answer File”, result should be “x”
    • Select the host and click “Check Compliance”, result should be “compliant”
  • Before we will create a new deploy rule we will want to add the HA depot and create a new image profile which includes the HA agent as we will want our hosts to be part of that. If you don’t add it the “new-deployrule” statement will throw a message that you will need to add it. First we will add the vSphere HA depot. The ip-address should of course be replace with the ip-address of your own vCenter server:
    Add-EsxSoftwareDepot http://192.168.1.45:80/vSphere-HA-depot
  • Now we will need to clone the ESXi Standard depot and add the HA agent to it:
    New-EsxImageProfile -CloneProfile ESXi-5.0.0-469512-standard -name “ESXiHA”
    Add-EsxSoftwarePackage -ImageProfile “ESXiHA” -SoftwarePackage vmware-fdm
  • Now we will create a new deploy rule and associate it with the just created host profile called “ESXiLabHostProfile”. We will also directly enable this new rule. Note that “HA-DRS” is the name of my cluster in this case. First we will remove the old rule to make sure we start with a clean slate:
    Remove-DeployRule -DeployRule FirstTimeBoot -delete
    New-DeployRule –Name “ProductionBootRule” –Item “ESXiHA”, ESXiLabHostProfile, HA-DRS –Pattern “model=VMware Virtual Platform”
    Add-DeployRule -DeployRule “ProductionBootRule”
  • Now you can restart the ESXi host and it should end up in the cluster (HA-DRS) with the correct host profile (ESXiLabHostProfile) and completely configured ready for action! (Note that for the next host you will need to create the answer file as well initially for it to work correctly.)

That’s it for today… Hope it helps, I had a lot of fun exploring this cool new feature! I love it but boy do I feel like a n00b playing around with PowerCLI after having seen some of Alan‘s or Luc‘s magic. Gabe also has a nice article on this topic… check it out, worth reading!


Changelog:
Edit 1: Changed naming scheme

Primary Sidebar

About the author

Duncan Epping is a Chief Technologist in the Office of CTO of the Cloud Platform BU at VMware. He is a VCDX (# 007), the author of the "vSAN Deep Dive", the “vSphere Clustering Technical Deep Dive” series, and the host of the "Unexplored Territory" podcast.

Upcoming Events

May 24th – VMUG Poland
June 1st – VMUG Belgium

Recommended Reads

Sponsors

Want to support Yellow-Bricks? Buy an advert!

Advertisements

Copyright Yellow-Bricks.com © 2023 · Log in