This question was asked on the VMTN community forum and it is a very valid question. Our documentation explains this scenario, but only to a certain level and it seems to be causing some confusion as we speak. To be honest, it is fairly complex to understand. Internally we had a discussion with engineering about it and it took us a while to grasp it. As the documentation explains, the failure scenarios are all about maintaining quorum. If quorum is lost, the data will become inaccessible. This makes perfect sense, as vSAN will always aim to protect the consistency and reliability of data first.
So how does this work, well when creating a policy for a stretched cluster you specify Primary Failures To Tolerate (PFTT) and Secondary Failures To Tolerate (SFTT). PFTT can be seen as “site failures”, and you can always only tolerate 1 at most. SFTT can be seen as host failures, and you can define this between 0 and 3. Where we by far see FTT=1 (RAID-1 or RAID-5) and FTT=2 (RAID-6) the most. Now, if you have 1 full site failure, then on top of that you can tolerate SFTT host failures. So if you have SFTT=1 then this means that 2 host failures in the site that survived would result in data becoming inaccessible.
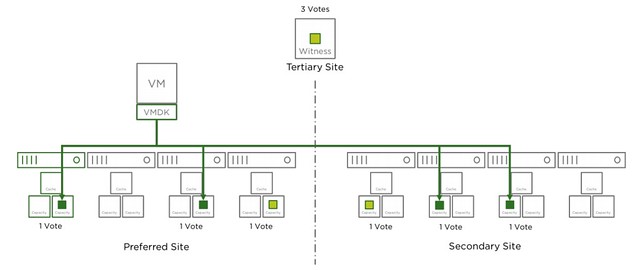
Where this gets tricky is when the Witness fails, why? Well because the witness is seen as a site failure. This means that if you have lets say 2 hosts failing in Data Site A and 1 host failing in Data Site B, while you had SFTT=2 assigned to your components, that your objects that are impacted will become inaccessible. Simply because you exceeded PFTT and SFTT. I hope that makes sense? Lets show that in a diagram (borrowed it from our documentation) for different failures, I suggest you do a “vote count” so that it is obvious why this happens. The total vote count is 9. Which means that the object will be accessible as long as the remaining vote count is 5 or higher.
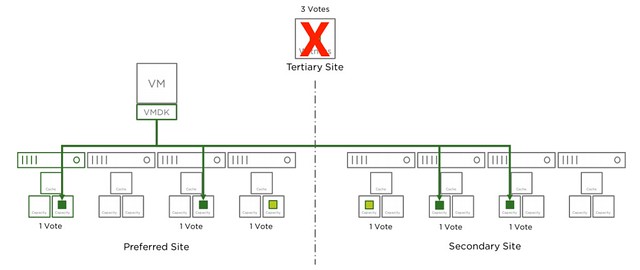
Now that the witness has failed, as shown in the next diagram, we lose 3 votes of the total 9 votes, no problem as we need 5 to remain access to the data.
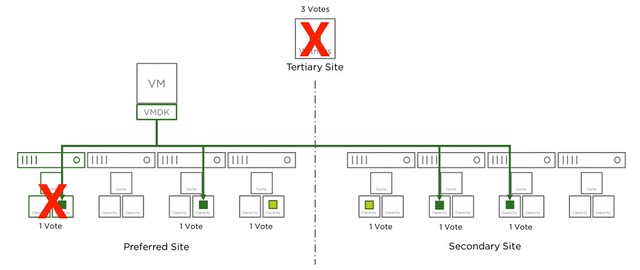
In the next diagram another host has failed in the environment, we now lost 4 votes out of the 9. Which means we still have 5 out of 9 and as such remain access.
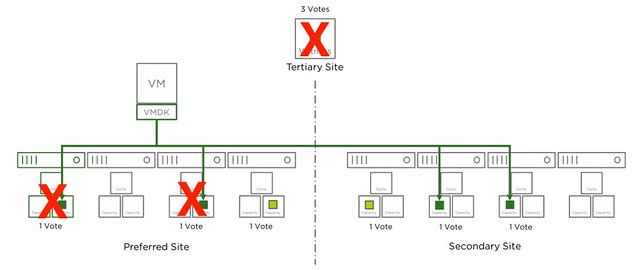
And there we go, in the next diagram we just lost another one host, in this case it is the same location as the first host, but this could also be a host in the secondary site. Either way, this means we only have 4 votes left out of the 9. We needed 5 at a minimum, which means we now lose access to the data for those objects impacted. As stated earlier, vSAN does this to avoid any type of corruption/conflicts.
The same applies to RAID-6 of course. With RAID-6 as stated you can tolerate 1 full site failure and 2 host failures on top of that, but if the witness fails this means you can only lose 1 host in each of the sites before data may become inaccessible. I hope this helps those people running through failure scenarios.