• Skip to primary navigation
  • Skip to main content
  • Skip to primary sidebar

Yellow Bricks

by Duncan Epping

  • Home
  • Unexplored Territory Podcast
  • HA Deepdive
  • ESXTOP
  • Stickers/Shirts
  • Privacy Policy
  • About
  • Show Search
Hide Search

cloud

vCD – Allocation Models

Duncan Epping · Sep 22, 2010 ·

Over the last two weeks I received multiple questions about the VMware vCloud Director (vCD) Allocation Models. vCD has three different type of allocation models which are used to allocate resources to a tenant. We will first reiterate some of the basic concepts of VMware Cloud Director before we dive into these allocation models.

vCD is an abstraction layer. vCD is a layer on top of vCenter and abstracts all the resources vCenter manages. All these resources are combined into large pools for cloud tenants to consume. (Read Frank’s excellent article on these resource groups.) Within VMware vSphere clusters and resource pools are used as resource containers. As a cloud tenant is unaware of the technology used underneath vCD has introduced the concept of Virtual Data Center’s (vDC).

There are two different types of vDC’s:

  • Provider vDC
  • Organization vDC (Org vDC)

A Provider vDC is a pool of CPU and memory resources combined with the storage resources you selected. A provider vDC can be a VMware vSphere Cluster or a Resource Pool and a provider vDC is the source for Org vDCs. Org vDCs are used within vCD to partition Provider vDCs and to allocate resources to an organization. vCD uses regular vSphere Resource Pools to partition these resources. So each Org vDC corresponds with a resource pool on the vSphere layer. So what is this Allocation Model that we will be discussing? Where does the Allocation Model come into play?

An Allocation Model is defined on an Org vDC level. The Diagram below depicts a scenario where four Org vDCs have been created in a single Provider vDC. The Provider vDC has a 1:1 relationship with the cluster in this case.

vmware vcloud director provider vdc org

Allocation Models

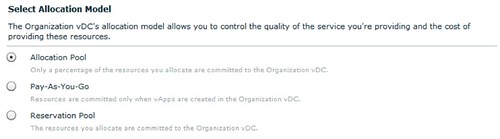
Allocation Models within vCD are used to determine how resources are allocated to the Organization vDC and more than likely how your customer will be charged for these resources. Currently vCD has three different types of allocation models. These allocation models are listed below, with the original description provided by vCD.

  • Allocation Pool
    Only a percentage of the resources you allocate are committed to the organization vDC. You can specify the percentage, which allows you to overcommit resources.
  • Pay-As-You-Go
    Allocated resources are only committed when users create vApps in the organization vDC. You can specify the maximum amount of CPU and memory resources to commit to the organization vDC.
  • Reservation Pool
    All of the resources you allocate are committed to the organization vDC.

Each allocation model has its own characteristics. These characteristics can be placed in two categories:

  • Virtual Machine Level
  • Resource Pool Level

The distinction between each of the Allocation Models is how resources are allocated or to use vSphere terminology how resources are reserved or limited. In order to guarantee resources to a VM or to an entire pool vCD will set a reservation. To avoid extreme contention vCD will also cap your resources by setting a limit. These reservations and limits will be set on a VM or Resource Pool level depending on the chosen allocation model.

For each allocation model shown in the screenshot below the characteristics will be broken down in the following sections.

vmware vcloud director allocation model

Allocation Pool

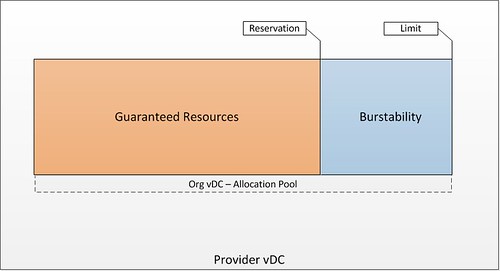
This is the default model, the Allocation Pool. This model allows you to specify the amount of resources for your Org vDC and also specify how much of these resources are guaranteed. Guaranteed means that a reservation will be set and that the amount of guaranteed resources is carved out of your Provider vDC. The total amount of resources specified is your upper boundary, also known as your resource pool limit. I think a diagram will explain it a bit better in this case:

vmware vcloud director allocation pool example

Characteristics

Each model as stated before has very specific characteristics. Each of these are listed below:

  • Pool of resources of which a percentage will be guaranteed
    • A reservation will be set to guarantee resources on a resource pool level
    • By default the resource pool reservations on CPU is 0% and memory 100%
    • Tenant has a guaranteed set of resources and has the ability to burst to the upper limit
  • VM Level characteristics
    • No reservations or limits set on a per VM level for CPU
    • Reservations set on a per VM level for memory. This reservation is based on the percentage of guaranteed resources

These characteristics are more in detail explained in the following example.

Allocation Pool example

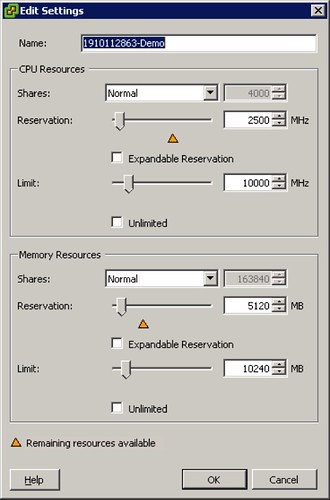
In the example below the tenant requested 10GHz of CPU resources with a guarantee of 25% and 10GB of memory with a guarantee of 100%.

vmware vcloud director allocation pool example

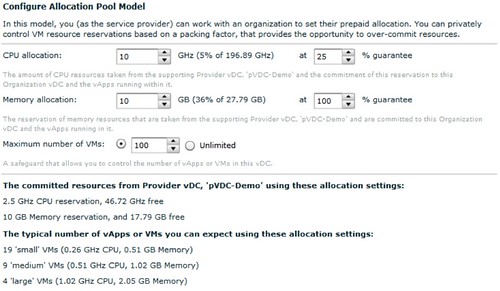
Note that the default for CPU is a 0% Guarantee which has been changed to 25% on CPU as requested by the tenant. Also note that you can specify the maximum amount of VMs that can be deployed in this org vDC. This will also help you restrict the level of over commitment and will be discussed later.

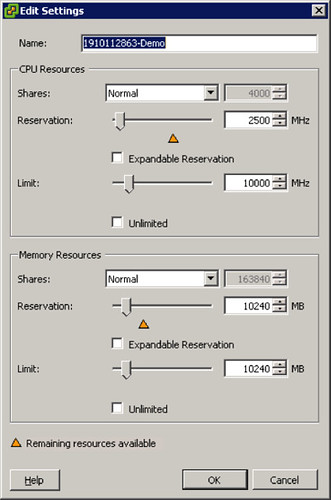
These settings on a vCD level result in a resource pool with a reservation of 2500MHz and a limit of 10.000MHz. As vCD describes it, 2500MHz are guaranteed and the customer will have the ability to burst up to 10.000MHz. The resource pool that is created and its properties are shown in the below screenshot.

vmware vcloud director allocation pool example

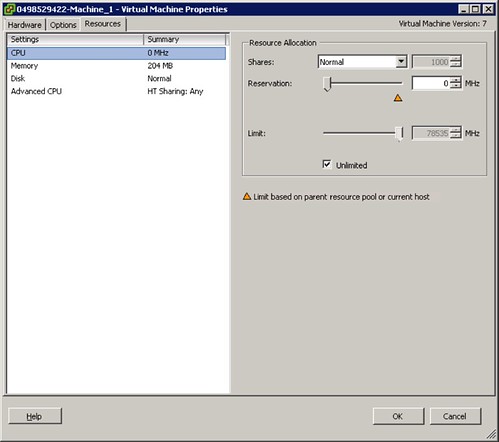
As described in the characteristics section no CPU reservation or limit is set on a VM level which is shown in the following screenshot.

vmware vcloud director allocation pool example

This is different on memory however. On memory both a reservation and a limit has been defined. The limit always equals the provisioned memory and the reservation equals the guaranteed memory as defined of part of the Allocation Model. However, in our example we set the percentage of guaranteed memory to 100% which results in a reservation and a limit of both 512MB.

vmware vcloud director allocation pool vm

For the sake of completeness we have changed the guaranteed resources for memory to 50%. Of course the resource pool has changed accordingly. As shown in the screenshot below the reservation on memory has changed to 5120, which “happens” to be 50% of 10240.

vmware vcloud director allocation pool vm

This will in its turn also has set the per VM level memory reservation to 50% of the provisioned memory. In the screenshot below the VM was provisioned with 512MB of which 256MB has been reserved.

vmware vcloud director allocation pool example vm

Summary

As shown in the example the percentage of guaranteed resources will have its impact on the implementation of the resource pool and the limits and reservations associated with these. It is recommended to align the maximum number of VMs with the specified amount of GHz and GB. When limiting the amount of VMs an extreme level of over commitment within the Org vDC can be avoided.

Pay-As-You-Go

This is the model many of you are familiar with and many also adopted in their company, pay-as-you-go. This model allows you to specify the amount of guaranteed resources per VM. When the percentage of guaranteed resources is set to 100% a reservation is set to 100% of what has been allocated that particular VM. Where this model differentiates itself from any of the other models is that it allows you to limit the vCPU speed. By default the vCPU speed is set to 0.26GHz, the impact of this vCPU speed will be shown in example below but be noted that this vCPU speed is set on the VM as a hard limit.

Characteristics

  • Percentage of resources guaranteed on a per VM level
    • A reservation will be set on a VM level
    • By default the VM reservation on CPU is 0% and memory 100%
    • By default the vCPU speed is set to 0.26GHz, which means you vCPU will be limited to 0.26GHz
  • The Org vDC resource pool is just an accumulation of all reservations set on a per VM level

These characteristics are more in detail explained in the following example.

Pay-As-You-Go example

In the example below the customer requests an Org vDC based on the Pay-As-You-Go Org allocation model with a vCPU speed of 0.26GHz of which 25% is guaranteed. Memory will be left to the default setting which is a 100% guarantee.

vmware vcloud director pay as you go

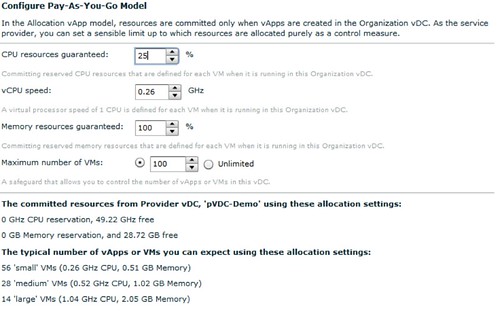
Note that the default for CPU is a 0% Guarantee which I changed to 25% on CPU to see the impact. Also note that the vCPU Speed is set by default to 0.26GHz. This is something that you will want to increase! When the Org vDC is created it results in a resource pool with the following characteristics.

vmware vcloud director pay as you go resource pool

As described in the characteristics when vApps are created the associated reservations will be accumulated into the resource pool. When a vApp is created with two VMs (each having a single vCPU and 512MB of memory) this will result in the following changes, note that both the reservation on memory and CPU have changed.

vmware vcloud director pay as you go resource pool

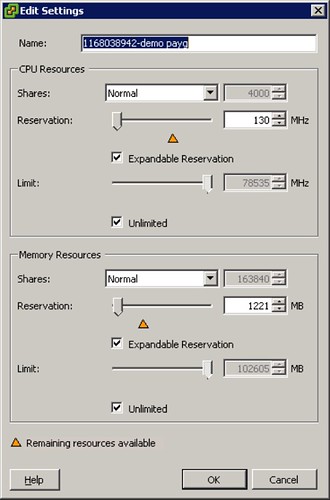
As can be seen on a Resource Pool level a reservation is set of 130MHz which is 25% of 2 x 0.26GHz. A guarantee of 100% was set on memory which translates to 1221MB in total. (Note that a resource pool includes the Memory Overhead of virtualization. See the Resource Management Guide for more details)

As stated the resource pool is jut an accumulation of all VMs. The following is what has been set on a per VM level, first screenshot shows the CPU details and the second shows the Memory details:

vmware vcloud director pay as you go vm

vmware vcloud director pay as you go vm

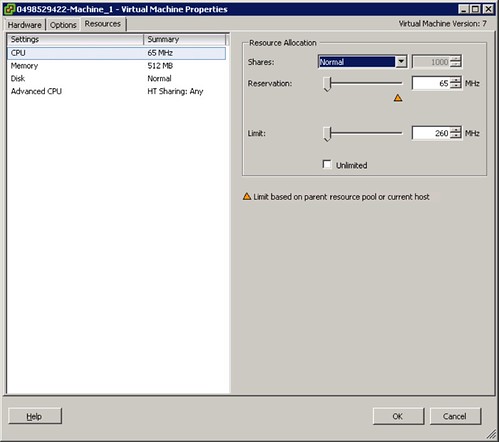
As can be seen a reservation has been set of 65MHz and a limit of 260MHz on CPU. For memory a 512MB reservation and limit has been set. If the “guarantee” on memory is set to 50% than the reservation of memory on this VM would be 256MB.

Summary

The tenant will have guaranteed resources per VM. As shown the vCPU speed defined is the limiting factor for a VM. For user experience it is recommended to select at least 1GHz as the vCPU speed. The resource pool created as part of the Org vDC only accumulates reserved resources and does not limit the VMs. Limits are placed on a per VM level. Please note that if the “guarantee” is set to 100% a reservation equal to the limit is set. In the case of a 1GHz reservation this can lead to very conservative consolidation ratios.

Reservation Pool

The third and final Allocation Model is the Reservation Pool. In this model all resources are guaranteed by default. It could be compared to an allocation pool with all guarantees set to 100% and is fairly straight forward.

Characteristics

  • Fully guaranteed pool of resources
    • A reservation will be set to guarantee resources on a resource pool level
  • No reservations or limits set on a per VM level for CPU

These characteristics are more in detail explained in the following example.

Reservation Pool example

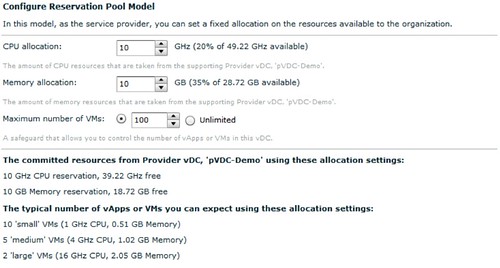
In the example below the customer requested 10GHz of CPU resources. As stated, the default guarantee is 100%. As can be seen in the screenshot there is no way to dictate the amount of MHz per vCPU or a Guarantee for that matter.

vmware vcloud director reservation pool

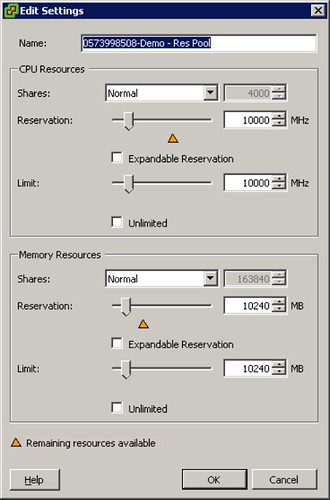
As expected that results in a resource pool with a limit equal to the reservation as shown in below screenshot.

vmware vcloud director reservation pool resourece

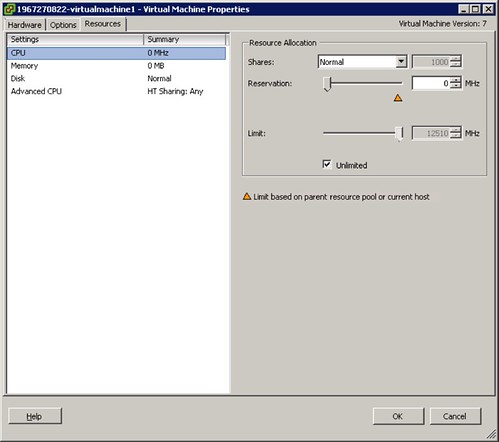
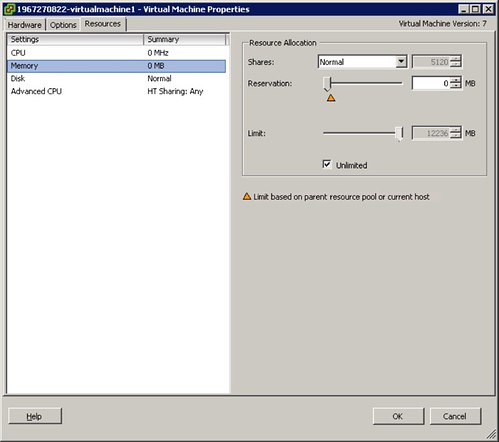
On a per VM level no reservations or limits are set. This is shown in the following two screenshots.

vmware vcloud director reservation pool vm

vmware vcloud director reservation pool vm

Summary

As shown the Reservation Pool allocation model is fairly straight forward. A limit equal to the reservation is set on a resource pool level which gives the tenant a guaranteed pool of resources. There are no limits or reservations set on a per VM level which gives the tenant a lot of flexibility. However, this flexibility could lead to severe over commitment within the Org vDC. As such it is recommended to limit the amount of VMs to avoid a degraded user experience.

Conclusion

Each of the three allocation models has its own unique characteristics to fit your customers needs. Is your customer looking for a pool of resources of which a chunk is guaranteed so that they can burst while having a fixed price per month and only pay for the burst space when they are using it? Allocation Pool would be the right answer! Do they have very transient workloads and do they only want to pay for these when using it? Pay-as-you-go would be the best fit. Is your customer just looking to expand their Datacenter with a “dedicated” chunk of resources? Reservation Pool does just that.

However, think before you decide which Allocation Model you will use, think about the amount of resources guaranteed and make sure the amount of resources add up with the max amount of VMs that can be deployed in the Org vDC. One of the most important thing when you are selling a service is user experience!

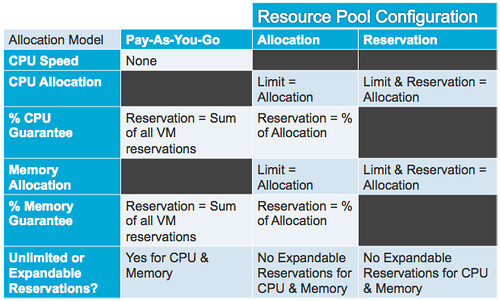
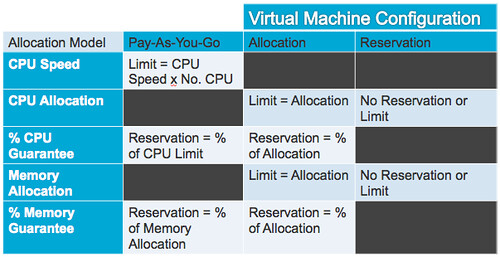
After I wrote all of this one of my colleagues(Thanks Andy!) was so kind to transform it into a table. This says it all in just two simple tables. The first table describes the characteristics on a Resource Pool level and the second on a Virtual Machine level. Enjoy:

vmware vcloud director allocation model table resource pool

vmware vcloud director allocation model table vm

RE: Migrating your VMs from vSphere to vCloud Director and vice versa

Duncan Epping · Sep 21, 2010 ·

Hany Michael wrote a nice article on importing and exporting your VMs from and to vCloud Director. Although the importing made a lot of sense the exporting from vCD and importing into vSphere in my opinion is a bit shady. It is not something I would recommend to anyone as I am unsure it is supported and I believe that vCD should be used as your management platform and not vCenter. Besides that in many environments tenants will not have direct access to vCenter to begin with. There is a simple method to export your VMs from vCloud Director in OVF Format:

  1. Power off your vApp and add it to the Catalog
  2. Select the correct catalog
  3. Open the Catalog you copied the vApp to
  4. Click “Download”

Now you can import it again in vSphere. You could keep the original vApp running in vCD if you want (when it is fenced of course as otherwise you will end up with an IP conflict) or you can completely delete it, that is up to you!

VMware vCloud Director Security Hardening Guide

Duncan Epping · Sep 16, 2010 ·

For those looking into deploying vCloud Director (vCD), VMware just published a white paper titled “VMware vCloud Director Security Hardening Guide”. I reviewed the document a couple of weeks ago and thought it was a really good read!

Download:
http://www.vmware.com/files/pdf/techpaper/VMW_10Q3_WP_vCloud_Director_Security.pdf

Description

The VMware® vCloud™ Director Security Hardening Guide helps users who are embarking into the journey of cloud computing understand key security elements and technologies found in VMware’s vCloud Director product. It also provides guidelines and best practices for installation, configuration and operation of secure clouds based on VMware’s vCloud Director.

vCD – Networking part 3 – Use case

Duncan Epping · Sep 15, 2010 ·

Part 1 explained the basic concepts of networking within vCD(VMware vCloud Director) and Part 2 focussed on Network Pools. In the final and 3rd part we will focus on a use case and what happens on the vSphere layer with these different types of vCD networks. I will cover just a single use case for now, but this one basically covers all areas! Please read both part 1 and part 2 of this series before you start reading this part. Lets just start diving into a scenario.

vApp directly connected to an External routed Org Network

Use cases:

  1. Internet connection for the VMs in your virtual datacenter. Firewall can be enabled to block all incoming traffic.
  2. Publicly publishing a single “service” externally by enabling NAT on the vShield Edge device. In this case all incoming traffic will be blocked and only a single IP will be translated and route back to that particular VM.

We will start with the basics. The flow of the network in this case will be:

As explained in Part 1 the External Network is backed by a Portgroup. This portgroup can be a regular portgroup on a vSwitch, or one on a dvSwitch or even the Nexus 1Kv. We will start by creating a dvPortgroup.

External Network

Lets first create a dvPortgroup within vCenter. This is the dvPortgroup that the External Network will use. We will give it a VLAN ID for layer 2 isolation. In this case we use VLAN ID 105 and label the dvPortgroup as “dvExternal-105”.

Now we will need to create a network within vCD that enables your vApp and Organization to use this dvPortgroup we just created. We do this by creating an “External Network”. (option 3 on your home screen in vCD.) First we will need to select the correct dvPortgroup we created:

Next thing to do is specify the associated IP Range, Gateway, Netmask etc. The IP-Range is used for any VMs that are directly connected to this External Network and for the vShield Edge devices. But we will show that later in this article.

Next up is is giving the External Network a name, we will keep it simple and name it “External – vlan 105”:

That is it for the External Network part. Now lets create an Org Network.

Org Network

We will create an External Org Network which is routed to an External Network. (On your home screen go to “7 Add another network to an organization”.) Select the Organization it needs to connect to first and then the real magic starts.

We will use the typical setup. We have unticked “Create an internal network”, and we have selected “Routed connection”:

The cool thing about the network section of vCD is that is shows you what it is building. In this case you can see that the vApp is directly connected to the External Org Network (NAT-Routed) which in its turn is connected to the External Network through a vShield Edge device. The next step is to select the correct External Network that this External Org Network connects to:

Please note that we also have selected a network pool, in this case the vCloud Network Isolated Pool! Next we will need to specify the associated IP Range, Gateway, Netmask for the Org Network. Now you might think that we have already done this but that was for the External Network! The pool of addresses will be used for any device that sits within the Org Network boundaries.

Of course the final step is giving this Org Network a name:

vApp layer

As this post is about networking I will skip the creation of the vApp itself but will show you what we have done in a single screenshot. As this screenshot below shows the VM is directly connected to the Org Network labeled “YB-NAT-Ext-Org”:

Connecting the dots

Now that we have shown you how this is created within vCD you would probably want to know what this results in on a vSphere layer. When we created the Org Network a dvPortgroup was automatically created. This automatic creating was enabled by the use of a network pool. The network pool in this case was a vCloud Network Isolation backed network pool.

The screenshot below shows the dvPortgroup that represents the Org Network. The VM that was created called “Direct”, however vCD uses IDs to uniquely identify VMs and as such it is labeled as “1227504509-Direct” within vSphere. Please note the “F46” in the name of the dvPortgroup. This means that it is using a fenced network with ID 46. (fenced –> vCloud Network Isolation) This Network Pool happens to use VLAN 107 (V107), which was defined when the pool was created and is also shown in the screenshot below.

In order for VM “1227504509-Direct” to communicate to the outside world it will need a connection to the External Network. As shown and described above VMware vCloud Director uses vShield Edge to do this. In other words, the vShield Edge device will have multiple NICs. This is shown in the following screenshot. The External Network portgroup contains a vShield Edge device (vse-651240915) which is the same device as shown in the screenshot above.

This is the vShield Edge device that enables the VM “1227504509-Direct” to communicate with the outside world, as it is connected to both portgroups.

Traffic Flow

As it took me a while to understand how this worked, I have created a couple of diagrams. The first diagram shows all components we created and how they are linked:

I guess this is still not saying much. Lets add the flow of the traffic to this diagram by extending it with another vApp. What if you would have two vApps connected to the same Org Network and both VMs of these vApps are on a different host in your cluster and the first VM wants to connect to the second VM? What does the flow of traffic look like? As you can see in the diagram below the VM of the first vApp is connected to the same dvPortgroup. However as both vApps reside on a different host the traffic will need to go to the physical switch layer first:

The other scenario I wanted to show is where a vApp wants to connect to a device on the outside world. In this case I labeled it as “internet” but it could be anything. Also I have assumed that the vShield Edge device resides on a different host than the VM that wants to connect to the internet.

It took me a while to write this “use case”. I hope this makes vCD networking slightly better to understand… but again the key here is to play around with it. If there are any questions please don’t hesitate to reach out to me! If I can find the time I will write another “use case” or maybe I will ask some of the other guys in my team to do something similar.

Creating a vCD Lab on your Mac/Laptop

Duncan Epping · Sep 13, 2010 ·

I was just building a vCD Lab and thought I would document the process. I know Hany has done something similar recently but mine is slightly different. I wanted to have a slim config from a memory perspective and virtual machine count perspective. Before I start, let’s give a warning… ***this is totally unsupported***

Pre-requisites:

  • CentOS 5 – 64 Bit
  • Oracle 10g Express
  • Windows 2008 – 64 Bit
  • ESXi 4.1
  • vCenter 4.1
  • vCD 1.0
  • vShield 4.1

We will be creating multiple VMs but for the sake of simplicity will be combining functionality where possible. First you will need to install multiple ESXi hosts and a vCenter server. I am assuming all of you know how to do this so I won’t go into detail here. If you don’t drop me a comment. I did list some of the recommendations/requirements:

vCenter / DNS / ESXi

  • Create a VM with 1 vCPU and 1 GB of memory. I used a 20GB thin disk, which should be more than sufficient as we will not be using VUM.
  • Connect the Windows 2008 – 64 Bit ISO and walk through the standard installation process. I will not describe every step, as all of you should be able to install an OS. However the following is recommended:
    • Fixed IP Address
    • I changed the host name to “vcenter”
    • Install DNS
      • pre-populate DNS with records for your two esxi hosts, vShield Manager and your vCD server.
  • I will not tell you how to install ESXi or vCenter for that matter. Just ensure you have two ESXi hosts with shared storage in a DRS enabled cluster, those are the requirements. Preferably with some memory resource. I gave both my ESXi hosts 3GB. There are a couple of options for shared storage:
    • You could use Openfiler as your iSCSI target for ESXi hosts (preferred), if you don’t know how to set it up read this excellent this article by Kiwi_Si.
    • You could enable NFS on your CentOS which also hosts your vCD and Oracle database
    • If you are using VMware Workstation enable “clustering” of disks… I haven’t tested this in a while though.

Result: vCenter Server, 1 Cluster containing at least 2 ESXi hosts with DRS enabled.

vShield Manager

You could run vShield Manager as a VM within your virtualized ESXi host, but from a performance perspective that is probably not the smartest thing to do. So we are going to import it into Fusion. For those using Windows VMware Workstation is also fine, or even Player.

I guess this is the most tricky part of the whole setup, you will need to convert the vShield OVA to a VM. Now this is not a must, you can also run the vShield on your virtual ESXi hosts, but I like to avoid this for performance reasons. So this is how I converted it:

  • Go to the folder which contains the OVA and go into the OVA and copy all files included into a separate folder
  • Download the OVF Tool to convert the vShield Manager OVF Files to a format that Fusion supports
    • Open a terminal window and “cd” to the folder which contains “VMware-ovftool-2.0.1-260188-mac.i386.sh”
    • Make the script executable by typing the following:
      chmod +x VMware-ovftool-2.0.1-260188-mac.i386.sh
    • Run the installer script by typing the following:
      ./VMware-ovftool-2.0.1-260188-mac.i386.sh
    • Confirm the installation with “yes”
    • Accept the EULA with “yes”
    • Confirm the path by pressing enter/return
    • The install should complete literally within seconds
    • Go to the folder that contains the “OVF” file and type the following:
      /opt/vmware/ovftool/ovftool.bin “VSM.ovf” .
    • Accept the EULA by typing “yes”
    • The conversion should now start and when it is completed a new folder should be created which contains your VMX file and your VMDK files. These can be imported into Fusion.
    • Copy the VSM Folder to the place you store your local VMs and open the VM within Fusion and fire it up
  • Now that you have VSM running on your Laptop/Macbook you will need to configure it. These steps are pretty straight forward, but they will need to happen in order for VSM to function correctly:
    • Open the vShield Manager console and login with user “admin” and password “default”
    • Type “enable”, enter the password “default” again and type “setup” to configure your VSM
    • Enter your IP, Subnet, Gateway and DNS details and exit to ensure these are active
  • That is it! Now you can use your internet browser to see if you can login to your VSM “https://<ipaddress”

Result: vShield Manager running within Fusion.

vCD VM

  • Create a VM with 1 vCPU and 1 GB of memory. I used a 20GB thin disk, which should be more than sufficient.
  • Connect the CentOS 5 – 64 Bit ISO and walk through the standard installation process. I will not describe every step, as all of you should be able to install an OS. However the following is recommended:
    • Default partitioning scheme
    • Fixed IP Address
    • Disable IP v6
    • Server GUI install
  • After the install is done you will need to reboot the VM and configure the OS. I recommend the following:
    • Disable the Firewall
    • Disable SELinux
    • Enable NTP
    • Create an additional user
  • Now that the VM has rebooted again we will need to upgrade all packages to the latest version and install VMware Tools all the required packages:
    • Install VMware Tools (extract the files from the archive and run the installer via a terminal window by going to the path where you extracted it and type:
      ./vmware-install.sh
      use all the default settings
    • Open a terminal window and type the following:
      yum update
      yum upgrade
    • Now install all the Oracle and vCD required packages:
      yum install alsa-lib bash chkconfig compat-libcom_err coreutils findutils glibc grep initscripts krb5-libs libgcc libICE libSM libstdc libX11 libXau libXdmcp libXext libXi libXt libXtst module-init-tools net-tools pciutils procps sed tar which
  • Install Oracle 10g Express (again note that this isn’t officially supported):
    • Copy the Oracle RPM file to your vCD VM
    • Open a terminal window and go to the path where you copied the Oracle RPM file
    • rpm -i oracle-xe-10.2.0.1-1.0.i386.rpm
    • /etc/init.d/oracle-xe configure
    • Use the default ports (8080 and 1521)
    • Enter the password twice
    • Select “y” to ensure the database daemon is started when the VM restarts
  • After the Oracle 10g Express server has been installed test if you can actually access it by opening a web browser. Try http://<ipaddress>:8080/apex
  • I would recommend to create a new user for the vCD environment:
    • Click “Administration”
    • Go to “Database Users” and click “Create User”
    • I would recommend to give it the name “vcloud” and an easy to remember password. Also make sure you tick the “DBA” tick box.
    • Click “Create”
  • Now it is time to install vCD (copy the bin file to your vCD VM)
    • First we need to create a virtual interface so that we have two IP addresses that vCD can use. Of course you can also add a second NIC, but I use this method to keep the VM configuration as simple as I possibly can:
      • Open a terminal windows and type the following:
        nano /etc/sysconfig/network-scripts/ifcfg-eth0:1
      • Add the following to the file you just opened, of course add the approriate IP address and net mask!
        BOOTPROTO=static
        DEVICE=eth0:1
        IPADDR=<ip address>
        NETMASK=<net mask>
        ONBOOT=yes
      • Save the file and restart the network by typing the following:
        service network restart
      • When you do an “ifconfig” it should show you two devices…
    • Open a terminal window and go to the path where you copied the vCD BIN file and make the bin file executable:
      chmod +x vmware-cloud-director-1.0.0-285979.bin
    • type the following to do the install
      ./vmware-cloud-director-1.0.0-285979.bin
    • It will ask you if you want to run the installer on an unsupported distro, type “y”
    • It will ask you if you want to run the configuration script, type “n”
    • Next we will create self signed certificates, open a terminal window and do the following:
    • Go to /etc and copy and paste the following:
      /opt/vmware/cloud-director/jre/bin/keytool -keystore certificates.ks -storetype JCEKS -storepass password -genkey -keyalg RSA -alias http -dname “cn=vcloud,  ou=vmware, o=vmware, c=US” -keypass password
      /opt/vmware/cloud-director/jre/bin/keytool -keystore certificates.ks -storetype JCEKS -storepass password -genkey -keyalg RSA -alias consoleproxy -dname “cn=vcloud,  ou=vmware, o=vmware, c=US” -keypass password
    • Now you should have a file called “certificates.ks” in /etc
    • Next we will need to configure vCD, type the following to start the configuration:
      /opt/vmware/cloud-director/bin/configure
    • Select your first IP address, this will be the IP address which is used for vCD Portal access
    • Select your second IP address, this will be the IP address which is used for the VM Remote Console
    • Type the path to your certificates store, which is “/etc/certificates.ks
    • Type the password, which is password
    • Press enter to skip the “syslog server”
    • Enter the host (or IP address) for the database
      127.0.0.1
    • Press enter/return to use default database port (1521)
    • Type the database service name
      xe
    • Type the database username, in my case:
      vcloud
    • Type the database password, in my case:
      vmware
    • Now the database will be initialized and the vCD install will be  completed
    • Type “y” to start the vCD service
    • You can monitor the progress of the vCD service start up as follows
      tail -f /opt/vmware/cloud-director/log/cell.log
    • It will show you the percentage of the initialization of the application that has completed. Of course it should say “Application Initialization: Complete. Server is ready in” at some point.

Result: VM with both Oracle 10g Express and vCloud Director 1.0.

Final Steps

That is it for the command-line stuff… All we need to do now is configure vCD through the web interface… here we go:

  • Open a browser and point it to “https://<vCloud Director Address>/cloud/
  • Click “Next” on the welcome screen
  • “Accept” the License Agreement
  • Type your license key and click “Next”
  • Create an Administrator account and type a password and click “Next”
  • Give the system a name, I called it “vCD”, and click “Next”
  • Review your settings and click “Finish” if they look okay

Now you should be presented with the following screen and you should be good to go!

So what’s next? Hany has listed a nice set of videos in his article that will describe how to create a Provider vDC, how to attach a vCenter server etc. Go ahead play around, have fun… enjoy the vCloud!

  • « Go to Previous Page
  • Page 1
  • Interim pages omitted …
  • Page 24
  • Page 25
  • Page 26
  • Page 27
  • Page 28
  • Go to Next Page »

Primary Sidebar

About the Author

Duncan Epping is a Chief Technologist and Distinguished Engineering Architect at Broadcom. Besides writing on Yellow-Bricks, Duncan is the co-author of the vSAN Deep Dive and the vSphere Clustering Deep Dive book series. Duncan is also the host of the Unexplored Territory Podcast.

Follow Us

  • X
  • Spotify
  • RSS Feed
  • LinkedIn

Recommended Book(s)

Advertisements


Copyright Yellow-Bricks.com © 2025 · Log in