• Skip to primary navigation
  • Skip to main content
  • Skip to primary sidebar

Yellow Bricks

by Duncan Epping

  • Home
  • ESXTOP
  • Stickers/Shirts
  • Privacy Policy
  • About
  • Show Search
Hide Search

Search Results for: vCD

vCD – Networking part 3 – Use case

Duncan Epping · Sep 15, 2010 ·

Part 1 explained the basic concepts of networking within vCD(VMware vCloud Director) and Part 2 focussed on Network Pools. In the final and 3rd part we will focus on a use case and what happens on the vSphere layer with these different types of vCD networks. I will cover just a single use case for now, but this one basically covers all areas! Please read both part 1 and part 2 of this series before you start reading this part. Lets just start diving into a scenario.

vApp directly connected to an External routed Org Network

Use cases:

  1. Internet connection for the VMs in your virtual datacenter. Firewall can be enabled to block all incoming traffic.
  2. Publicly publishing a single “service” externally by enabling NAT on the vShield Edge device. In this case all incoming traffic will be blocked and only a single IP will be translated and route back to that particular VM.

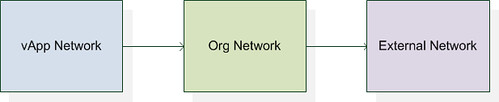
We will start with the basics. The flow of the network in this case will be:

As explained in Part 1 the External Network is backed by a Portgroup. This portgroup can be a regular portgroup on a vSwitch, or one on a dvSwitch or even the Nexus 1Kv. We will start by creating a dvPortgroup.

External Network

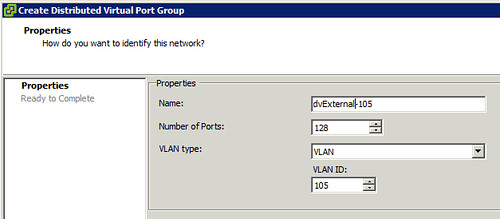
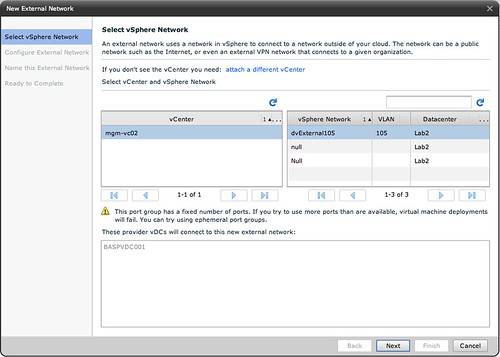
Lets first create a dvPortgroup within vCenter. This is the dvPortgroup that the External Network will use. We will give it a VLAN ID for layer 2 isolation. In this case we use VLAN ID 105 and label the dvPortgroup as “dvExternal-105”.

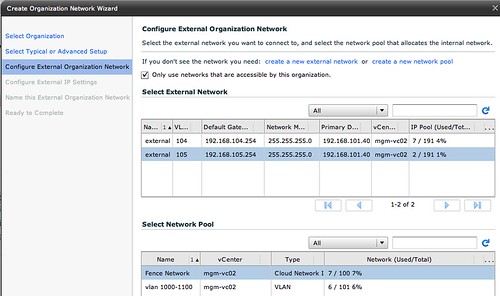
Now we will need to create a network within vCD that enables your vApp and Organization to use this dvPortgroup we just created. We do this by creating an “External Network”. (option 3 on your home screen in vCD.) First we will need to select the correct dvPortgroup we created:

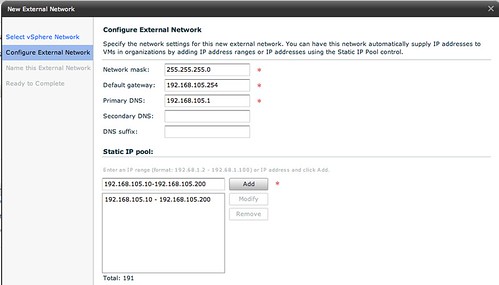
Next thing to do is specify the associated IP Range, Gateway, Netmask etc. The IP-Range is used for any VMs that are directly connected to this External Network and for the vShield Edge devices. But we will show that later in this article.

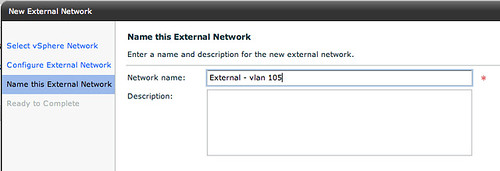
Next up is is giving the External Network a name, we will keep it simple and name it “External – vlan 105”:

That is it for the External Network part. Now lets create an Org Network.
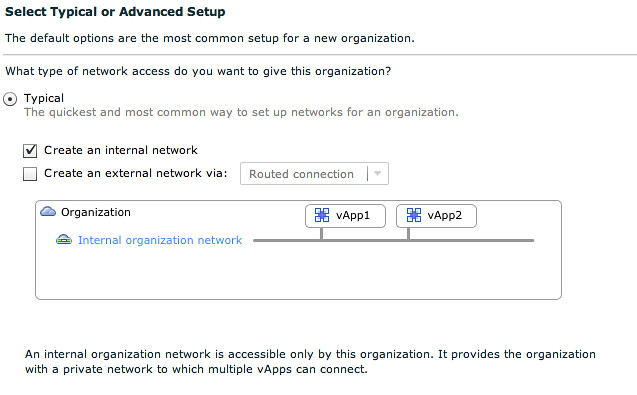
Org Network

We will create an External Org Network which is routed to an External Network. (On your home screen go to “7 Add another network to an organization”.) Select the Organization it needs to connect to first and then the real magic starts.

We will use the typical setup. We have unticked “Create an internal network”, and we have selected “Routed connection”:

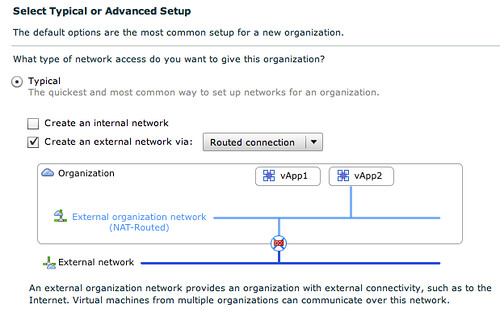
The cool thing about the network section of vCD is that is shows you what it is building. In this case you can see that the vApp is directly connected to the External Org Network (NAT-Routed) which in its turn is connected to the External Network through a vShield Edge device. The next step is to select the correct External Network that this External Org Network connects to:

Please note that we also have selected a network pool, in this case the vCloud Network Isolated Pool! Next we will need to specify the associated IP Range, Gateway, Netmask for the Org Network. Now you might think that we have already done this but that was for the External Network! The pool of addresses will be used for any device that sits within the Org Network boundaries.

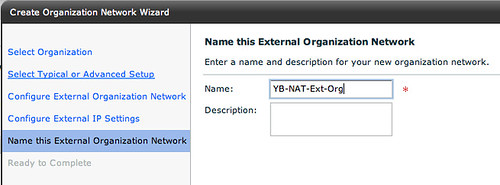
Of course the final step is giving this Org Network a name:

vApp layer

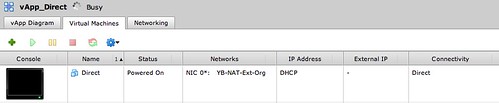
As this post is about networking I will skip the creation of the vApp itself but will show you what we have done in a single screenshot. As this screenshot below shows the VM is directly connected to the Org Network labeled “YB-NAT-Ext-Org”:

Connecting the dots

Now that we have shown you how this is created within vCD you would probably want to know what this results in on a vSphere layer. When we created the Org Network a dvPortgroup was automatically created. This automatic creating was enabled by the use of a network pool. The network pool in this case was a vCloud Network Isolation backed network pool.

The screenshot below shows the dvPortgroup that represents the Org Network. The VM that was created called “Direct”, however vCD uses IDs to uniquely identify VMs and as such it is labeled as “1227504509-Direct” within vSphere. Please note the “F46” in the name of the dvPortgroup. This means that it is using a fenced network with ID 46. (fenced –> vCloud Network Isolation) This Network Pool happens to use VLAN 107 (V107), which was defined when the pool was created and is also shown in the screenshot below.

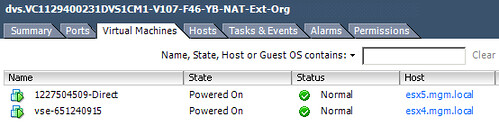
In order for VM “1227504509-Direct” to communicate to the outside world it will need a connection to the External Network. As shown and described above VMware vCloud Director uses vShield Edge to do this. In other words, the vShield Edge device will have multiple NICs. This is shown in the following screenshot. The External Network portgroup contains a vShield Edge device (vse-651240915) which is the same device as shown in the screenshot above.

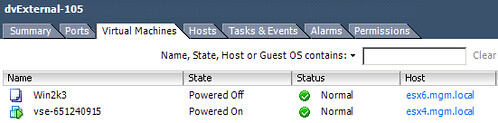
This is the vShield Edge device that enables the VM “1227504509-Direct” to communicate with the outside world, as it is connected to both portgroups.

Traffic Flow

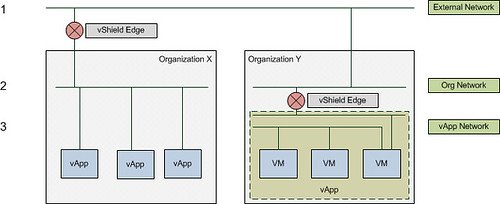
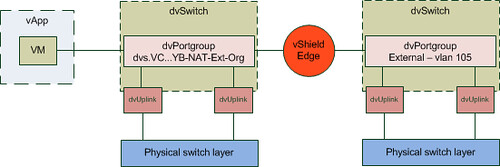
As it took me a while to understand how this worked, I have created a couple of diagrams. The first diagram shows all components we created and how they are linked:

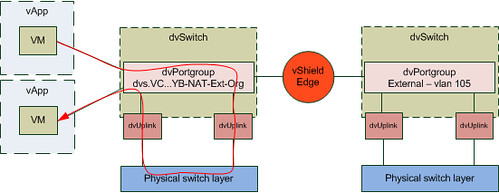
I guess this is still not saying much. Lets add the flow of the traffic to this diagram by extending it with another vApp. What if you would have two vApps connected to the same Org Network and both VMs of these vApps are on a different host in your cluster and the first VM wants to connect to the second VM? What does the flow of traffic look like? As you can see in the diagram below the VM of the first vApp is connected to the same dvPortgroup. However as both vApps reside on a different host the traffic will need to go to the physical switch layer first:

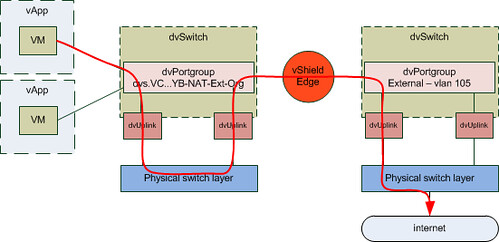
The other scenario I wanted to show is where a vApp wants to connect to a device on the outside world. In this case I labeled it as “internet” but it could be anything. Also I have assumed that the vShield Edge device resides on a different host than the VM that wants to connect to the internet.

It took me a while to write this “use case”. I hope this makes vCD networking slightly better to understand… but again the key here is to play around with it. If there are any questions please don’t hesitate to reach out to me! If I can find the time I will write another “use case” or maybe I will ask some of the other guys in my team to do something similar.

Creating a vCD Lab on your Mac/Laptop

Duncan Epping · Sep 13, 2010 ·

I was just building a vCD Lab and thought I would document the process. I know Hany has done something similar recently but mine is slightly different. I wanted to have a slim config from a memory perspective and virtual machine count perspective. Before I start, let’s give a warning… ***this is totally unsupported***

Pre-requisites:

  • CentOS 5 – 64 Bit
  • Oracle 10g Express
  • Windows 2008 – 64 Bit
  • ESXi 4.1
  • vCenter 4.1
  • vCD 1.0
  • vShield 4.1

We will be creating multiple VMs but for the sake of simplicity will be combining functionality where possible. First you will need to install multiple ESXi hosts and a vCenter server. I am assuming all of you know how to do this so I won’t go into detail here. If you don’t drop me a comment. I did list some of the recommendations/requirements:

vCenter / DNS / ESXi

  • Create a VM with 1 vCPU and 1 GB of memory. I used a 20GB thin disk, which should be more than sufficient as we will not be using VUM.
  • Connect the Windows 2008 – 64 Bit ISO and walk through the standard installation process. I will not describe every step, as all of you should be able to install an OS. However the following is recommended:
    • Fixed IP Address
    • I changed the host name to “vcenter”
    • Install DNS
      • pre-populate DNS with records for your two esxi hosts, vShield Manager and your vCD server.
  • I will not tell you how to install ESXi or vCenter for that matter. Just ensure you have two ESXi hosts with shared storage in a DRS enabled cluster, those are the requirements. Preferably with some memory resource. I gave both my ESXi hosts 3GB. There are a couple of options for shared storage:
    • You could use Openfiler as your iSCSI target for ESXi hosts (preferred), if you don’t know how to set it up read this excellent this article by Kiwi_Si.
    • You could enable NFS on your CentOS which also hosts your vCD and Oracle database
    • If you are using VMware Workstation enable “clustering” of disks… I haven’t tested this in a while though.

Result: vCenter Server, 1 Cluster containing at least 2 ESXi hosts with DRS enabled.

vShield Manager

You could run vShield Manager as a VM within your virtualized ESXi host, but from a performance perspective that is probably not the smartest thing to do. So we are going to import it into Fusion. For those using Windows VMware Workstation is also fine, or even Player.

I guess this is the most tricky part of the whole setup, you will need to convert the vShield OVA to a VM. Now this is not a must, you can also run the vShield on your virtual ESXi hosts, but I like to avoid this for performance reasons. So this is how I converted it:

  • Go to the folder which contains the OVA and go into the OVA and copy all files included into a separate folder
  • Download the OVF Tool to convert the vShield Manager OVF Files to a format that Fusion supports
    • Open a terminal window and “cd” to the folder which contains “VMware-ovftool-2.0.1-260188-mac.i386.sh”
    • Make the script executable by typing the following:
      chmod +x VMware-ovftool-2.0.1-260188-mac.i386.sh
    • Run the installer script by typing the following:
      ./VMware-ovftool-2.0.1-260188-mac.i386.sh
    • Confirm the installation with “yes”
    • Accept the EULA with “yes”
    • Confirm the path by pressing enter/return
    • The install should complete literally within seconds
    • Go to the folder that contains the “OVF” file and type the following:
      /opt/vmware/ovftool/ovftool.bin “VSM.ovf” .
    • Accept the EULA by typing “yes”
    • The conversion should now start and when it is completed a new folder should be created which contains your VMX file and your VMDK files. These can be imported into Fusion.
    • Copy the VSM Folder to the place you store your local VMs and open the VM within Fusion and fire it up
  • Now that you have VSM running on your Laptop/Macbook you will need to configure it. These steps are pretty straight forward, but they will need to happen in order for VSM to function correctly:
    • Open the vShield Manager console and login with user “admin” and password “default”
    • Type “enable”, enter the password “default” again and type “setup” to configure your VSM
    • Enter your IP, Subnet, Gateway and DNS details and exit to ensure these are active
  • That is it! Now you can use your internet browser to see if you can login to your VSM “https://<ipaddress”

Result: vShield Manager running within Fusion.

vCD VM

  • Create a VM with 1 vCPU and 1 GB of memory. I used a 20GB thin disk, which should be more than sufficient.
  • Connect the CentOS 5 – 64 Bit ISO and walk through the standard installation process. I will not describe every step, as all of you should be able to install an OS. However the following is recommended:
    • Default partitioning scheme
    • Fixed IP Address
    • Disable IP v6
    • Server GUI install
  • After the install is done you will need to reboot the VM and configure the OS. I recommend the following:
    • Disable the Firewall
    • Disable SELinux
    • Enable NTP
    • Create an additional user
  • Now that the VM has rebooted again we will need to upgrade all packages to the latest version and install VMware Tools all the required packages:
    • Install VMware Tools (extract the files from the archive and run the installer via a terminal window by going to the path where you extracted it and type:
      ./vmware-install.sh
      use all the default settings
    • Open a terminal window and type the following:
      yum update
      yum upgrade
    • Now install all the Oracle and vCD required packages:
      yum install alsa-lib bash chkconfig compat-libcom_err coreutils findutils glibc grep initscripts krb5-libs libgcc libICE libSM libstdc libX11 libXau libXdmcp libXext libXi libXt libXtst module-init-tools net-tools pciutils procps sed tar which
  • Install Oracle 10g Express (again note that this isn’t officially supported):
    • Copy the Oracle RPM file to your vCD VM
    • Open a terminal window and go to the path where you copied the Oracle RPM file
    • rpm -i oracle-xe-10.2.0.1-1.0.i386.rpm
    • /etc/init.d/oracle-xe configure
    • Use the default ports (8080 and 1521)
    • Enter the password twice
    • Select “y” to ensure the database daemon is started when the VM restarts
  • After the Oracle 10g Express server has been installed test if you can actually access it by opening a web browser. Try http://<ipaddress>:8080/apex
  • I would recommend to create a new user for the vCD environment:
    • Click “Administration”
    • Go to “Database Users” and click “Create User”
    • I would recommend to give it the name “vcloud” and an easy to remember password. Also make sure you tick the “DBA” tick box.
    • Click “Create”
  • Now it is time to install vCD (copy the bin file to your vCD VM)
    • First we need to create a virtual interface so that we have two IP addresses that vCD can use. Of course you can also add a second NIC, but I use this method to keep the VM configuration as simple as I possibly can:
      • Open a terminal windows and type the following:
        nano /etc/sysconfig/network-scripts/ifcfg-eth0:1
      • Add the following to the file you just opened, of course add the approriate IP address and net mask!
        BOOTPROTO=static
        DEVICE=eth0:1
        IPADDR=<ip address>
        NETMASK=<net mask>
        ONBOOT=yes
      • Save the file and restart the network by typing the following:
        service network restart
      • When you do an “ifconfig” it should show you two devices…
    • Open a terminal window and go to the path where you copied the vCD BIN file and make the bin file executable:
      chmod +x vmware-cloud-director-1.0.0-285979.bin
    • type the following to do the install
      ./vmware-cloud-director-1.0.0-285979.bin
    • It will ask you if you want to run the installer on an unsupported distro, type “y”
    • It will ask you if you want to run the configuration script, type “n”
    • Next we will create self signed certificates, open a terminal window and do the following:
    • Go to /etc and copy and paste the following:
      /opt/vmware/cloud-director/jre/bin/keytool -keystore certificates.ks -storetype JCEKS -storepass password -genkey -keyalg RSA -alias http -dname “cn=vcloud,  ou=vmware, o=vmware, c=US” -keypass password
      /opt/vmware/cloud-director/jre/bin/keytool -keystore certificates.ks -storetype JCEKS -storepass password -genkey -keyalg RSA -alias consoleproxy -dname “cn=vcloud,  ou=vmware, o=vmware, c=US” -keypass password
    • Now you should have a file called “certificates.ks” in /etc
    • Next we will need to configure vCD, type the following to start the configuration:
      /opt/vmware/cloud-director/bin/configure
    • Select your first IP address, this will be the IP address which is used for vCD Portal access
    • Select your second IP address, this will be the IP address which is used for the VM Remote Console
    • Type the path to your certificates store, which is “/etc/certificates.ks
    • Type the password, which is password
    • Press enter to skip the “syslog server”
    • Enter the host (or IP address) for the database
      127.0.0.1
    • Press enter/return to use default database port (1521)
    • Type the database service name
      xe
    • Type the database username, in my case:
      vcloud
    • Type the database password, in my case:
      vmware
    • Now the database will be initialized and the vCD install will be  completed
    • Type “y” to start the vCD service
    • You can monitor the progress of the vCD service start up as follows
      tail -f /opt/vmware/cloud-director/log/cell.log
    • It will show you the percentage of the initialization of the application that has completed. Of course it should say “Application Initialization: Complete. Server is ready in” at some point.

Result: VM with both Oracle 10g Express and vCloud Director 1.0.

Final Steps

That is it for the command-line stuff… All we need to do now is configure vCD through the web interface… here we go:

  • Open a browser and point it to “https://<vCloud Director Address>/cloud/
  • Click “Next” on the welcome screen
  • “Accept” the License Agreement
  • Type your license key and click “Next”
  • Create an Administrator account and type a password and click “Next”
  • Give the system a name, I called it “vCD”, and click “Next”
  • Review your settings and click “Finish” if they look okay

Now you should be presented with the following screen and you should be good to go!

So what’s next? Hany has listed a nice set of videos in his article that will describe how to create a Provider vDC, how to attach a vCenter server etc. Go ahead play around, have fun… enjoy the vCloud!

Error during creation of NAT Routed network via VMware vCloud Director (vCD)

Duncan Epping · Sep 10, 2010 ·

Internally I have seen this one a couple of times so I knew what the issue was, but outside of VMware not many people have played with VMware vCloud Director (vCD) yet. Here’s the full error that is shown when you create a NAT Router Org network of vApp network:

Error creating Shield network appliance.
– vClould-Shield edge error: Creating/configuring the VR failed: vsmHandle.initializeEdge() net:1948253845/dvportgroup-218 vse:vm-220 VSM IP:10.0.0.10 failed.
– HTTP/1.1 403 Forbidden – The user does not have permission to perform this operation.

This usually means that the vShield Edge license key has not been added to vCenter. You can simply add it as follows:

  1. From a vSphere Client host that is connected to a vCenter Server system, select Home > Licensing.
  2. For the report view, select Asset.
  3. Right‐click a vShield asset and select Change license key.
  4. Select Assign a new license key and click Enter Key.
  5. Enter the license key, enter an optional label for the key, and click OK.
  6. Click OK.
  7. Repeat these steps for each vShield component for which you have a license.

That should resolve this issue. Yes I agree, the error could have been more “user friendly” and I will ask the Engineering team if they can change this.

vCD – Networking part 2 – Network Pools

Duncan Epping · Sep 9, 2010 ·

In Part 1 of this series we described the different layers of networking. We already briefly spoke about Network Pools and that both a vApp Networks and Org Networks consume a segment out of a pool. In order to fully understand vCD (VMware vCloud Director) networking we will need to explain the foundation for all Cloud Internal traffic first which is the Network Pool.

Network Pools

As described in one of my earlier articles vCD mainly revolves around pooling of resources. This also goes for networking and more specifically for the Org Network and the vApp Network. Each vApp and Org Network will consume a network (segment) out of a defined pool. This network pool typically isolates network “segments” on layer 2 from the other networks in the pool. There are currently 3 types of network pools:

  1. VLAN Backed
  2. vCloud Network Isolation Backed (VCNI)
  3. Portgroup Backed

Each of these pools have specific requirements, recommendations and constraints and they will be listed below. However all of the three different types of pools are interchangeable; with that meaning a segment from a VLAN-Backed Pool and a Portgroup-Backed pool each offer the same functionality to your Org and vApp network and basically should be seen as a means of intra-Cloud transportation. Or to simplify it even further, it provides a wire. This wire enables VMs in a vApp to communicate to each other or vApps in an Org to communicate to each other. This also means, and that might sound very logical to some, the distributed vSwitch / Nexus / vSwitch needs physical uplinks in order to enable communication across multiple hosts in a cluster!

When is a segment of the network pool used? The answer is simple, whenever you create a vApp or Org Network which is not directly connected to the above layer a segment of your designated network pool will be used. Before you ask, the reason the network pool is not used in the case of a “directly” connected Org or vApp network is because the Org/vApp network is just a logical object in that case and the VM/vApp ends up directly in the portgroup the layer above. I will show you what that looks like in Part 3 of this series which will tie part 1 and 2 together including vShield Edge.

Now lets assume you created a VLAN-backed or a vCloud Network Isolation-backed pool. When an isolated or NAT routed vApp/Org network is created vCD will automatically instantiate a new network segment. This segment is essentially a portgroup on a distributed vSwitch. This portgroup will provide layer two isolation between the different segments. As a distributed vSwitch is used every host in your cluster will instantly have the same portgroups available. There is a very specific reason I only mentioned the VLAN Backed and the VCNI Backed pool, for the Portgroup Backed pool you will need to manually pre-create all portgroups and of course ensure all those portgroups are available on every host in the cluster.

To visualize it a bit more I took three screenshots. The first one shows the network pool. The pool is VLAN backed and holds VLAN 1000 through 1100 and these networks will be created on the distributed vSwitched labeled as “dvSwitch”:

Now that we have created a network pool we can create an isolated Org Network, in this case we create a fully isolated Org Network. This isolated org Network aka “Internal network” enables the vApps within your virtual datacenter to communicate to each other:

In order to be able to communicate we need a network segment. This network segment is provisioned from the Network Pool we created earlier, which was VLAN Backed.

After you fill out some of the other details and click “finish” a portgroup is automatically created within vSphere. Although difficult to read the portgroup name contains the Org Network and the VLAN ID. (VLAN 1008 and Org Network “YB-ISO-ORG”). You can even see the task at the bottom of the screenshot:

Hopefully that visualizes the process a bit more. I dropped some steps for the creation of the pool and the Org Network to keep it relatively simple. You can find a full detailed video here. Now as stated earlier each of the the three types of pools have very specific requirements and constraints I listed them below so you can make a decision based on the requirements or constraints you might have.

VLAN Backed

VLAN-backed network pools require availability of a set of unused VLANs. When an Org or vApp network is created which is based on a VLAN-backed network pool a portgroup is created on a dvSwitch and a VLAN is assigned to this portgroup. It should be noted that all VLANs specified for the pool will need to be trunked to the host and that in most environment the amount of available VLANs is limited.

  • Requirements: Distributed vSwitch, pool of available VLANs, Physical uplinks need to support VLAN Trunks.
  • Recommendations: n/a
  • Constraints: Nexus 1000v and regular vSwitches are not supported currently, amount of available VLANs in most environments.

vCloud Network Isolation Backed

vCloud Network Isolation-backed(VCNI) network pools are flexible, easy to configure and do not require VLANs. vCNI provides layer 2 isolation by utilizing a network overlay. This network overlay is provided by MAC in MAC encapsulation and requires a vDS. For each consumed network vCloud Director creates a portgroup and assigns this portgroup a network ID number. This network ID number is used for the encapsulation of the traffic. As explained vCD uses MAC in MAC for the encapsulation of traffic. However, because of that the use of VCNI requires an increase in the MTU of the underlying transport network(dvSwitch) to avoid frame fragmentation due to the minor overhead cause by the MAC in MAC encapsulation.

Now this is a very thin explanation, but I don’t want to go to deep into this as it would only complicate things.

  • Requirements: Distributed vSwitch
  • Recommendations: minimum of 1 VLAN, MTU Increase (24Bytes, 1500 –> 1524).
  • Constraints: Nexus 1000v and regular vSwitches are not supported currently.

Portgroup Backed

Portgroup-backed pools require pre-created portgroups within the vSphere environment. Portgroup-backed pools are in my opinion the least flexible of all three options. However, Portgroup-backed pools do not require vDS and can be based on vSS, vDS or Cisco Nexus 1000v which can be a specific customer or even platform requirement.

  • Requirements: All portgroups need to be pre-created and available on all hosts of your cluster
  • Recommendations: Use a scripted solution or host profiles to create the portgroups to ensure consistency
  • Constraints: n/a

Wrapping up

Hopefully this clarifies network pools a bit. As explained, when creating and Org of vApp network which is not directly connected to the layer above a network of your Network Pool will be used to provide intra-cloud communication. For those who haven’t used vCD at all, believe me it took me a while to grasp these concepts so don’t be shy and ask questions/comment if anything is unclear.

vCD – Networking part 1 – Intro

Duncan Epping · Sep 7, 2010 ·

After my introduction on vCD last week, I thought it was time to publish an article on Networking. Networking is most likely the most complex concept of vCD(VMware vCloud Director) and can at times be very confusing. I have created three articles which will explain the concepts of networking within vCD and of course will explain on a technical level how things work. (Including the vSphere layer)

If there are any questions don’t hesitate to leave a comment. Please note that I am deliberately trying to simplify things in this first article as I don’t want you to get lost in any of the layers of networking vCD offers.

Layered

Networking within vCD is built up out of 3 distinct layers.

  1. External Network
  2. Org Network
  3. vApp Network

These three layers have been created to give the end-user the flexibility needed in a multi purpose virtual datacenter. I have depicted all three layers in the following diagram which shows the logical relationship between the layers:

Some of you technical guys might say, that’s nice but I would like to see something less abstract. I created the following diagram which depicts the different layers in a different way. The diagram shows the three layers. I created a single External Network which links to two Org Networks. These Org Networks in its turn connect to multiple VMs(Org Y) and multiple vApps(Org X).

This is just an example however that illustrates possible network connections and as can clearly be seen it can be rather complex. As demonstrated there are multiple ways to connect vApps to each other or the outside world.

Now that we know some of the basics I will break down the three layers of networking. The  first before we will discuss any of the advanced options like vShield Edge or network pools

External Network

The External Network is used for inter-Cloud connections. Or as I like to call it “your connection to the outside world”. It is the first network “object” that you create within vCD. An External Network is always backed by a Portgroup, meaning that a portgroup needs to exist within vSphere before you can create this vCD network object. This portgroup can be on a regular vSwitch, a dvSwitch or you could use Nexus 1KV. It all works, and all of them are supported!

Of course it is heavily recommended to set this portgroup up with a VLAN for layer 2 isolation, again note that this is an outbound facing connection for your Org or for multiple Orgs.

Examples of External Networks are:

  • VPN to customer site
  • Internet connection

As said, an external network can be shared between organizations but is typically created per organization and is your connection from or to your virtual datacenter.

I would to stress that, the external network is your exit from your virtual datacenter or your entrance!

Org Network

The second object that is created is the Org Network. The Org Network is used for intra-Cloud connections. Or as I like to call it “Cloud internal traffic”.  An Org Network is linked to an organization and can be:

  • Directly connected to an External Network
  • NAT/Routed connected to an External Network
  • Completely Isolated

With that meaning that although an Org Network is primarily intended for internal traffic, it can be linked to an External Network to create an entry to or exit from your virtual datacenter. Note that it doesn’t necessarily need to be connected to an External Network, it could be completed isolated and used for “Cloud internal traffic” only! A use case for this would be for instance a test/dev environment where vApps will need to communicate with each other but not with the tenants back-end.

It should also be noted that the Org Network is mandatory! Every organization needs an Org Network, it is the only mandatory network object.

Just for completeness, an Org Network consumes a segment from a Network Pool when it is NAT/Routed or Isolated. A network pool is a collection of L2 networks which will be automatically consumed by vCD when needed, and what I call a segment is one of those L2 networks… basically a portgroup. I will explain Network Pools more in-depth in part 2.

When an Org Network is directly connected it is just a logical entity and physically doesn’t exist. Again in one of the following articles(part 3) I will explain what that looks like in vCenter.

vApp Network

The vApp Network kind of resembles the Org Network as it also consumes a segment from a Network Pool. The vApp Network enables you to have a vApp internal network, this could be useful for isolating specific VMs of a vApp. The vApp Network can be:

  • Directly connected to an Org Network
  • NAT/Routed to an Org Network
  • Completely Isolated

It should be noted that the “directly connected” option for both the Org Network and the vApp Network is just a logical connection. In the back-end it will be directly connected to the layer above.

As shown in an earlier diagram and explained above a vApp can contain multiple networks. This can be used to isolate specific VMs from the outside world. An example is shown in the following diagram where only the Web Server has a connection to the Org Network and the App and Database servers are isolated but do connect to the Web server.

Summary

vCD has three different layers of networking. Each of these layers has a specific purpose. The External Network is your connection to the outside world, the Org Network is linked to a specific Organization and the vApp network only resides within a vApp.

That is it for Part 1. Part 2 will focus on the Network Pools and Part 3 will focus on what these vApp, Org and External Networks look like on a vSphere layer and some general best practices.

My tip of the day, if you want to get to know vCD really well, check vCenter every time you make a change and see what happens!

UPDATE: for a full schematic overview check Hany’s awesome diagram.

  • « Go to Previous Page
  • Go to page 1
  • Go to page 2
  • Go to page 3
  • Go to page 4
  • Go to page 5
  • Interim pages omitted …
  • Go to page 21
  • Go to Next Page »

Primary Sidebar

About the Author

Duncan Epping is a Chief Technologist in the Office of the CTO in the Cloud Infrastructure Business Group (CIBG) at VMware. Besides writing on Yellow-Bricks, Duncan co-authors the vSAN Deep Dive book series and the vSphere Clustering Deep Dive book series. Duncan also co-hosts the Unexplored Territory Podcast.

Follow Me

  • Twitter
  • LinkedIn
  • Spotify
  • YouTube

Recommended Book(s)

Advertisements


Copyright Yellow-Bricks.com © 2023 · Log in